Followers

Monday 29 June 2015

Exploring different papers

Hello there,

How are you all? In my last post here  I talked about Neenah Card Stock which is excellent for regular cardmaking and works the best with   ink blending, stamping, die cutting and as a card base .  Today, I am sharing few other speciality papers and how they work with different mediums.  I am sharing few other papers we have at Crafters Corner. See, each paper has its characteristic so read the package carefully to get the best out of it. I am listing few of them with its meaning .

- Acid Free - Means it has pH 7.0 or higher. In our school chemistry we learned about acidic and basic substances and their pH scale measures . If the pH is less than 7 it is considered acidic. Such papers (eg. news paper) deteriorate and become yellowish and brittle. So your cards and scrapbook will deteriorate over time if you are not careful choosing your papers.

- Lignin Free - As we know papers are made from plants. Lignin is a natural occurring bonding element in plants that holds the wood fibre together. While lignin is not an acid, it does give off acids as it deteriorates. Therefore if you have a paper that is only acid free, but still contains lignin, it will become acidic over time.  

- Archival Quality - means paper is acid & lignin free, made from cotton and processed in a way to make it more durable.

- Cotton Content - makes paper strong yet pliable at the same time. Cheap papers are made from wood pulp rather than cotton.
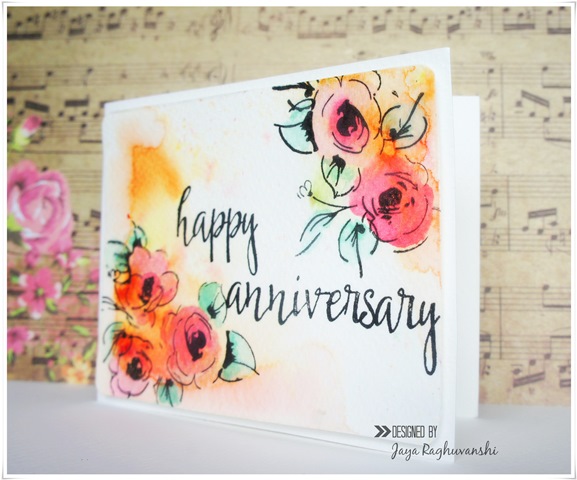


These papers are made of cotton and cellulose. They are professional grade paper made in Italy . It is cold press paper which means it has texture. The bumps and dents hold colour pigments very well. It adsorbs water quickly without warping and gives bright images. 


I simply stamped and heat embossed images from this penny black  set  .  I used various distress inks ( I don't have distress markers. I love to dab my ink pad on an acrylic block  and use it as a palate.) Die cut is by PTI die. It didn't buckle or warp a bit in spite of using loads of water and ya, I never tape it down...:P. Use regular glue to mount it on Neenah CS.

And here goes my first video. (It has a spelling mistake but hey...i didn't have time to correct it). It is very basic and mute  but I request you all to go easy on my video making skills...:)  I really wanted to share how i use distress inks as water colours


Hope you will enjoy it. And don't forget to leave a comment. 


This paper is super smooth which makes it ideal for solvent based markers, felt tip pen, ink, airbrush, pencil & charcoal.


I have used the Altenew stamp  with black Memento ink for stamping and Copic markers for colouring. Because of the paper's smooth surface, the marker tip glides very smoothly making colouring so...so easy and gives beautiful blending. And it is little less absorbent which means you use less ink to blend. 

For the next card, I have used same paper for panel . I used Altenew -Figure Effect- stamp set. Background is stamped in smoke grey-versa fine ink. Added few splatters in gold.  For the panel, I used Hero arts Ink Daubers to make that little green slope. Both the figures and 'more than you'll know' sentiment are stamped with versafine-black ink. Added little glossy accent on heart. 


As the paper is smooth, stamping was super neat. Along with Neenah this is going to be my go to paper.


3. In my last post, I worked with Neenah and pigment inks. Today, I used various dye inks for stamping on Neenah. See the end result.


I used Papertrey ink stamp to create this fun pattern by stamping multiple times with various (memento, wplus, heroarts) inks. Die is by papertrey too. I stacked various colored die cut underneath to give dimension to sentiment. It gives very elegant touch to the card.


4.  You all know about Fabriano paper. It is textured on one side and smooth on other. Their colors are bright and pretty. Here i have used the smooth side of white CS as my card base. it is a simple single layer card with multilayer stamping.


 I created a cluster of flowers using wplus9 stamp and various memento inks. Sentiment is by Simon says stamp. Smooth side is ideal for stamping. Textured side can be used as base when you are mounting stamped panel on top of it.
 

5.  Next paper is Brustro Artists'Oil Painting  Paper. I don't know how many of you have used this paper but I used it for the first time and I am very impressed. It has this unique paper surface which is obtained through a specialized texturing process. It is similar to linen canvas. I used it as a base for my card. I gave a wash with yellow thin down acrylic color. Added a layer of gesso on top of it to mute the background a little.


  • I applied texture paste using Tim Holtz Stencil and some acrylic colour splatter.  I took one portion of a cover plate die cut by Winnie & Walter. I coloured the die cut using acrylic colours with a piece of foam. Added foil in few parts once dried. Added diamond die cut, sentiment and two rub-ons to finish it off. This paper is perfect fit for mixed-media artists.


 I loved this paper so much that I decided to try acrylic colours. I wanted few tags for a friend who is an artist. So instead of making each tag separately, I decided to make a large panel and cut it into tags eventually.  


 I taped down a panel with masking tape and painted a whole rainbow with acrylics. Once it was dry, I added a wash of white color and drew some shapes with sharpie. I kept on adding layers till I was happy. I was so engrossed that I forgot to take pictures in between. Once it was dry I cut the panel into various tags.


Look at the gorgeous canvas like texture. Love it.

I hope this post will help you to choose a perfect fit paper for your project.
Please leave a comment here if you would like to know about any particular product. I would love to hear from you all.
Keep crafting and be happy...!


Supply List:
Papers :
      - Neenah  CS
      -  Fabriano
Inks : 
 - Versafine Black, Smoke grey
 - Copic Markers

Stamps:

  - Simon Says Sending and wishing

Other :

  - Gesso

Saturday 27 June 2015

Feather card -with inka gold

Hi friends,
I felt ecstatic after recieving so many beautiful comments and messages on my last post and video in which I featured the viva decor Inka golds. The last experience with the product was amazing so I decided to use it one more time and try few more tips n tricks.
I personally love creating cards because they are quick and give me 100% happiness but I want to mention all the steps can be very easily used to create layouts,tags and altered art.

So let's begin today's project and the things u will need are :

Pearls /sequence 

So guys !!grab all the supplies and let's start it together :)

Step1: die cut and emboss the feather from a white card stock and add gold on the tips fading downwards .


Step 2:die cut the arrows and paint them with red ,gold and apricot inka golds

Step 3: ink the card panel with cracked pistachio by using the mini foam blending tool. Apply two coats to get a more solid and even coverage .
😊TIP: always use the craft mat when you work with paints and inks. It is heat proof stain poof and super easy to clean.

Step 4: cut the coloured panel into four stripes of different thicknesses. Now start adding little strokes of gold using a small piece of foam. This will give it a beautiful golden distressed look.

Step 5: I embossed a sentiment on some vellum card stock using super fine white embossing powder. 

😊 TIP: It is always a good idea to use a powder tool to remove any static /oil/ or debris which might attract the EP. This makes the EP stick only to the versa mark:)


Finally we all all set to assemble the card together.try different arrangements and then stick them the way you liked the most. I added few flat back pearls and gold seqence to jazz up the project.


Here is the video link which shows you each and every step to make this beautiful card.


I hope u liked my post for today.

I feel blessed when I read all the amazing comments you guys leave for me. 
Stay happy...
And enjoy the rains !
Love
Arjita 

Wednesday 24 June 2015

Pretty!


Hello Everyone!

We cannot stop the winter or the summer from coming. 
We cannot stop the spring or the fall or make them other than they are.
 They are gifts from the universe that we cannot refuse. 
But we can choose what we will contribute to life when each arrives.
Gary Zukav

Spring being my favourite,
I love to create happy and floral layout
especially when its a dull and gloomy day
I sit by my craft table
and start building the lovely spring day again
all ready to experience and re-live the same moment.
onc such remembrance is this floral layout.
Pretty!


This amazing paper collection Hello Beautiful by Heidi Swapp is to die for. 
I love the pinks and the teals with a bit of black the florals patterns and graphical patters. 

Hence I choose the following papers to work with today.


Being a blue day, I choose to work with the floral pattern being on the top.
Using the amazing The theme being hope, I choose the following paperswith floral elements with pinks and grays.
(oh these patterns are amazing!

Using the amazing super sturdy Tonic super trimmer
I have trimmed the following papers according to the sizes mentioned below.
(12" x 11" - top paper)


(7" x11" - centre)
(12 x 12"- bottom)
no need to trim


Lets begin assembling now.
Using the super red tacky tape - especially 24mm is excellent to stick the papers.


Align the 4 papers  as shown in the image below.
(There are several ways to arrange these papers)
(The red tacky tape is an amazing bubble free solution to stick your papers)


Viola! now its time for the icing.
using the amazing and super cool
(These beauties are a must, they are amazing and can do 
wonders in beautifying your projects and add those 
little emotion touches and boost up your page. )
I choose the following elements to work with.
( I am so much in love with the pink and teal)


After having pasted the following papers its time to make the photo matt.
I trimmed the white paper with 3.5 inches by 5inches and gave it a backing with the gorgeous pink paper from the Heidi Swapp collection to make it sturdy and attractive
Again the bubble free 6mm red tacky tape to stick the photmatt.
Having added a bit of gray and teal papers make the photomat standout.


Fussy-cutting one of my favourite part. 
I love florals, hence I choose the following paper to extract some gorgeous flowers out.


After having fussy cut the flowers its time to arrange the floral cut pieces as shown in the image below.
(There are several way to arrange it)
I found this one very interesting.
Using super tacky red tacky tape and the 3d foam tape I pasted the following flowers
Viola, now its ready for the icing!


I was playing around with these gorgeous elements,
and landed up with the following combinations.
(There are several ways to arrange these elements)
I really loved the way this looks.
Hence I settled with this.


Viola! and its all ready 

- - - - - - - - - - - - - - - - - - - - - - - - - - - - - - - - - - - - - - - - - - - - - - - - - - - -


The Products List:
Heidi Swapp - Hello Beautiful
Neutral Shapes - enamel shapes
- - - - - - - - - - - - - - - - - - - - - - - - - - - - - - -


I hope I have inspired you to create 
Have a crafty week
Thanks for Stopping by
...Nupur Patel...


Tuesday 23 June 2015

Easy techniques with Ken Oliver Crafts Color Bursts

Hello everyone!
Jaya here with you all today :)

Today I will be sharing some easy to follow techniques with Ken Oliver crafts color busrts.
These are the newest addition to the Crafters corner shop and in fact a must try... Especially for all the mixed media artists- beginners and professionals... and all those people who love to try out watercoloring.

What are color bursts?


Color Burst is an amazing concentrated microfine watercolor powder that lets you create beautiful watercolor techniques like never before! This versatile powder can be used with so many fun techniques! 

Spritz your project with water and sprinkle on Color Burst and  you can create amazing designs. 
Sprinkle Color Burst on dry paper and then spritz with water for a completely different look. Dissolve in water and spray from a mister bottle to create your own custom mists.
 The possibilities are endless! 


The best part-

1.Very economical. Each bottle contains around 8 grams  of concentrated pigment powder that is enough to last you for a long time! 

2.A single bottle of pigment powder can give varied results of mist color from lightest to darkest depending on the amount of dilution.

3. As there are 6 colors- 3 primary and 3 secondary, there is an endless possibility of mixing and making your custom made mists in the color you want.

4. Mix a little amount with water in a mister and add some perfect pearls to it to create your own customised glimmer mist.


Here is a projects I did using the 
Ken Oliver Crafts color bursts and Altanew Stamp- Painted Poppy


The background demonstrates the effect of color bursts when used as pigment powder and the stamped images show how you can achieve beautiful water coloured effect with these pigment powders.

HOW?

This is actually a 5 minute card.
1. For this card the background was done using the Color bursts.( Please see the video ). Simply sprinkle some Orange Color burst on the Brustro watercolor paper and spray some water using the Rangers mister bottle

2. After the background was dry, I stamped the rose image using Versamark black Onyx and my new stamp set from  Altanew Stamp- Painted flowers.

3. I heat dried the stamped image and then simply went inside the flower image with Ken Oliver crafts Crimson color  diluted with a little water and leaves with diluted Pthalo Green Color bursts. 

I painted the flowers and leaf images rather randomly without worrying about the details.

5.I adhered this cardstock piece to my base using some double sided foam tape


The second card I tried -


I am certainly not much of a card maker and the mixed media work I do is far from being CAS usually. My fellow DT members Neha and Nupur are my huge source of inspiration when it comes to making anything CAS. 
So here is a card I tried and believe me, other than the embossing this is once again a surprisingly quick to make card.

The trick is using Ken Oliver crafts color bursts to watercolor embossed images.
 You really don't have to worry about the water coloring to be accurate.
The embossing resists these inks and you automatically end up with these gorgeously painted images!
I used the Altanew stamp- Painted Poppy


 You can see the video to get an idea of how I painted the image. 

HOW?

1. I stamped the image on Brustro watercolor paper using Versamark watermark ink and sprinkled the rangers white embossing powder. I heat embossed this using the Rangers Heat it tool.

2.  I taped the watercolor paper to my Inkssentials craft mat along all the four edges 
3. Next I dabbed the flower image with lots of water containing myself only inside the embossed flower image.

4. I diluted a very small amount of the Alizarin crimson color burst with water directly on my Inkssentials craft mat ( very easy to lift color from my Inkessentails craft mat and even easier to clean!)

5. I dabbed the centre of the poppy flower with the Alizarin crimson color and without picking up any more color I continued to blend it towards the edge of the petal using ore and more water. The colors blend beautifully into the watercolour paper and there isn't much you need to do from your side ;)

6. I used diluted Pthalo Green color to color the leaf and stem of the image.

7. For the sky background, I soaked the paper with lots of water and the simply dabbed the diluted Ultramarine blue color burst on the edges of the cardstock and blending with more and more water( without picking up any more color)  as I went inwards.

8. Heat dry and mount this on the card base using foam tape. Finish off with a sentiment and some Wink of Stella- Clear on the petals.

For the sentiment, I used a Altanew clear stamp- Painted Poppy sentiment and embossed it on vellum using the Rangers gold heat embossing powder and  Rangers heat it tool.


And the third project-


Finally... I have this galaxy canvas I made using the Ken Oliver Crafts color bursts,  Prima heavy black gesso, Prima heavy white gesso and white pen

HOW?

1. This canvas was done in at different time intervals to achieve this look. The blue you see here is the Ultramarine blue mixed with some white ink, the burgundy color that you see is the  Alizarin Crimson color mixed with the blue . There is also a hint of yellow in there which is basically the Orange Color Burst diluted to an extent.

 2. I went over and over the background around 4 times to get this look.

3. I gave a random coat of Prima heavy white gesso to some areas ( see the top right corner) that I painted with Color bursts to give the appearance of  clouds.Since the color bursts are meant for porous surfaces, they cloud not coat the area properly thereby giving a cloud- like finish.

4. Once satisfied with the galaxy background, I splattered it with Prima heavy white gesso ,  I also tried embossing some spots with Rangers White embossing powder. Once all this was dry I went over some white stars with white pen to create sparkle like effect.

5. Finally I embossed my sentiment in Rangers White embossing powder.


There are numerous techniques you can try out with these powder pigments.
 Here are the 6 colors you get them in-
Violet
Ultramarine blue
Pthalo Green
Lemon Yellow
Orange
Alizarin crimson


Picture courtesy- Google


 I have a short video for you all regarding how you can try out various techniques with these Color bursts. Will upload it soon.There are many more that I still have to discover. 
This is just the beginning!


Supplies use from Crafters Corner-

Ken Oliver crafts Color bursts-

 Altanew stamp- Painted Poppy
Altanew Stamp- Painted flowers.
Rangers gold heat embossing powder
Rangers White embossing powder.
 Rangers heat it tool.
Brustro watercolor paper
 Inkssentials craft mat
Versamark watermark ink
Versamark black Onyx 
double sided foam tape
Wink of Stella- Clear


That's all from me today!
Hope I inspired you today to try out these new products.
Thank for stopping by!

Hugs
Jaya