Dear friends Dr Sonia here to share more about the popular Martha Stewart Punches .A special "Thank you" for the enthusiastic response to my post on Craft Punch Use and Repair Do read that post first in case you missed it !
Crafters Corner has a huge range of tempting Punches :See this link :
Craft Punches
And
Martha Stewart Punches are one of the most popular punches out there ! Popular Martha Stewart Punch designs include
- Martha Stewart Border Punch
- Martha Stewart Punch Around the page [ Combo of a border and corner punch]
- Martha Stewart Punch All over the page
- Martha Stewart Circle edge punch
- Martha Stewart designer punches- in various designs eg butterfly , circle, flower, cup cake
The
Border Punch is one of the most popular of all these designs as not only are there so many beautiful tempting designs but there is so much you can do with just a single Martha Stewart border punch and really get value for money! Soin this post will be sharing about border punches
Salient features of Martha Stewart border punches
- Lever mechanism - makes it so much easier to punch without straining your hands!
- Design is marked on the sides - this is the best feature of the Martha Stewart punch in comparison to certain cheaper border punches as it helps to easily and accurately punch a continuous border design on your paper
- Wings which fold - most of the Martha Stewart border punches have wings which fold up and make the punch more compact for storage
- High quality
- There are 2 main types of border Punches
- Deep Edge border punch
- Normal border punch
 |
| Martha Stewart punches |
Shown above are the Daisy fan deep edge punch and the Beaded ruffle normal border punch...as you can see the deep edge punches are huge!
 |
| border punches |
The picture above shows the comparative sizes of border punches of similar design and here is how it looks punched out on paper.
 |
| Border Punches |
So when you decided to buy a border punch do take into consideration the size difference too as you can see the difference in the borders of the rosettes I made below.
 |
| Martha Stewart punch |
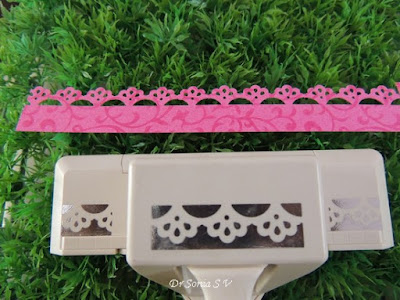
How to use a Border Punch
Align where you want to start punching and insert paper fully into the punch [you will feel a resistance]
Remove your punched design and line it over the guiding design on one of the wings of your border punch
Punch again...repeat aligning and punching to get beautiful punched border designs!
 |
| Add caption |
Key points in using a border punch
Border punches are super easy to use but sharing a few points to keep in mind so that you get perfect borders every time!
- Take care to position the starting point of your paper strip where you want it depending on the design of your border punch
 |
| Martha Stewart punch |
- In designs which are complete like this beaded ruffle I found it best to start with the edge of my paper on the fold line/ marking where the ledge on the side starts.
- If you want to start at a particular point on your paper you can invert the punch and see from underneath and punch
 |
| Martha Stewart |
- Its important not only to align the punched design to the guiding design on the punch wings it is also important to remember to align the edge of the paper to the ledge on the other side and support with your finger while punching so that the paper doesn't slide away!
 |
| Martha Stewart |
- As you reach the end of your paper...press the paper on to the punch surface as shown so that the paper doesnt slide away
- If you are punching a long strip of paper or doing quite a lot of punching remember to periodically remove the bits of paper from under the punch!
Sharing a few Border Punch Ideas
1 . Use the punches borders to decorate boxes, cards etc
 |
| Altered Box |
Using just layer upon layer of border punches you can create simple yet beautiful designs such as the cake in this simple pop up cake card
 |
| Add caption |
2. Make easy tags using border punched designs
 |
| Add caption |
3. Use border punches to make mini frames / name plates !
4. Make Punched Tag Holders with matching tags for albums/ gifts/ cards
 |
| Tag holder |
5.Position your punched borders in opposing directions in your project
6. Try ribbon / twine weaving if your design allows it
7. Make Rosettes
Using border punches you can make really cool rosettes easily !
8. Have fun experimenting with making double border designs
Its fun to create totally new designs by punching both edges of a strip of paper and you can vary the design depending on the width of the paper strip you punch
Here is a double border with another Martha Stewart border punch[
Vintage floral]
To get perfect double borders
|
| Martha Stewart punch |
Align the edge of the paper at one point eg at the fold line as shown above.
After you have punched the border on one side , flip it as shown below so that you can start punching on the same end of the paper as the first time
Align the edge as before and punch
You will get perfectly aligned double punched borders!
9. Layer your punched and double punched borders to create cool lacy patterns!
10. Create different borders by changing the width of your paper and where you punch the double border as shown in the designs below created with the Deep edge daisy fan
11. Combine your border punch with corner punches
as in this card which is the front of the pop up cake card shared in the beginning of this post.
12.Use the border punch to create a border all around!
The Martha Stewart
punch around the page is ideal to create a border which runs all around a paper's border but you can do a little bit of fiddling around with your border punch alone to create a border all around the paper!
Here is a you tube video on how to create a complete border using a daisy deep edge punch :
Punch borders
To create complete borders using the deep edge punches requires a bit of measuring as shown in the video but to make the frames shown using a normal border punch such as the beaded ruffle I could eyeball it without being very accurate and still get decent borders!
Start punching by aligning the paper edge right at the fold line as shown in the pictures earlier.This leaves a small bit un-punched. Once you have punched 1 or more designs measure/ eyeball the same length as the initial "unpunched" area and cut.
To simplify the design I cut out a square
Align the paper edge as shown lining the edge to the fold line as always and punch.
You will get a fairly decent corner!
Yes you will not always get perfect corners if your measuring is quite "off" but most of the time you will get beautiful frames
Supplies


 Align the paper edge as shown lining the edge to the fold line as always and punch.


wow!! thanks for sharing this Sonia!! I didn't know all these details about the punches.. especially the one about aligning... this should make it easier...
ReplyDeleteThank you so much Berina !
DeleteWell explained as usual. as I told earlier your post will be a bookmark for many crafters
ReplyDeleteThank you so much Shylaa you are always a pillar of support!
DeleteThanks again Sonia ji! Your posts are so so helpful!!! Loved the ribbon weaving idea...will surely try it...
ReplyDeleteThank you so much Purvi
DeleteI bow down to your versatility in using one product for a multitude of ways!! Stunning post!!! Now I need to dust my punches and start using them!!! Thanks for a fabulous fabulous post!!
ReplyDeleteTejal...I get obsessed with a particular thing...even my hubby teases me about it. In May I was obsessed with the Frozen theme birthday party for my daughter. As soon as it was over I got obsessed with the Martha Stewart punches Shalini sent me! Before I started crafting I used to become obsessed about my patients and their diseased...that was very very stressful!
DeleteYou are genius. What an awesome post. That ribbon weaving is fantastic idea. Thanks for sharing.
ReplyDeleteThank you so much Neha
DeleteThank you so very much for sharing this power packed informative and a fabulous post with us Sonia...Love it...
ReplyDeleteThank you so much for always being so supportive and encouraging Nupur
DeleteGreat tutorial Sonia, so much v useful info n tips.
ReplyDeleteThank you so much Kripa...good to see such encouragement from you!
DeleteThank you so much Payal
ReplyDeleteThank you Payal
ReplyDeleteU can never leave to chance to raise your own standard of working ...u r one super lady with all information always in your hands....
ReplyDeletethanks a ton for being a part .