I think you will
agree that one of the charms of crafting as a hobby is that buying and hoarding
craft supplies satisfies the innate “collecting” tendency many of us have!And I think Punches are among
the top “collected” crafting tools by paper crafters the world over!
 |
| Punches |
Before I got my Big
Shot, I had a serious addiction to buying punches! And I think because there
are many posts on my blog dedicated to punch-craft, if you google Punch craft tutorials you will find quite a few links leading to my
blog!
I get a lot of mails asking
for guidance on punches and this month Shalini and I decided to have “Basics” type of posts sharing Tips, Tricks and Techniques on one of crafter's most loved tools : Punches!
What is a craft Punch?
I think all of us are familiar with the
2 hole punch we use to punch holes on papers to file them...well craft punches are just more sophisticated version of that.
Using craft punches you can easily punch beautiful designs on paper for home decor and party decorations,
make beautiful cards and gift boxes , add oomph to
school projects,or for that matter any kind of paper craft!
 |
| MS border punches on House shaped Box |
House Shaped Box with
MS Vintage floral,
MS lattice heart deep edge
Tips on Using Punches
Using Punches is so easy you dont require any special skills but here are a few tips and tricks to get the best out of your punches
Surface to Punch
- Try to keep the punch on a hard surface[ not on your bed] while punching
- You will get the best force with the least effort if you place your punch- paper on a sturdy table and use the palm of your hands to apply pressure on the punch [ arms extended with elbows only slightly bent so that you can exert the weight of your body and not strain your hands]
 |
| Punching |
- If you have a lever punch you can hold it in your hand and punch but if at all it gives you trouble go back to punching on the floor or a table exerting pressure using your hand from above!
Paper to Use for Punches
- A mistake most beginners make while using punches is assuming all papers will work with punches
- The thickness and texture of the paper are important considerations for using punches - Some punches work only with thin paper while some work better with thick paper like card-stock.
 |
| Punchcraft paper and Punch Bunch punches |
- Some punches will work best only with punch-craft paper. Most Punch Bunch , Jef Punches will not punch Card stock.
 |
| MS versus other punch on Card stock |
- Martha Stewart Border , Corner and Punch around the Page Punches work beautifully with card stock and in fact don't work so well with thin or cheap quality paper
 |
| MS Beaded ruffle Border punch on Card stock |
|
 |
| MS Border punch on Card stock |
Papers to avoid with Punches
- Handmade Paper - The fibers in most handmade papers don't cut well with punches.And not only punches many dies too dont cut well with handmade paper
- Glitter Paper
- Adhesive Backed Paper- you can use them with punches but adhesive can jam your punches so it is best to avoid.
- Specialty papers like Thai paper , Metallic foil covered paper
- Corrugated Paper
 |
| Papers to avoid |
- Fabric lined paper
- Ivory Card stock- even Martha Stewart Punches dont punch ivory card stock though normal card stock punches easily with Martha Stewart Punches
- Foam - to punch foam only use punches specially designed for foam otherwise your punch can jam hopelessly!
Storage of Punches
- Store your punches in a dry place not subject to lots of humidity to prevent them from rusting
- Store your punches neatly arranged in a draw or box and not in a bag--well if you are wondering what is the problem with bags or throwing all your punches together...I once damaged a particularly loved punch by putting it in a bag along with some other punches and I was dismayed to find some plastic parts of the punch broke due to all the jiggling around it was subject to and it stopped working!
- Store your punches away from dust - I have seen many crafters from foreign countries proudly displaying their punches in the open. This is not a very good option for Indian crafters as most of us stay in places with a dust problem! Store in small / large plastic style cupboards or plastic boxes or cupboards.
 |
| Plastic cupboard Drawer set |
I am lucky to have a hubby who not only tolerates but appreciates my crafting hobby and last year he designed cupboards for my craft supplies.
 |
| Craft Supply Storage |
He actually measured the height of my largest Martha Stewart Punch to design perfect sized cupboard draws to store my punches!
|
| Punches |
Care of Punches and How to keep your Punches in good condition
If you are a seasoned crafter you must have read about the Aluminium foil tip to sharpen a punch ...well I had heard of it but was frankly speaking apprehensive to try kitchen aluminium foil on any of my beloved punches!
I was thrilled to try out the
Punch Revitaliser Kit by EK Sucess which Shalini stocks at Crafters Corner
The kit is quite small and handy and has
- several sheets of Wax paper
- Aluminum foil sheets
- A silicone Lubricant
How to sharpen your punches?
Just like we can sharpen our kitchen knifes when they blunt with use we can sharpen our favorite punches too.
 |
| Al foil to sharpen punch |
I tried out the Aluminium foil sheets in the
EK Sucess Punch revitalizer kit and I dont know if I am biased but I think after I punched the aluminium sheets with the punch and then tried it on paper it did create a more sharp edge to the punch out. My only gripe is that the Aluminium foil sheets are actually not very large so you need to be rather nimble in holding it while punching through the sheet.
How to smoothen the action of a Punch?
Now the wax paper in the kit was something I loved and did notice a marked difference in action of the punch.
I am demoing the wax paper with a Punch Bunch punch. [My MS punches all punch smoothly as long as I use quality paper with them!].
 |
| Wax Paper Punching |
This particularly old leaf punch of mine has been vigorously used and doesnt punch smoothly.
 |
| Punch wax paper several times |
I punched a single sheet of wax paper several times with it and I was pleasantly surprised to notice a marked difference in the ease and smoothness of the punching action!
 |
| Smoother acting Punch after wax paper punching |
You can also apply a few drops of the
lubricant on the under-surface of the punch and let it rest for some time [ works in the same mechanism as oiling metal parts of machinery!]
 |
| Punch Lubricant |
Special tip from Shalini on solving Punch Problems : Humidity can play spoilsport while using punches. If you have any difficulty in punching a paper you could previously punch the fault may not be with your punch but the paper which had become damp while stored in our climate. You can iron / air dry the paper and try again!
What to do if you jam up a punch ?
Anyone who has used punches for some time would have had a jammed punch at some time or the other.
Why does a punch jam?
- A punch will jam if you dont exert enough pressure while punching and the partially punched paper catches in the punch mechanism [ hence the importance of using the punch on a hard, even surface and exerting adequate pressure with your palms!]
- It will also jam if you try to punch through a thickness of paper too thick for the punch [ best solution to this is prevention!]
- It may have more tendency to jam if it has not been used for some time [ punch parts are metal and just like any other machinery which has not been used for some time a punch needs a bit of lubrication to spruce it back to life!]
- Ironically if you use a particular punch continuously too it has a tendency to jam [ solution to this is a bit of lubrication in between batches of extensive punching projects!]
How to release a jammed punch?
If your punch jams up and the top punching mechanism does not bounce back to its normal position here are a few things to try
- Place the punch on a table/ floor and try punching through the jammed paper exerting enough pressure through your palms with arms extended at the elbows [ so that your body weight exerts its force too]- you can try this several times
- Give a gentle bang on the side of the punch - please exert due caution and dont be too rough and do try this as one of your last resorts only! I have actually had success in releasing a few naughty punches using the good old hit!

- Use a pencil with eraser on top / any rounded thin but strong object to push back the plunger of the punch back up from the under surface of the punch.Be especially careful about your fingers while doing this as punch metal parts are sharp and you can cut your fingers!
- Try prising the jammed paper bits using a forceps /fingers /anything else !
- I read on the net many crafters advising to put the jammed punch in the freezer to contract the metal and help release the jam but I think this is best kept as a last resort as the freezer is a damp area and the metal mechanism of your punch can rust if you subject it to such a moist environment!
- If nothing else works and you lose all hope try opening it up - but a word of caution the spring mechanism inside many punches are dicey and tricky to reassemble and some punches are not easy to open up!
Now summing up - How to keep your Punches in good condition
- Dont punch thick/specialty papers with it
- Lubricate it to keep it punching smoothly
- If you are going to carry around your punches, take care that they dont bang around and damage each other![pack well]
If you have a good quality punch it will be so easy to quickly make some "wow" projects!I used the
MS Daisy fan deep edge border punch to make huge paper rosettes as part of the party decorations for my daughter's Frozen themed birthday celebration recently.
 |
| Huge Paper Rosettes made with MS punches |
In a celebratory mood Shalini very generously is allowing me to offer crafters a wonderful
10 % discount on Martha Stewart Punches , EK success , Punch Bunch punches and punch aids this month (upto 14th june 2015 only)...just add the discount code
SONIAMAR10 during checkout while shopping at
Crafters Corner!
I hope you find this post useful and will enjoy shopping for punches this month using the special discount offer!


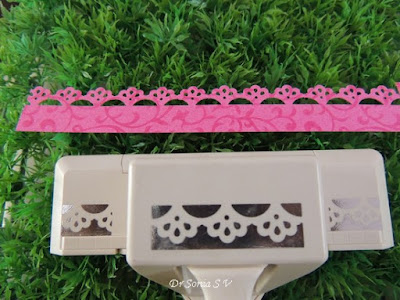


 Align the paper edge as shown lining the edge to the fold line as always and punch.


