
Hope is the thing with feathers
that perches in the soul and sings the tunes
without the words and never stops at all.
- Emily Dickinson
Hello everyone!
Its something unusual today,
a quiet morning,


still breeze,
grey feel,
with a cup of coffee I think
sitting by my window
and the very first word that strikes me is "HOPE"
Hence I decided to create a layout on Hope!
This amazing paper collection by Heidi swapp is to die for.
I love the pinks and the teals with a bit of black and the florals patterns.

The theme being hope, I choose the following papers
with floral elements with pinks and grays.
(oh these patterns are amazing!)
Decisions, decisions, decisions!
Which paper goes at the top?
Which paper goes at the bottom?
Which paper dwells in between?
(after a bit of thinking...)
Using the amazing super sturdy Tonic super trimmer
I have trimmed the following papers according to the sizes mentioned below.
(12" x 12" - Base)
no need to trim
(11.5" x 11.5"- Centre)
(11" x11" - Top)
I loved the floral pattern paper to be on the top.

Lets begin assembling now.
Using the super red tacky tape - especially 24mm is excellent to stick the papers.

Align the 3 papers in the centre as shown in the image below.
(There are several ways to arrange these papers)
(The red tacky tape is an amazing bubble free solution to stick your papers)
After having pasted the following papers its time to make the photo matt.
I trimmed the white paper with 3.5 inches by 5inches and gave it a backing with the gorgeous pink paper from the Heidi Swapp collection to make it sturdy and attractive
Again the bubble free 6mm red tacky tape to stick the photmatt.

Viola! now its time for the icing.
using the amazing and super cool
(These beauties are a must, they are amazing and can do
wonders in beautifying your projects and add those
little emotion touches and boost up your page. )
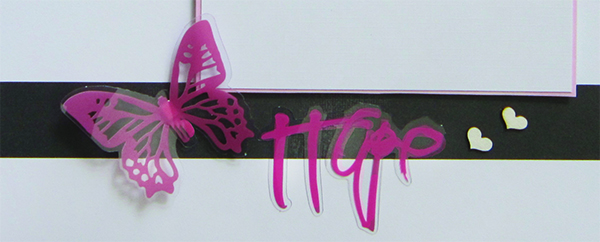
I choose the following elements to work with.

I was playing around with these gorgeous elements,
and landed up with the following combinations.
(There are several ways to arrange these elements)
I really loved the way this looks.
Hence I settled with this.
The Neutral Shapes are just magnificent,
with the little icing, if added a cherry it enhances your project even more.

The Wycinanka - Chipboard hearts are so gorgeous,
I loved it original colour and the texture hence
I decided to use it and add little earthy feel to my layout
I have pasted the sentiment and the using .
and its ready!
I must say scrapbooking is the best way to preserve your memories.

- - - - - - - - - - - - - - - - - - - - - - - - - - - - - - - - - - - - - - - - - - - - - - - - - - - -
The Products List:
- Heidi Swapp - Hello Beautiful
- Heidi Swapp - Hello Today -Acrylic Words
- Heidi Swapp - Dreamy Ephemera Die-Cuts
- Wycinanka - Chipboard
- Neutral Shapes - enamel shapes
- Tonic super trimmer
- Martha Stewart Scissors
- Red Tacky Tape
- Tacky glue
- - - - - - - - - - - - - - - - - - - - - - - - - - - - - - -
I hope I have inspired you to create
Have a crafty week
Thanks for Stopping by
...Nupur Patel...
I sooo love this page Nupur! So beautifully executed. Thank you so much for the detailed and easy to follow tutorial. :)
ReplyDeleteThank you so very much Jaya...xx
DeleteThis comment has been removed by the author.
ReplyDeleteWhy my comment is not there? Any way.... I love how you make paper shine. Simplicity is awesome. I wish these papers come in 6x6 too.
ReplyDeleteWhy my comment is not there? Any way.... I love how you make paper shine. Simplicity is awesome. I wish these papers come in 6x6 too.
ReplyDeleteThank you so very much Neha...xx
DeleteIt's a superb cheerful full of HOPE layout indeed. Loved the colour combination so much.
ReplyDeleteTFS
Thank you so very much Arjita...xx
DeleteI agree with Neha... it would be so great to have these in 6" by 6"... fabulous layout Nupur! :) Thank you for sharing the step by step process.
ReplyDeleteThank you so very much Halak...xx
DeleteLovely layout!!
ReplyDeleteThank you so very much Anchal...xx
DeleteSo pretty. I never tire of dreamy ephemera pack. Goes with so many paper packs
ReplyDeleteThank you so very much Kripa...xx
DeleteThank you so very much Sonia...xx
ReplyDelete