Followers

Showing posts with label Marianne dies. Show all posts

Friday, 16 February 2018

Glitters and Micro Pearls

Hi friends...Dr Sonia here on Crafters Corner blog after nearly a year!!!
Life threw me a few curves last year and I had to take a break from DT work now things have settled  down and so thrilled to be rejoining back with Shalini in the capacity of Blog Educator which gives me a lot of freedom which was not possible in the role of DT.
I am a bit rusty so please bear with me while I ease into things and share a fairly simple post.
I am not going to bore you with my usual long essays in this post as the gorgeous products I am showcasing are super simple to use and they literally do shine on their own!!
I am sure you will agree that Pop Up Cards are very special cards not only because of the fun element but because they are flat folding and easy to mail. The only problem with pop up card designs is to add that extra bit of jazzing without adding bulky embellishments and flowers!

I had actually made the basic framework of this whimsical pop up box card even before Shalini sent me her gorgeous DMC products.Even though the card had a lot of beautiful elements, it looked really dull and because I wanted to keep it flat for mailing I was struggling with how to embellish it.
DMC products
The beautiful newly launched glitter array and special micro and micro mini pearls from DMC helped transform the Pop Up Card creating areas of interest and beauty without making it bulky!

I used glossy accents  on the mushroom which by the way is a beautiful Marianne die I got on "Preorder" from Crafters Corner. Like many of you I too am extremely apprehensive about directly ordering from overseas .....what with the unreliability of the postal services and the unpredictability of the customs duties which can be levied! It was so easy to preorder...all it entailed was emailing  Crafters Corner!!


You can actually use any kind of glue but I find that using a really tacky and fast grabbing glue like glossy accents and Aleene's tacky glue made sticking glitters and pearls really fast and less messier. In this instance, the floppy cattail reeds I applied the glossy accents to made them stiffer and nicely rigid holding their shape better.
 Just look at the beautiful look of the rainbow glitter chunks.....when I read the label rainbow I was actually afraid to experiment with it... but oooh they are now my favorite type of glitter creating such a unique dazzle!!

Wherever you want a subtle shimmer, opt for micro sparkling dust or microfine glitter . And if you want a bit more pizzaz opt for the sparkling dust.

In the photo above you can see how dull parts of the card originally looked before adding glitters .It may be okay for a muted card but  it's not the look you would want for a happy looking birthday card! The "birthday" was outline with  rainbow glitter and oooh it dazzles so prettily even from across the room!

The little mushrooms and the cute mice and hedgehog [from Penny Black]all have subtle micro sparkling dust and micro fine glitter on them!


And that is how the sparkling Pop Up Card looks  beside the bonsai orange tree in my garden!

Supplies : You can buy from Crafters Corner 
Glitters all DMC brand : Rainbow Glitter Chunks
Die cutting Machine : Sizzix Big Shot 

Monday, 22 September 2014

3 D Gazebo /Lantern tutorial

Gazebo tutorial 
         Dear friends ,Dr Sonia here sharing yet another 3 D project made with dies[but doable in principle even if you don't have a die cutting machine!].I used the same Marianne Petra Corner Die set I used to make the 3 D chariot .  And I must thank everyone who showered me with wonderful encouraging comments about the 3D Chariot both on the blog and on Facebook....I never expected it would be so loved! Thank you so much !
I made a 3 D Gazebo which is big enough to house a  little doll .You could even call it a Bird house or a Lantern as it houses a battery operated tea-light.
Paper Gazebo
The picture below shows the dome of the lantern with a large red diamond and a tiny hook to help hang the lantern. I dressed up my lantern with delicate lacey bows made with the new Sue Wilson Filigree bow die! These are so delicate and beautiful!
Gazebo
I actually wanted to make a "Diwali Lantern"  but I must have been thinking of Valentines day and Christmas combined as I added a dangling heart and made a Christmas theme colored lantern!
3 D lantern
The cute and dainty pollen bunches winding around my Gazebo pillars are crystal beaded pollen which are part of the latest embellishment collection Shalini has brought into the store!
Gazebo tutorial  6
Crystal Beaded Pollen
How to make a 3 D Gazebo/Lantern
You dont really need to use the same dies I have used in this tutorial ---just sharing the pictures so that the same principles can be adapted to a shaped die cut / punch you may be already having and you can even apply the same principles to hand cut pieces.
Gazebo tutorial  16
Gazebo tutorial 
These are the 2 dies from the Marianne Petra Corner Die set I used to make the dome of the Gazebo.
Gazebo tutorial  7
Die cut 
Here is the die cut "unadorned" and using the techniques I shared in the Fun with Dies post here is how it was transformed after inking and heat embossing!
Gazebo tutorial  8
Inked and Embossed
I cut and heat embossed 6 of the above die cuts and folded them in half as shown below. As I said don't despair if you don't have the exact die I have shown-- you can make a gazebo dome using a humble circle shape too and use it as a base to make the rest of your Gazebo! [See tutorial to make a 3 D structure using Circles : Easy Paper decoration tutorial ]
Folded die cuts
Apply glue to half of one folded die cut shape and stick to half of another one as shown below
Stick Die cuts
Stick  all 6 pieces and your dome is nearly done.You get a fairly lovely shape even if you use only 5 die cuts but I found working with 6  made the rest of the 3 D construction easier [ like placing the pillars] !
Gazebo Roof
Before you stick the last 2 pieces, add a hook if you plan to hang your lantern. I used a long jewelry finding and threaded a large bead on one end and made a hook on the other end.Later on I added a dangling heart to the hook on the inside and a pearl- ruby to the hook on the top.
Gazebo dome
To complete the Gazebo roof, I used the Marianne die cut shown below.It looks rather plain doesn't it..well instead of inking and embossing , I took a shortcut!
Gazebo tutorial  10
Marianne Petra Corner
I know many of you will already be embossing your die cuts with the Bigshot/Cuttlebug...well this was the first time I did it ! So sharing yet another way to explore  the maximum potential of your dies!
Gazebo tutorial  11
Die cut embossing
Place the die cut within the die itself [on your acrylic cutting plate]and place a Spellbinders Embossing pad atop it and then your other cutting plate.
Gazebo tutorial  12
Die cut embossing
Just one run through your big shot and you will get beautiful embossed impressions on your die cut as shown below.
Gazebo tutorial  13
Die cut embossing
Before I got the embossing pad, I tried  to emboss die cuts with thick felt and even foam-- I did manage to get some amount of embossing but my foam/ felt spoilt and disintegrated real fast and on comparison the embossing was not as deep and beautiful as what I got using the proper Spellbinders Embossing pad.
Gazebo tutorial  14
Embossed Die cut
To give sturdiness and complete the Gazebo roof ,attached 6 of the above die-cuts between the arms of the basic frame made earlier.
Gazebo tutorial  21
Gazebo
Here is the aerial view of the Gazebo roof showing the pretty dies and bows.
Sue Wilson bows
Here you can see the dangling heart and pearly beaded sprays [See Easy Beaded Spray tutorial ]
Gazebo tutorial  24
Hanging Heart
Embossed 6 of the 3rd design in the Marianne Petra die set and folded them into little "crowns" as shown.
Gazebo tutorial  25
Marianne Petra Die
Glued the "legs" of the die cuts together so that they literally stood up to embrace my tea light!
Gazebo tutorial  26
Lantern tutorial 
Stuck the Marianne design arrangement atop a circle ,leaving enough space in the center to fit in a battery operated tea-light.
Gazebo tutorial  27
Tattered Lace die
I used a  Big Bite to punch a hole in the center of a Tattered Lace rose [ I love this die--- even though it is so delicate and detailed it cuts like butter!] and fit it atop a battery operated tea light.
Gazebo tutorial  28
Tea light
Here is the lighted up tea light!
Gazebo tutorial  29
Lantern tutorial 
Made pillars using corrugated paper and stuck it to the base circle.
Lantern tutorial 
Stick the top of the pillars to the Gazebo roof. You can wind a piece of card/ corrugated paper around the base circle and pillars to make your base sturdy and strong.
Gazebo tutorial  32
Gazebo tutorial 
Tip : Obsessing a bit about symmetry, gluing and re-gluing is the key to building a good looking and sturdy Lantern/Gazebo! Working with 6 eg :6 spokes on the roof, 6 pillars, 6 sides  etc makes it easier to build a symmetrical 3 D structure than working with 5 !
Gazebo tutorial 
Phew that was a super long post but I do hope you enjoyed my first DIY Lantern ,and hoping some of the principles shared will come in useful to help you make your own Diwali /Christmas Lantern for the upcoming festive season.
Do tell me how you like it.

Tuesday, 9 September 2014

Fun with Dies

Handmade Chariot 1
3 D Chariot
           Dear friends Dr Sonia here with a special post showcasing some beautiful dies.First of all Thank you so much for the fantastic support you gave for my Flower punch board projects.This month Shalini sent me a beautiful Marianne die set to play with. Marianne designs have such intricate beautiful designs especially in their Petra series and I had never mustered the courage to buy them as these dies spelt “elegance” and elegant projects are not my forte !! [ you will have to rely on Crafters Corner DT Anchal and Arjita for your dose of crafty glamour and elegance!]
Handmade Chariot
But as many  of you know I have a little girl who is very much into princesses and fairy tales and so most of my crafty projects are influenced by her! I used the Marianne Petra Corner Die set  to make this glittery chariot !
Handmade Chariot 6
Marianne Petra Corner Die Set
This is not a detailed tutorial to make the chariot but just giving you some ideas to get the maximum potential from intricate stencil- emboss style dies such as the Marianne or Spellbinders dies.The set had 5 dies and looked so beautiful !
Handmade Chariot 7
Marianne Petra Die
But I was disappointed to see the die cut didnt actually wow! Has that happened to you with a new product ?
Handmade Chariot 8
Marianne Die
Well inks seem to add oomph to any die cut ,so back went the die cut into the die, and inked the diecut using the die like a stencil.
Handmade Chariot 9
Inking Diecuts
Looks so much better doesnt it!! Ha Ha I did feel foolish and clever at the same time[LOL!!]. Many dies are actually meant to be inked-- so dont hesitate to bring out those inkpads to your dies!
Handmade Chariot 11
Embossing with Dies as stencil
I just recently got the Ranger heat embossing gun from Crafters Corner and I love how heat embossing can glamorize any project..so of course I had to try heat embossing the intricate die cut. With the die cut still in the die ,run your watermark pen on the design[easier than freehand drawing on the die cut], pour embossing powder,remove the die  and heat with your heat gun.
Handmade Chariot 13
Heat embossed Die cut
Dont you just love the shimmer and texture! You can directly use the watermark pen or even run the embossing ink pad on the die-cut while its in the die and omit the inking step but if you do that tiny errors will show up more! If you ink and emboss- most errors are hardly noticeable!
Handmade Chariot 10
Heat embossing a diecut design
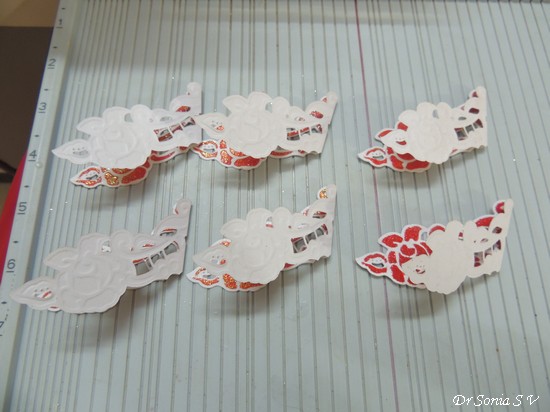
The picture above shows the contrast between the  un-embossed and the heat embossed designs
Handmade Chariot 14
Die cut layering
Well if you want to play with your die cuts even more- how about layering them!
Handmade Chariot 15
Die cut layering
This set has 2 matching outline dies and I popped up the intricate die cut atop its matching outline using foam tape.
Now on how I made the 3 D Chariot
If you dont plan to buy this particular Marianne design--not to worry-- the purpose of the step by step photos in this post is just to entice you to play with your die cuts and challenge you to maximize how you use your dies!
Just play with your die cuts like you would do with a jigsaw puzzle- rotate and match and also cut a bit here and glue a bit there and you can make entirely new designs!
Handmade Chariot 16
Die cutting tips
The pic above shows the die cuts from the Marianne Petra corner set I used to make the body of the chariot. As I said Rotate  a little,Cut a little, Glue a little, and you get new designs!
Handmade Chariot 17
Fun with Dies
I used Spellbinders Asian accents die cuts [again inked and embossed] to make the wheels.You could of course use circles or whatever lovely die cut design you have to serve as wheels
Handmade Chariot 18
3 D chariot
Joined 2 of the above 2 dimensional chariots using a folded rectangular piece of card stock and also added a roof made using 4 of the 3rd die cut design. I joined 2 Spellbinders Majestic labels 25 die-cuts to make the steps [seen in the earlier photo of the chariot] and the seat within the chariot
Handmade Chariot 4
3 D diecut chariot
You could use some beautiful eyelets [ I am eyeing some of the new brads and eyelets in Crafter's Corner] on the center of the wheels and connect them with skewer sticks/toothpicks or just roll paper rolls to  form the axles of the wheels!
Handmade Chariot 5
3D Chariot
         I hope you enjoyed the run through on how you can have so much fun with your dies. I know I have shared fairly simple ideas for the seasoned crafter but hoping it will help at least a teeny bit to many!
And I know many will make some  mind-blowing elegant projects with such beautiful dies!
But for now hope you liked my kiddy inspired 3 D Chariot!Currently the chariot has been hijacked by my daughter and Princess Indumathi from the  Chota Bheem cartoon series is riding in it!!