|
| Projects with Dress My Craft Punches |
Hi friends,
Dr Sonia here and I am very excited to share a review post and project ideas on my first love
Craft Punches . I was so thrilled when I came to know that Shalini launched Craft Punches under her brand
Dress My Craft !
Shalini always maintains a high benchmark for the products she stocks in her shop and even higher standards for products under her brand
Dress My Craft so even before I got my hands on the new punches I knew they would be fabulous !!
And these punches have truly exceeded my expectations and that is not just the "DT" in me speaking but a paper-crafter who loves fabulous tools !!
In this post I will demo the Triple Punches and show you how versatile they are with a couple of projects.
 |
| Triple Punches |
Special Features of the Triple Punches
- Size : They are pretty large and sturdy Punches and can punch paper widths of upto 2.5 inches
- No limit to the length of paper you can punch!
- Mechanism :All 3 Triple Punches act by the "Lever mechanism" which is personally my most favorite punch mechanism as not only is it easier to punch paper using lever punches but it also gives cleaner cuts
- Can hold in hand and punch! Because of the levering mechanism you can hold the punch and punch with your hand instead of having to always set it on a surface to punch.This is an advantage when you want to use the negatives of the punch-outs as shown in my video.
- Layering Punches- The base of the 3 punches have markings of 1.5, 2 and 2.5 inches on wedges to fit papers of these 3 widths- this makes layering of your punched out tags and banners super easy.
- Wedged Paper feeder
 |
| Triple Punch Mechanism |
The wedges on the paper feeder base are an especially useful feature as if you cut your paper to size and feed it into a wedge say 1.5 or 2 or 2.5 inches...you can easily align the edges of your paper so that you dont get a wonky or crooked tag/banner.
- Another advantage of the wedges is it allows you to easily align paper widths such as 1 and 3/4 or 2 and 1/4th to make layering quicker and easier.
- Nonskid Base : The base has built in nonskid discs which is especially handy when you are working with big punches such as these.
- Heavy duty Punch : The punches can easily punch papers of 300g and it even smoothly punched ivory sheets!
- Punches Thin Paper too- now you may be wondering why am I listing this as an advantage of these Dress My Craft punches...well surprisingly some heavy duty punches give jagged edges with thin paper as they are meant to be used with card-stock! Happily the Dress My Craft punches give fabulous cuts with thin paper too!
- Cut pieces are useful too! I am sure there are many of you who like to waste as little paper as is practically possible when you craft. I love it when I can creatively use the negatives and little bits which are left with the main punched design . When you scroll down you'll see how easy it is to create chevrons and beautiful patterns with the negative bits of the triple punch designs!
Ok now that I have talked to you about the salient features let me show you some project ideas to show the versatility of the Triple punch designs
Apart from the obvious tags and banners here are more ideas
- Layered Bookmarks
- Mini Album/Box Closure Mechanism
- Business/ID Card Holder Box
- Accordion Box
- Organiser/Gift Basket
Bookmarks
When I got the triple punches a few days back I was frantically making notepad holders as Teacher's Day gifts and these layering punches were quite handy to quickly make some gorgeous matching bookmarks for my daughter's teachers.
I used the Rounded Tag Punch to create the layered bookmarks. It is very easy to create layers quickly using the wedges and marking.
Crafty Tip
If you are using the increments of 0.5 inches width strips....increase your paper strips by 1/4th inch only to get the perfect margin.
One big time saver with this tag punch is the hole which also punches perfectly with the rounded top shape. You just have to add an eyelet and a thread to finish the bookmarks!
The lemony bookmark was created by punch through very thin paper and it was layered on Dress My Craft Textured pink card-stock which is of 300g!
The chocolate bookmark below has a base made of ivory sheet through which the Tag punch worked beautifully.
I played around with the measurements of the strips to get borders of different widths.
Love how the punches work beautifully with different papers. The Blue bookmark was made with Dress My Craft Hydrangea Lawns and the pink one with Lemoncraft Fresh Summers...both papers varying widely in thickness but punched out beautifully with the tag punch.
 |
|
The raspberry set was made with DCWV papers
The green one below was made with Lemoncraft papers
In case you are interested in how I made the Shaker Notepad Holders here is the link :
Teachers Day Gifts
Box / Mini Album Closure
The shape of the Rounded Tag is just perfect to make a stylish closure mechanism!
I created a acetate window box from this project :
Foamiran Flowers Hanging Decoration and made a secure closure using the Rounded Tag punch.
You just have to add an eyelet and thread a ribbon/twine to create the closure.
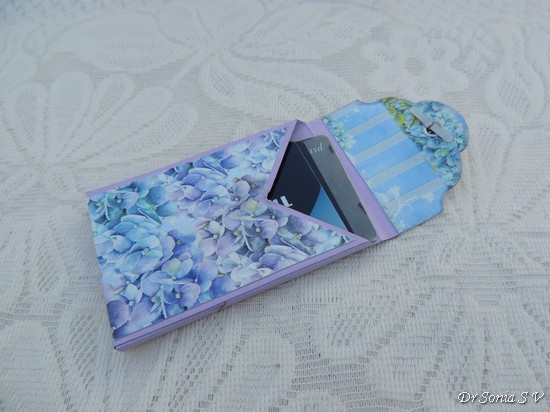
ID Card/Business Card Holder
These cute Mini Flip top boxes are designed to hold ID/Business Cards. They are made from 10 and 1/4 x 4 inch pieces of card-stock using the rounded tag punch.
Accordion Boxes
This box looks similar to the boxes shown above but is much easier to make and is quite roomier too.
It is an accordion box which is 1/2 inch thick and you can size it at different lengths to hold tags, I love you notes, small photographs etc.
I designed them to hold Membership cards.
The base is made from a single strip of cardstock measuring 2.5 x 10 and 1/4 inches
Accordions on the sides allow partition of the inside of the box
And the accordions allow the holder to expand when you open it.
The dimensions are perfect to hold Membership/ID cards and will make such cute gifts!
Chevron Pattern
 |
|
Here are the backsides of the boxes showing how you can use the negatives of the punch-outs to create chevron patterns. They would look beautiful in cards too.