Followers

Saturday 29 June 2013

SHADOW BOX BOOK CARD---VINTAGE STYLE

Hi friends

I,m Anita and I hope you all are doing good and creating wonderful craft projects. Before I get on to the facts of my post, let us rewind a few things.
First Crafters Corner is now having lots of beautiful designs of napkins for decoupage and you have got to see the range. It is so beautiful and unbelievable !!!
Second, Now we also store all materials for volume decoupage or sos peso also!!! Just contact us for all the details.
Third, Now no more hunting for perfect embellishments. Just visit the store and check out the wide range of embellishments added .
and last, The Challenge-Gifts Galore is going to end tonite. So there is still time to upload your entries as the winner will get two distress paints of their own choice.
Oh !!! There's another wonderful news!!! But !!!! No!!! I,m not supposed to tell you now!! Its a secret!!! So Keep Watching!!!
Now on to my project!!!
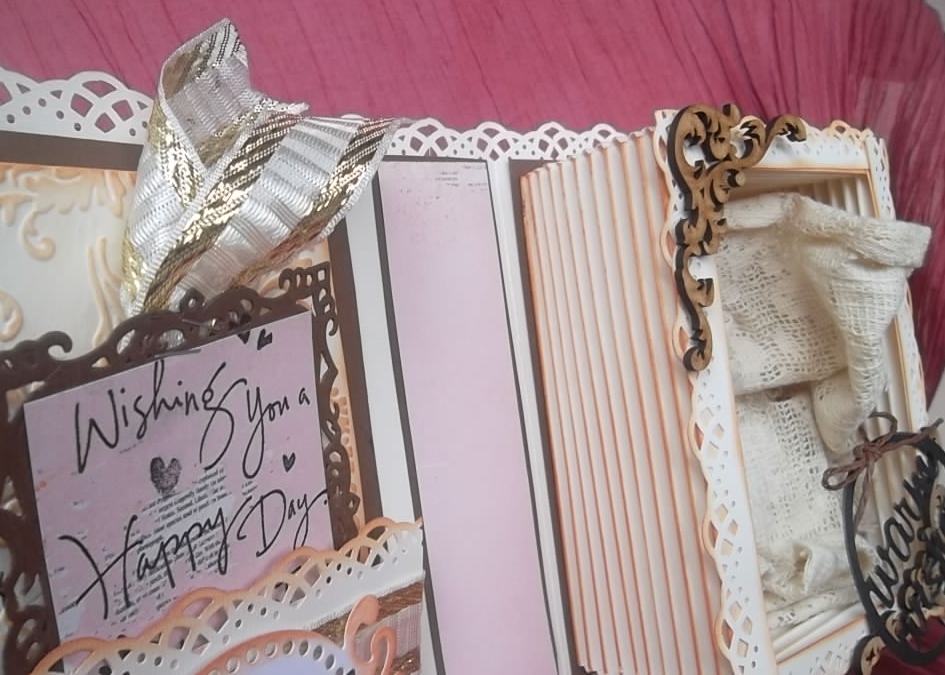
I,m showing you today, a tutorial on making a shadow box book card.
Initially when I saw this, I thought that it is going to be difficult. But that is not so!!! With precise measurements, you can make it very easily.
So here is the video tutorial.


 There is an error in the video. I have mentioned that the die on top is English pastry. Its not that. Its called French Pastry doiley.

Supplies used ---:
scor-pal
Fabriano Card stock
Prima Rondelle Paper pack
Martha stewart Swirling Lace punch around the page
Spellbinders  Decorative Label 8
Spellbinders-Fancy tags 3
Cherry lynn die-French  Pastry Doily
Distress ink-Tea Dye
Distress ink-Black soot.
Stamps-Inkadinkado
Die Versions die cut
Mulberry flowers
Embossing folder-sizzix
ribbons etc from stash.

I hope You liked my video. If you want to know anything else, feel free to ask here.
Any other product related information can be answered at info@crafterscorner.in
Do visit our blog for wonderful projects. You can also upload your projects made from supplies from our store on Facebook HERE and last but the most important--All your needs for craft supplies will be taken care at Crafters Corner--All craft supplies under one roof.
I hope you are all having a good time!!! Till then HAPPY CRAFTING!!!!

Friday 28 June 2013

Distress Cards!

Hello All!

Quickly sharing the cards I made using distress paints.. These paints are so pretty and so versatile and one can go on and on playing with these..
I created 2 cards today where I used distress paints to create background.. Oh I love the colors..!

Have a look..


I used Peeled paint and mustered seeds color paints to create the background.. then I heat embossed with golden embossing powder from Ranger.. Love the effect.. added some rhinestones to give the final touch up..

In the second card, I used spun sugar and Picked Raspberry.. added some mulberry flowers to give different dimension to embossed vines..


This one looks soo pretty in real..

I hope you liked my cards..
Everything used in my cards are available on crafter's corner...

For any product query please write to info@crafterscorner.in..
And don't forget to play the current challenge where winner will get 3 distress stains of her choice! isn't it cool??

Have a good day!
Priya

Thursday 27 June 2013

Martha Stewart Scoreboard-A Review !!

Hi Everyone ,

Its Hussena here  and today I am  sharing with you some detailed review about the Martha Stewart Scoring Board and its various uses as well as a detailed look at the product itself.

So first a little bit about the  Martha Stewart scoreboard : Martha Stewart Score Board is made from an ivory colored plastic with the numbering in black and the signature Martha blue. Very easy to read. In addition a storage space has been provided at the top to keep the bone folder that comes with the board. Under the flap is a guide that tells you how to make standard sized cards and boxes. It  also tells you what size paper to start with and where to score.The board  has scoring indentations every 1/8th of an inch! It also open on the right hand side AND the bottom, so it will incorporate really large sheets of paper.


What does the Martha Stewart Scoring Board  Package consist of Well firstly you get the scoring board itselfa scoring tool (otherwise known as a bone folder,) and an envelope template. Also included is a chart with standard sizes of boxes, cards and envelopes..And believe me this chart is so very handy it really helps you with the different measurements for making envelopes and your Boxes... No more rulers and measuring, you simply lay your paper on the board, run the scoring tool down the groove and ta da your paper is perfectly scored for easy, neat folding. How great is that!!!
P.S : { Most of the images taken are from Google and Pinterest but I have also combined some of the pictures from my personal blog too! }

Okay here's a look at  how the board looks like front and back side  :  
                                                       
 As you can see on the back side there is a groove provided in which your envelope template fits in snugly and there is also  enough space for a pencil to fit in.
                                  What makes the Martha Stewart score-board more preferable over other score-boards is its unique bone folder which is quite thin and slides into the grooves provided deeply which results in much more crisper folds and makes your scoring more neatly finished.

As you can see there is a flap on the top of the score-board in which you can store your bone folder for easy-access and also the added incentive of it being right there where you want it when you take it out to create a project.....On this flap,are also the measurements for making boxes and cards which looks something like this :
                                                             

And here's a look at the envelope maker template along with the guide which comes in the package :
                                                                           

As you can see,the company people have provided you with various measurements to make different sizes of envelopes so that,you don't have to rack your brains trying to figure out the measurements for each of your different sized envelopes.

Now that you have seen how the score-board looks like and the different tools and accessories provided with it...
Here's a look now at the different things that you can do using these score-boards!

1.Making a rosette-You can make different sizes of rosette's for embellishing your card-making or any 3-D projects.There are several tutorials on how to make a rosette using the MS score-board and below I am showing you a very short tutorial for it :


And here's a sample of how I have used the rosette on my card and 3D projects :


2.Scoring to create a background on your cards : You can easily create interesting backgrounds for your cards by scoring them horizontally or vertically like I have done in my below card...I wanted to create a trellis-like effect and it was very easy doing it using the score-board! 
                                         
3. Simple scoring to highlight a card :


4. To make envelopes :(Image from Capadia Designs)
                                                    

Here's the sample of the envelopes I have made using the scoring-board and MS punches :
                                               

5.Making fancy-fold cards : Making all the difficult fold cards becomes a breeze using a score board  as you not only get perfectly scored lines but it also helps in figuring out the different measurements!

Here's an example by DT member Priya who is brilliant at doing fancy-fold cards!...Look how she's used her score-board to create the below card :
                                           

And below is my card :                         
Hope you all find this review useful ...From personal experience I really do recommend buying the MS Score board...I have found it's really good value for money and the old days when I used to a metal-edged ruler to score my work have been left far behind since I have laid hands on my MS Score-board :)

The Martha Stewart Score board is available at the Crafter's Corner shop at very attractive price of Rs 1550 only! :)
Like I said, its total value for money and a must-have for any crafter!..Makes your work so much more easier and faster and what's more it's one of the highest selling Score-boards available compared to others !

Have a nice day everyone!
www.crafterscorner.in(All craft supplies under one roof)
For further information please contact us at : info@crafterscorner.in


Tuesday 25 June 2013

Hi all
I hope u all must be enjoying this holiday mood.....as its vacation time for kids as well....
even I had great fun during these vacations and so is the reason that I have been out of the social networking like facebook and blog......
but now I am trying to be back......
First of all I would like to tell you that winning entry for the month of the June will get  any two distress stains of their own choice so u can choose from a wide variety of colors 


So you all out there don't forget to participate in our lovely gifts galore challenge.....to win lovely prize.

You know I always want to share my things on blog with you but for or the other reason I miss it but this time I wanna share this lovely project and news with you all .....
I have recently done a decoupage course and after completing the same we are getting the products in our store as well for all of you......as we found this decoupage very innovative and versatile.....so in the store u will soon find a lot of range.....
But meanwhile we do have decoupage glues in our store .


I really wanna share this pic with you all ...actually its a suitcase which I made for my son....isn't it very pretty.....
he was very happy when he got this....I hope you all will like it as well...


Now a super duper news for all of you ......we are completing our one year of website in coming month ....yes you are right the time flies......
so are you ready for the celebration time and goodies....
then keep checking our website for wonderful schemes and offers.....

Now without any more delays I wanna announce our DT results for the last month.....
Our Best post of the May month goes to
                                                                  Pallavi Iyer
                                             for her beautiful altered dressing table


Congratulations to you....you did a great job......
And u win your self one crafters workshop template and one distress stain of your own choice....
So enjoy crafting more now.....
also our best DT of the month goes to
..........Oh my god......
You wont believe it goes to
Pallavi Iyer again


Wow.....its double bonus for you so u win your self a beautiful brand new template from Prima Marketing which is still to be uploaded on website.....isn't lovely.......

For any further information.....please contact us at info@crafterscorner.in

Love and hugs
shalini


A bag, a tag and a tutorial!

Hello everyone!

I have made a gift bag and a matching tag to share with you. I also have a small tutorial for you. An easy one.

First let me show you the bag and tag...

I made that front panel with distress paints. These work amazing for back grounds. Mine isn't perfect but I like it! :p


This is the rear side of the bag. Kept it very simple...
 Made a similar BG fro the tag also.

Do you want to know how I made the background and those flourishes on the BG?

Here is a small tutorial for you..

Sorry for the bad pictures..

Supplies required-
1. Distress paints (Available in Crafters Corner. Not uploaded but contact Shalini in case you want to buy these awesome paints.)- I have used Fired brick and wild honey distress paints.
2. Water colour paper
3.Craft mat or a laminated sheet
4. Mini mister (or just anything to spray some water to blend the paints)
5. An embossing folder- I have used a cuttle bug embossing folder.
6. Distress ink - I have used worn lipstick distress ink here


Step 1. Select distress paints of your choice.
Step 2. Dab them onto a craft mat
step 3. Spray lots of water
step 4. press down a water colour paper onto the paints on the craft mat. Swirl it if you don't mind blending the colours. Mine is a bit messy but I like the final look of it.
Paints once dry dont blend when you add an extra coating. This lets you achieve brighter colours. So I took some extra wild honey colour onto my paper.
Step 5. Take an embossing folder. As you all are aware there are two sides to an embossing folder. One thats smooth and another that's not smooth. Apply distress ink to the side of the folder which is NOT SMOOTH.
Step 6. Just press it down on to the BG you have already made...

Simple, isn't it? :)

I want to thank the person who helped me by sending her embossing folders without which I wouldn't have been able to do THIS post.  It wouldn't have been possible without your help girlie! Love you! :)

So that's it for now. Have you played along our current challenge which is 'gifts galore'? You have five more days to play along.  And the prize is...


The winner will get to choose TWO distress stains of their choice from a very wide range of colours!  Isn't that great? :-)

Any queries, send a mail to Shalini at info@crafterscorner.in.
Any questions about the project or tutorial in this post, I'll be glad to answer. 

See you.. Take care!

Love
Sindhu..

Monday 24 June 2013

DISTRESS PAINT, DISTRESS STAIN

Hi, Eveyone....Today i'm going to give a product overview on Distress paint and Distress Stain and i hope these basic things would help you on how to use these products...
DISTRESS PAINT


Distress Paints are very fluid water-based acrylic paints for multiple surfaces – paper, wood, metal, fabric, glass. Tim and Ranger developed these special paints to be reactive with water just like Distress Inks —perfect to accomplish a wide variety of artistic techniques. Distress Paints have a convenient dabber system for easy and mess-free application. Use it to get a timeless matte finish on craft projects.
§  27 colors that coordinate with the Distress palette
§  Very fluid water-based, multi-surface acrylic paint
§  Reactive with water like Distress Inks and Stains
§  Convenient dabber system application

How to use
You have to shake it up before usage. It has a sort of mixing ball inside which will mix the ingredients thoroughly so that the effects of its usage is perfect.
Apply a coat of your favourite color on any surface (say paper tag). You can use the dabber to spread it out or even use your fingers. Since it is water based, you can clean up your hands after your work very easily (Imagine how difficult it was earlier while using acrylic or any other chemical based colors).
Sprinkle some water on it and the paint reacts with water. On drying up it will give that unique distress look to your tag.
It has unique water reactive qualities. Hence the paint is blend-able when wet. But when it gets dried out it becomes permanent.
Another lovely characteristic of Distress paint is that, once the paint is dried, and you spray water on it, it doesn’t re-wet. So in case you are working on mix medium, like on canvas, you can use your markers etc. on the surface which has been distressed using distress-paint, without having to worry for the paint getting re-wet or smudged.

Mix different colors and create your own lovely looking smudged background which is permanent and has that peculiar distress look to it.

Tim Holtz Metallic Distress Paint
New -- Metallic Distress Paints are very fluid water-based acrylic paints for multiple surfaces. Tim and Ranger developed these special paints to be reactive with water just like Distress Inks and Distress Stains—perfect to accomplish a wide variety of artistic techniques. Distress Paints have a convenient dabber system for easy and mess-free application. Use with stamps, paper, wood, metal, glass, plastic and more for a timeless matte finish on craft projects.
  • Coordinate with the Distress palette
  • Very fluid water-based, multi-surface acrylic paint
  • 1 oz. bottles
  • Reactive with water like Distress Inks and Stains
  • Convenient dabber system application
Here's a video from Tim Holtz announcing the new Metallic Distress Paints:


DISTRESS STAIN

Distress strain can be easily understood as a fluid version of distress ink. Hence we can say Distress strain is a water-based dyes for papers and other porous surfaces.
Advantage of distress strain is that it can be used to cover larger areas which was not possible with distress ink. It can be misted with water to lighten color and create mottled effects. You can layers of stain to achieve more saturated color.
Distress strain is available in the entire Distress color palette, including Metallic shades.
This gives a completely different look to your stress path that you may not get with distress inks. You can distress a large surface. And you can distress almost every surface using distress stain – canvas, wood, trimmings, ribbons,
• Acid free, non-toxic
• Fade-resistant dyes
• Dabber top with spring valve control


How to use :
The bottle has a soft fabric top dabber on it. Underneath the fabric is a value which prevents leakage during transportation. This value also allows controlled release of strain from the bottle.  So while using the bottle for the first time, press the dabber on to the surface where you want to use the distress strain and press the sides of the bottle gently. This will start the flow of the stain. The dabber will never dry and block the flow for further use. Just remember to screw the cap back on after usage.
You can spread the strain onto the surface by the dabber itself or can use a brush or your fingers.
The strain dries up to give a translucent finish. In case you feel, you can reapply the strain to get a more opaque finish.
The strain reacts with water. So you can spray some water on the dabbed strain to get the wonderful distress look. With the heating tool, you can dry it up to make the look permanent.
You can mix colors on your tag or any surface you are working on to get a hue of colorful distress look.

Tips and Technique on how to use distress stain


These r the concepts which i created using distress paint and distress stain


All the shades are available at crafterscorner.in
I hope such information would help you and any query regarding the product please contact at info@crafterscorner.in and don't forget to participate this month Challenge 9-Gift Galore

Have A Great Day!

Friday 21 June 2013

Make your pattern papers with Tim Holtz distress paints

Hi All,

It's Priya here to show you some cool effects using distress paints.. These are thick opaque colors water based color which are highly reactive with water.. However, once they are dry, they set like any other paint.. so you have both the properties of distress inks and paints.. You can achieve various effects like marbeling, ombre, gradient, etc using these paints..
I will show you how you can use these in paper crafting and card making.. I tried to make pattern papers using these paints.. .

Supplies Needed:


1. Distress Paints of various colors
2. Stamps
3. Crafter's Workshop Templates
4. Embossing Powders
5. Versamark ink
6. Paper Towels

Now lets have a look at the PPs I created using these supplies..

1. Ombre effect with heat embossing using template:
For this I am using 3 distress paints of same color family, Vintage Photo, wild honey and mustered seeds.. I have also used Herlequin stencil from Crafter's Workshop and Ranger super fine gold embossing powder..

1. Stick the template firmly to the paper and surface..

2. Tap the embossing ink directly on to template.. Make sure the exposed paper is fully covered by the ink..

3. Sprinkle the embossing powder and heat it..

 4. Paint through the paper using inbuilt dauber..

5. Sprinkle some water to make colors more liquidy.. User your fingers to spread and mix the colors till you get the desired ombre effect..

I made a card using this PP..

2. Vibrant Pattern paper:

1. Draw straight lines of different paint colors.. using the inbuilt dauber..

 2. Let the colors air dry for 15-20 mins..

3. Using Picket Fence color, just dab the color out and make impressions at various places.. don't move the daubber around.. it will give around 1/2 inch nice, solid white circles.. Use it the way you like..


3. Stamping and embossing with paints on Kraft paper:
Unlike distress inks and stains, distress paints give nice solid colors on darker surfaces because they are opaque and thick..
1. Use a lighter shade of distress paint as ink and stamp onto the paper.. The color will just pops out.. I have used Spun Sugar Distress paint here..


2. While the paint is still wet, sprinkle some clear glitter embossing powder..

3. The embossing powder will stick to the wet paint and we can then just heat the powder to melt it..


Here is the complete card.. it's looks so b'ful in real..

4. Layered Stamping with Distress Paints:
You need 2 distress paints, one dark color and one light color of same or different families.. I have used Spun sugar and picked Raspberry..

1. Stamp the image with dark color (picked Raspberry)..

2. Let it dry for some time. Make sure to remove the paint from the stamp after stamping. Otherwise the paint will not come out once it's dry..


3. Stamp with lighter shade of color.. (Spun Sugar here..)

 4. Stamp it little further, around 2-3 mm.. this will give a nice effect.. the dark color will look like a shadow..

There are many more techniques to use distress paints... the list is endless.. keep trying as the possibilities with are endless..
You can buy distress paints from Crafter's corner..If you have any queries regarding any of the products used please leave me a comment here or write to us at info@crafterscorner.in
Have a Good Day Everyone and Don't forget to play along our current challenge Gift's Galore to win some Exciting Prizes :)

cya!
Priya