
If you have been like me..simply hoarding crafty stuff...do hunt for a stencil in your stash or better yet go craft shopping, bring out your inks and media and start playing!!
Once you start exploring the different things you can do with stencils....it's simply amazing the endless amount of fun you can have !
I recycled a cake base cardboard to create this mixed media wall hanging of a woodland scene.
In this project I used the The Crafters Workshop Mini Tuscan Wall Stencil and the Carabelle Studio Effet Bois stencils with Texture paste to create the main textural elements of the woodland scene.
Supplies
Carabelle Studio Vitrail Stencil
Distress Inks
Distress Crackle Paint Clear Rock Candy
This is a super easy technique but the end result sooo gorgeous !
Remove the stencil carefully and allow to dry...you get such a beautiful crackle effect!
On the negative areas you can still play around by adding more ink in a contrasting color like the brown and green triangle on the right.
I used the stencilled backgrounds I created to make Turtle Bookmarks![Tutorial : Corner Bookmarks]
The design looks fabulous on the turtle dont you think!!
And here is the more grungier fella!
This technique will be nothing new to most of you but sharing for the benefit of newbies.
Use Distress Inks on your stencil
And if you are into crafting professionally...being able to use stencils with different media to create gorgeous effects and textures can escalate your crafts to another level altogether by giving it oomph and grandeur!
Creating Textures with Texture Paste and Embossing Powders
Supplies
Stencils :The Crafters Workshop Mini Tuscan Wall Stencil, Carabelle Studio Effet Bois
Ranger Texture Paste
Heartfelt creations Delightful Daisy Stamp and Die
 |
| Mixed Media Wall Hanging |
 |
After applying texture paste through the stencil, while the paste is still wet sprinkle embossing powder[ used Ranger's Gold Embossing Powder here].
You can wait for the texture paste to dry or heat emboss right away depending on the effect you want.
For the Cracked Wall I used a thin layer of texture paste and sprinkled embossing powder and embossed it after the texture paste had dried...you get a subtle texture that way.
 |
If you leave sprinkles of embossing powder on the un stencilled areas you get a cool texture in the surrounding too.
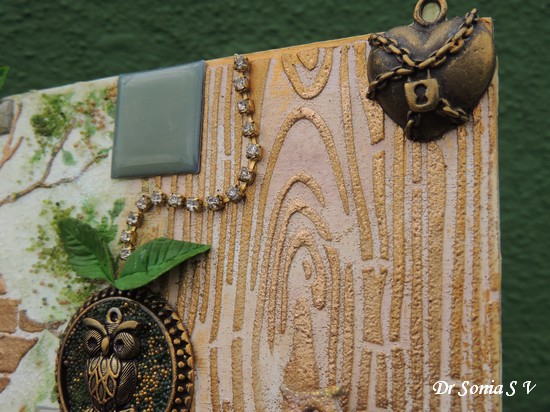
In the background of the owl charm are texture paste stencilled vines using the vine in the same The Crafters Workshop Mini Tuscan Wall Stencil but the grungy look is achieved by letting the embossing powder[ green Stampendous embossing powder] spill onto un stencilled areas and embossed while the paste was still wet.
In this project I achieved lots of textural elements on the background using crackle paint and glass beads gel and you can catch the subtle shimmery effect in areas fromt Distress glitter.
I love working with clay and used a Plaid Silicon mold to make the little bird's nest. Painted on the spots using Sharpies[ now available at Crafters Corner]
Here is a closeup of the background with glass beads gel , microbeads, distress glitter and Clear Rock Candy crackle paint.
I used a pendant base and an owl charm with glass beads gel to create the wise Owl!
All the charms were glamorized with a rubbing of the gorgeous Inka Gold.
On the woodgrain I applied a generously thick layer of texture paste and after sprinkling gold embossing powder heat embossed it almost immediately while the texture paste was still wet.
 |
 |
| Mixed Media Supplies |
I love working with clay and used a Plaid Silicon mold to make the little bird's nest. Painted on the spots using Sharpies[ now available at Crafters Corner]
 |
 |
 |
 |
| Mixed Media Supplies |
This gave a more raised texture to the stencilled area.
The matching music note was created by using 4 layers of a Spellbinders die cut and heat embossing it with gold embossing powder.
And I am especially proud of the roses which I made using sheets of Sola wood[ will be sharing Tutorial soon on my blog]
 |
 |
Creating Cool Effects with Crackle Paint and Stencils
Carabelle Studio Vitrail Stencil
Distress Inks
Distress Crackle Paint Clear Rock Candy
 |
Use your favorite Distress Ink or Inks on the taped stencil.
Do not use thin paper for this technique but use thick card stock.
Once your Distress Inked background is dry , with the stencil still taped in place gently brush on Crackle paint .
 |
 |
 |
 |
 |
 |
 |
Creating Cool Effects with Distress Inks and Spraying
Supplies |
Sponge Distress Inks onto your stencil taped on cardstock
Without allowing time to dry, spray on water or Lindy's pearlescent spray
Letting only a few moments lapse, blot the paper with tissue paper
You will get a cool mottled look due to the fabulous reaction of Distress Inks with water.
And now look at your Tissue paper....you will have the negative of the stencil design imprinted on your stencil...This goes by the fancy name of Reverse stencil effect!! Cool and easy wasn't it!
 |
 |
 |
 |
 |
Creating Effects with UTE Powder
 |
Tip : Use good quality thick card stock for this technique. It wont work on flimsy paper.
Dab your background with Versamark Ink pad either with the stencil in place or with out the stencil depending on the coverage you desire and sprinkle on a generous amount of UTE Powder and heat emboss.
You will get a cool water effect !
 |
 |
 |
Creating Textures with Multi Medium and Distress Glitter
Stencilling with inks alone can be so much fun but how about combining some simple ingredients to create gorgeous textured effects!
Supplies :
Stencil : Carabelle Studio Effet Bois
Inks :
Ranger Archival Inks Coffee...alternately use any brown ink you like
Medium : Ranger Multimedium Matt :This medium is simply fabulous to use with stencils and particularly suited for this technique as it has a lovely fluidity , has amazing adhesive quality and dries absolutely clear. Alternately experiment with any other liquid adhesive.
Glitter : Ranger Clear Rock Candy Distress Glitter . Alternatively use any fine glitter you have but the distress glitter is simply amazing !
Secure the stencil to your paper with tape.Ink the stencil with brown ink. Let it dry. Take Ranger Multi medium Matt on your
palette knife and spread it onto your stencil.This medium is like a gel and smoothly spreads. Dont stress out on trying to cover every nook and cranny!
Lift the stencil off your paper and here is how it will look like. I was amazed the medium had not oozed all over but stuck to only the stencilled areas.
Transfer the paper on to your preferred surface for glittering. I used my favorite
funnel tray which I told you about in my previous post on Stencils Techniques. Sprinkle on Distress Glitter and leave it to dry
Dust off the excess distress glitter only once it has dried
Once it is dry....look at the amazing glittered texture you have achieved!!
It's amazing to look at and the light reflecting on it just makes it shimmer so beautifully !
Leaving some of areas un glittered can highlight the textured effect even more beautifully !
And in the photos below you can see the contrast between a simple woodgrain stencilled look and the gorgeous textured look!
Here is a tag with only an inked wood grain stencil
And here is the glamorous textured glittered one!Isn't it truly gorgeous !!Hehe pardon me sounding like an advertisement...I simply loved this effect hence the overenthusiasm!
Apply a nice generous uniform layer of embossing paste over the stencil
Tip : Do not scrape off excess paste while the stencil is on your project but remove the stencil and place it on another surface before you scrape off the excess paste and transfer it back to your jar.
The black embossing paste is amazing to look at!
Once the stencilled design is dry, stencil on more texture using a contrasting white texture paste
Here I used the beautiful Carabelle Studio Geometry stencil to add corner elements to my altered box
Love how the black embossing paste holds its shape so magnificently!
The stencilling effect was so cool I only had to add a few flowers and leaves as a final touch!
The Taj Mahal is a stencil I picked up from the market years ago and lits iterally falling apart now so I guess this may well be its last crafty outing ! [ It was featured on my blog way back in 2011 : Stencil Art Tutorial ]
Do tell me how you liked the post.
 |
| Texture Creation Tutorial |
 |
| Texture Creation Tutorial |
 |
| Texture Creation Tutorial |
 |
| Texture Creation Tutorial |
 |
| Texture Creation Tutorial |
 |
| Texture Creation Tutorial |
 |
| Texture Creation Tutorial |
 |
| Texture Creation Tutorial |
Here is a tag with only an inked wood grain stencil
 |
| Texture Creation Tutorial |
 |
| Texture Creation Tutorial |
Creating Textures with Texture Paste and Embossing Paste
Supplies
Stencils :Carabelle Studio Geometry
Ranger Texture Paste
Dreamweaver's Matt Black Embossing Paste
Creative Expressions Sue Wilson Faux Quilled Leaves
Cheery Lynn Rose Leaf Strip
Heartfelt Creations Botanical Wings die and stamp
 |
I can't let a post on textures go without sharing a technique with the fabulous Dreamweaver's Black Embossing Paste. Here I used Stencils and Texture pastes to alter a box to create a simple but elegant design.
 |
 |
 |
 |
 |
 |
 |
 |
 |
Regards


