The picture below shows the dome of the lantern with a large red diamond and a tiny hook to help hang the lantern. I dressed up my lantern with delicate lacey bows made with the new Sue Wilson Filigree bow die! These are
I actually wanted to make a "Diwali Lantern" but I must have been thinking of Valentines day and Christmas combined as I added a dangling heart and made a Christmas theme colored lantern!
which are part of the latest embellishment collection Shalini has brought into the store!
You dont really need to use the same dies I have used in this tutorial ---just sharing the pictures so that the same principles can be adapted to a shaped die cut / punch you may be already having and you can even apply the same principles to hand cut pieces.
 |
| Gazebo tutorial |
These are the 2 dies from the Marianne Petra Corner Die set I used to make the dome of the Gazebo.
 |
| Die cut |
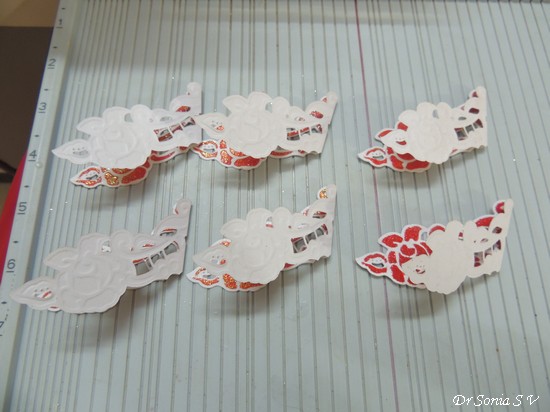
Here is the die cut "unadorned" and using the techniques I shared in the
Fun with Dies post here is how it was transformed after inking and heat embossing!
 |
| Inked and Embossed |
I cut and heat embossed 6 of the above die cuts and folded them in half as shown below. As I said don't despair if you don't have the exact die I have shown-- you can make a gazebo dome using a humble circle shape too and use it as a base to make the rest of your Gazebo! [See tutorial to make a 3 D structure using Circles :
Easy Paper decoration tutorial ]
 |
| Folded die cuts |
Apply glue to half of one folded die cut shape and stick to half of another one as shown below
 |
| Stick Die cuts |
Stick all 6 pieces and your dome is nearly done.You get a fairly lovely shape even if you use only 5 die cuts but I found working with 6 made the rest of the 3 D construction easier [ like placing the pillars] !
 |
| Gazebo Roof |
Before you stick the last 2 pieces, add a hook if you plan to hang your lantern. I used a long jewelry finding and threaded a large bead on one end and made a hook on the other end.Later on I added a dangling heart to the hook on the inside and a pearl- ruby to the hook on the top.
 |
| Gazebo dome |
To complete the Gazebo roof, I used the Marianne die cut shown below.It looks rather plain doesn't it..well instead of inking and embossing , I took a shortcut!
 |
| Marianne Petra Corner |
I know many of you will already be embossing your die cuts with the Bigshot/Cuttlebug...well this was the first time I did it ! So sharing yet another way to explore the maximum potential of your dies!
 |
| Die cut embossing |
Place the die cut within the die itself [on your acrylic cutting plate]and place a Spellbinders Embossing pad atop it and then your other cutting plate.
 |
| Die cut embossing |
Just one run through your big shot and you will get beautiful embossed impressions on your die cut as shown below.
 |
| Die cut embossing |
Before I got the embossing pad, I tried to emboss die cuts with thick felt and even foam-- I did manage to get some amount of embossing but my foam/ felt spoilt and disintegrated real fast and on comparison the embossing was not as deep and beautiful as what I got using the proper Spellbinders Embossing pad.
 |
| Embossed Die cut |
To give sturdiness and complete the Gazebo roof ,attached 6 of the above die-cuts between the arms of the basic frame made earlier.
 |
| Gazebo |
Here is the aerial view of the Gazebo roof showing the pretty dies and bows.
 |
| Sue Wilson bows |
Here you can see the dangling heart and pearly beaded sprays [See
Easy Beaded Spray tutorial ]
 |
| Hanging Heart |
Embossed 6 of the 3rd design in the Marianne Petra die set and folded them into little "crowns" as shown.
 |
| Marianne Petra Die |
Glued the "
legs" of the die cuts together so that they literally stood up to embrace my tea light!
 |
| Lantern tutorial |
Stuck the Marianne design arrangement atop a circle ,leaving enough space in the center to fit in a battery operated tea-light.
 |
| Tattered Lace die |
I used a
Big Bite to punch a hole in the center of a Tattered Lace rose [ I love this die--- even though it is so delicate and detailed it cuts like butter!] and fit it atop a battery operated tea light.
 |
| Tea light |
Here is the lighted up tea light!
 |
| Lantern tutorial |
Made pillars using corrugated paper and stuck it to the base circle.
 |
| Lantern tutorial |
Stick the top of the pillars to the Gazebo roof. You can wind a piece of card/ corrugated paper around the base circle and pillars to make your base sturdy and strong.
 |
| Gazebo tutorial |
Tip : Obsessing a bit about symmetry, gluing and re-gluing is the key to building a good looking and sturdy Lantern/Gazebo! Working with 6 eg :6 spokes on the roof, 6 pillars, 6 sides etc makes it easier to build a symmetrical 3 D structure than working with 5 !
 |
| Gazebo tutorial |
Phew that was a super long post but I do hope you enjoyed my first DIY Lantern ,and hoping some of the principles shared will come in useful to help you make your own Diwali /Christmas Lantern for the upcoming festive season.
Do tell me how you like it.


