Followers

Showing posts with label Layout. Show all posts

Wednesday, 30 May 2018

Mixed Media Layout- Enjoy Today (with Step-by-Step Pictorial)

Hi folks!
Good Morning :)

For today's post, I've shared a Mixed Media Layout titled "Enjoy Today" and there is a Step-by-Step Pictorial as well :) The inspiration for the layout came from a photo of coffee, I simply love coffee, so I knew I had to create a layout around it. For me, coffee time is "me" time. I can sit, relax, be quiet for 5 minutes, sip my beverage, think & forget about other things. I wanted to remind myself that it is important to delight in the little things in life that give us joy & enjoy them today, to "live in the moment".

So let's get started :)

Mixed Media Layout- Enjoy Today


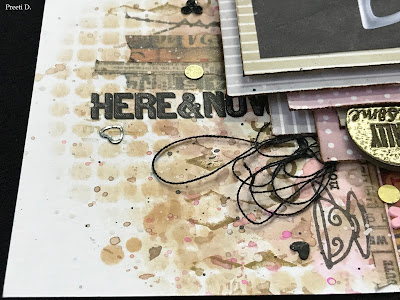
Here Are the Close-up Photos (to Show the Details):


Step-by-Step Pictorial:
(All the products used are linked to the Crafters Corner Store at the bottom of the post, if you wish to explore/shop)

1. On a sheet of  Dress My Craft's 12 by 12 sized Floral Oriental Collection White Cardstock, first applied white gesso to prep the page for mediums. Then I did ink smooshing to add color, by using different mediums. I used distress inks, Lindys Sprays and Zig Markers here. This card stock is meant for flower making so it takes water and mediums very well. I was happy that it did not warp at all. 


2. Created photo mats using papers from Dress My Craft's Dots n Stripes Paper Pack, distressed their edges and darkened them with distress ink to give better definition 

3. This is how the background looks after color is added, I also created a lot of ink splatters using a small sized brush. (Tip: Always keep tissues ready while doing any mixed media work, to quickly dab away excess color or errant drops)


4. Adhered the mats to the photo and created dimension between some of the layers by using 3d foam tape 


5. Added background stenciling using Tim Holtz stencils and distress ink 


6. Added vintage design washi tapes to the layout for visual interest


7. Did background stamping with multiple stamps using 3 shades of archival inks (browns and black)


8. To add more details to the layout, I used Tim Holtz rub ons, these are a great way to add quotes/text to difficult to reach spots, where stamping isn't possible. It is very simple to use them, just peel the backing paper, rub over the desired quote with the ice cream stick, a few times, putting a lot of pressure and poof, the quote transfers like magic! 


9. Heat embossed Dusty Attic Chipboards for the titles. (Heat embossing chipboards gives them added dimension and shine)


10. In the end, added Tim Holtz chit chat stickers, a little thread for texture and embellished the project with Dress My Craft Little Hearts and Sequins (used glossy accents to stick them) 


Products Used:
(All these can be bought/pre-ordered from the Crafters Corner store)

13. Mudra Craft Stamps- Simply Alpha (pre-order)
14. Dylusions Stamps- Basic Backgrounds (pre-order)
27. Lindys Gang- Midnight Bronze Embossing Powder (pre-order)
28. Dusty Attic Chipboard- Page Pebbles #8 (pre-order)
29. Dusty Attic Chipboard- Word Pack #29 (pre-order)
30. Tim Holtz Idea-Ology- Small Talk Stickers (pre-order)

That's all for today :)

If you'd like to check out my blog posts (in the series of Beginner's Guides), please click on the below topics.


Also, if you'd like to check out my creative project posts with pictorials, please click on the below topics. 


As always, we love to see your gorgeous creations using supplies from the Crafters Corner store, so please do share them with us in our Facebook Group- Crafters Corner Showcase using the apt hashtags #craftwithcrafterscorner #dressmycraft #crafterscornerindia, on Twitter and/or on Instagram. And please remember to like/follow Crafter's Corner Facebook Page, Instagram & YoutubeAccounts for updates on sales, giveaways, free tutorials and new product information. 

Hope you have a great day!
Thanks a lot for your precious time :)
Stay Blessed!
Preeti Datta
Blog
Instagram

Friday, 9 March 2018

Easy WaterColor Background Canvas layout

Hello friends!
I have a Easy Water Color Canvas to share today which I made for baby girl.
When I start with canvases my very first steps are something like this, so... to all those people who want to start with mixed media / light Color / Watercolor .. Here you go. Give this a try and you will love it :)


Step 1: Canvas Size 8 x 10 inch, I prepped the surface with some Gesso 

Step 2: Use any flower design stencil to get  beautiful texture look :) 


Step 3: Then i start coloring with Prima water color: I choose Only 2 shades of colors 


Step 4: I used the ball pen for highlighting my texture.


Step 5: I stamped the random area of my canvas.


Step 6: I select few beautiful stuffs from stash for decorating my canvas. 


Then Finally


How is it, Isn't this really easy?
Try it out and Share your beautiful creation
I hope you liked my project.
Have a great Day
Hugs
Suzna
 
Supplies Used

Liquitex Modeling Paste Acrylic Gel Medium
Floral Frames - Chipboard Cutouts
Wildflower #3 - Chipboard Cutouts
Magnolias - Stencils
Acrylic Tube - Gesso
Prima_marketing Flowers
Messy - Stamp
Gabi’s Texture - Stamp
Watercolor-14-color-set
Kuretake-gansai-tambi-set-assorted-Water colors

Saturday, 24 February 2018

Mixed Media Canvas & Layouts: Guest Design Post by Preeti Datta

Hi folks!

Preeti Datta (aka Dutt Preety) here. Good Morning :) 
I am thrilled & honored to be back on the Crafter’s Corner Blog as a Guest Designer. 
Very grateful for this opportunity. Thanks a ton to Shalini di & the whole team at Crafters Corner.

I will be sharing 3 projects today; a Vintage Themed Mixed Media Canvas & 2 Mixed Media Layouts. 

I’ve used Dress My Craft's gorgeous products: Stencils, Glitters, Beads, Papers, Flowers & other craft supplies from the Crafter's Corner store

Let's get started. 

1. Vintage Mixed Media Canvas- "Dream"


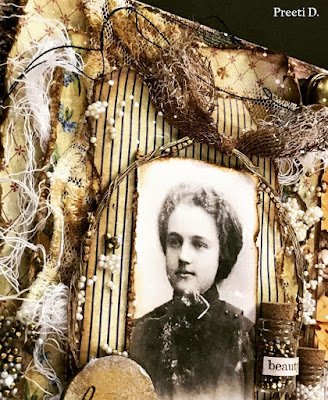
Here are some close-up photos to reveal the intricate details :- 


Collage of the Process Photos: 


Synopsis of the Process: Prepared the canvas (10 by 8 inches) with Prima's Heavy White Gesso and added texture through DMC's Swirls & Couture Fashion stencils & Prima's modelling paste. Created the composition in the background with laces, then added color with Lindy's sprays. For more texture & details, did background stamping with a Prima stamp & Potting Soil Archival Ink, added DMC's pearl micro beads, golden antique beads, DMC rainbow glitter using Prima's 3d Matte Gel, made a wire embellishment with DMC's golden antique beads & prepared the Dusty Attic chipboards by heat embossing them & adding some DMC rainbow glitter chunks to them. Also, added tiny glass bottles with DMC's pearl micro beads, golden antique beads, stickers, thread, antique brads & rolled up book paper cigars. For creating the layers, used papers from DMC's Teenie Weenie Paper pack, fussy cut elements from DMC's motif sheets, added gauze & lace. In the end, created ink splatter, distressed the edges of the canvas with Vintage Photo Distress Ink & added a little shine using Inka Gold & Prima waxes.

2. Mixed Media Layout- Celebrate


Here are some close-up photos of the layout:


Collage of the Process Photos:

Synopsis of the Process: Prepared the base with Prima's Heavy White Gesso & then applied Prima's Modelling Paste through DMC's Alphas Stencil. Added color using ink sprays & distress inks/oxides. Added more interest to the background by stamping with archival inks & sponging on distress oxides through DMC's Thumb Print & Couture Fashion Stencils. Then prepared the elements for layering & embellishments by using DMC's Dots N Stripes Paper Pack & Motif Sheets. Further, gathered all the elements for layering like flowers, die cuts, laces, twine, gauze, DMC's 3D Fairy flowers (altered the color by applying gesso and then coloring with sprays) pollens etc and created a composition. In the end, added texture & shine to the flowers and in places around the layout, using DMC's Pearl Micro Beads, DMC sequins, Little Hearts, Rainbow Glitter, Microfine Glitter Powder & Rainbow Glitter Chunks using Prima's 3D Matte Gel. 

3. Mixed Media Layout- Dream Big


Here are some close-up photos of the layout:


Synopsis of the Process: Prepped one of the Pattern Papers from DMC's Hydrangea Lawns Paper Pack with Prima's Clear Gesso and applied Prima's Modelling Paste through DMC's Thumbprint Stencil. Then added  DMC's Rainbow Glitter & Microfine Glitter Powder to add sparkle to the background. Sprayed on a spray sealer (to bind the glitter to the layout better) then deckled the edges of the paper & adhered it to other deckled & distress edged papers to create a layered 3-D look.  For the main composition, used DMC's 3D Fairy Flowers, twine, gauze & die cuts. Fussy cut the butterflies & titles from DMC's  Motif Sheets. Did background stamping & added color to the background with ink sprays. Added texture & shine to the flowers and in places around the layout, using DMC's Pearl Micro Beads, Golden Antique Beads, DMC sequinsRainbow GlitterMicrofine Glitter Powder & Rainbow Glitter Chunks using Prima's 3D Matte Gel. In the end, created white ink splatter. 

That's all for today :) 

In case, you'd like to check out my first GD post where I shared 8 Simple Mixed Media Cards (using DMC stencils & glitters), please click HERE.

I'm very grateful to Crafter's Corner for this experience. I had so much fun playing with the supplies. I highly recommend that you check out their website, HERE and also, their brand- Dress My Craft for it’s Stencils, Glitters, Sequins, Flowers, Pattern Papers, charms, miniatures etc They have a plethora of cool options to choose from. Buy a few to try them out, experiment and see the quality for yourself. I'm sure you'll love them :) 

Please don't forget, there is a great deal on DMC stencils via a Grab Bag Offer,wherein you can pick up all 12, A4 sized DMC stencils at a discounted price, please click HERE to check it out. 

Have a great weekend!
Thanks a lot for your precious time :)
Stay Blessed
Preeti Datta
Blog
Instagram