Followers

Showing posts with label dcwv garden party. Show all posts

Thursday, 24 January 2013

A paper Birdhouse

Hi Everyone,
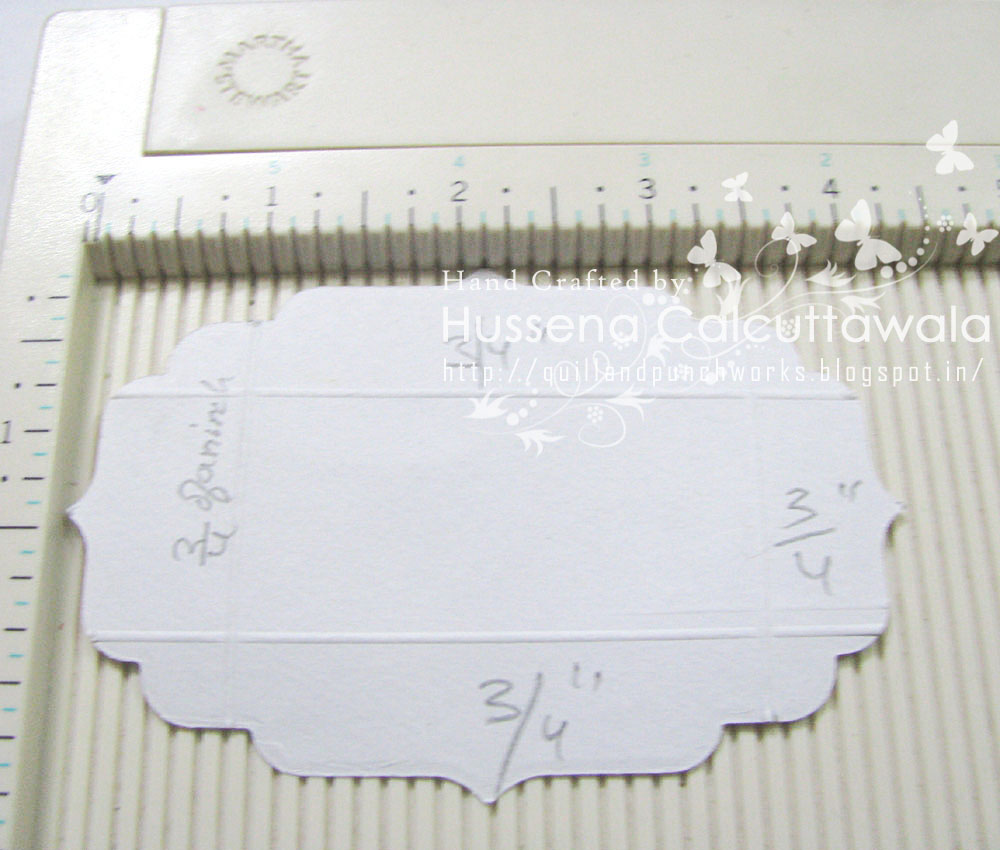
Hussena here to share with you my inspiration for our this time's Challenge # 4 which is "Anything but a Card or LO "....Well like my title suggest I am sharing a birdhouse completely made with paper using a template I found online in Pinterest ...And thought  this could make a perfect Valentine gift for your loved ones...It has a detachable roof & you can store candies ,small cards or message tags inside this & any personalised item of your choice..Its quite spacious that way :)..So here's a look at what I have created :-

                                                       
And a side view of the birdhouse :-


And showing you the inside of the birdhouse with the sentiment placed (Unfortunately could not get a better picture of this!) :-

                                                          
Supplies used :-
Pattern Paper- DCWV Garden Party Stack (Crafter's Corner)
Martha Stewart Doily punch - (Crafter's Corner)
Cheery Lynn Olive Branches- (Crafter's Corner)
Distress Inks :Tim Holtz Broken China ,Shabby Shutters & Vintage Photo (Crafter's Corner)....Used the Koi Brush & Distress Inks to color the Leaves & the Flowers in the foliage .
Flowers -Handmade using Punch Bunch Plum Blossom (Crafter's Corner)
Sentiment -Studio Calico Alphabet Stickers
Bird -Paper Pieced from DCWV Pattern Paper (Available at Crafter's Corner)
Butterfly ,Charm & Pearls -Stash

Hope you all like my birdhouse :)...If you have any questions regarding any of the products used then do leave me comment and I will get back to you or you can mail Shalini at : mshalini79@yahoo.com

Do play along our challenge this time to win some awesome Magnolia magazines & a chance to be in the Top 3 or the Random Winner :)

ETA : Here's a link for the free template :http://papercraftinspirations.themakingspot.com/blog/free-birdbox-gift-box-template

Hope this helps :)

www.crafterscorner.in(All craft supplies under one roof)
For further information please mail us at :info@crafterscorner.in

Have a nice day everyone!                                                   

Monday, 14 January 2013

A mini -treat box tutorial..!!

Hi everyone,
This is Hussena here & I am sharing with you all a tutorial for making a mini treat box perfect for gifting this Valentine or your preferred occasion...This is a very easy to make box & you will have loads of fun embellishing it in your own way....So here's a look at the box I have made :-


      And the top view of the box :


Supplies used for this BOX :-
Base CS -Stash
Lid is made using DCWV Garden Party Stack Pattern paper. -Crafter's Corner
Mulberry flower & leaves- Crafter's Corner
Red heart & small flowers -Colored using Tim Holtz Festive Berries Distress Ink -Crafter's Corner
Leaves & foliage -Colored using Memento Bamboo Levaes &  Tim Holtz Vintage Photo Distress Ink.
Dies:
Cheery Lynn Fanciful Flourish -Crafter's Corner
Cheery Lynn Olive Branches- Crafter's Corner
Cheery Lynn Exotic Butterflies (Small) -Crafter's Corner
Alphas & small hearts -Simple Stories
Small flowers -Stash


Now for the TUTORIAL  :

Supplies used :-
Martha Stewart Scoreboard
Fiskars Sure cut trimmer
Cardstocks of your choice
 Spellbinders Label 4 die
Double sided tape
Scissors

Step 1 - Take a piece of cardstock measuring 5- 1/4 inch * 7 -3/4 inch.

                                                               
Step 2 - Then placing the cardstock long way score it at 1 -1/4 inch , 3 -5/8 inch , 4 7/8 inch & 7 -1/2 inch.

 
Step 3 -Then flip the cardstock the other way & score at 1 -1/4 inch to make the bottom.      


Step 4 - Now ,cut the below scored line as shown in the picture below.

Step 5 -Glue the two sides of the box as shown below .

                                         
Step 6-Fold all the scored lines & glue the bottom flaps.

 
Now for the LID :

Step 1-  Take the second largest label die from the set ...It will measure approximately 4 inch * 2 -3/4 inch.


Step 2- Now score the die at 3/4 of an inch on all sides...This will fit the box perfectly giving a nice decorative edge to your lid..You can work with other shaped dies also as long as you work out the measurements for the box  against the die measurements....There are many possibilities with this kind of lids.


Step 3 - This is how the lid will look after you have scored and glued it on all four sides.


Step 4- To give you an idea how the box looks with a lid I have added to it .
                               
                                     
Hope you all like my tutorial ...If you have any doubts or queries regarding any of the steps or products used do drop me a comment & I will get back to you as soon as possible.

Don't forget to participate in our current challenge -'Anything but  a Card or Lo "...There is amazing Magnolia magazines up for grabs..:)

www.crafterscorner.in (All craft supplies under one roof)
For further information please mail at : info@crafterscorner.in    

Have a nice day everyone!                                                                                                                                                                                                                                                                       

Saturday, 22 December 2012

3d Box Card


Hi 
Shalini Pahwa here. I really enjoyed working on this card. I had used Ek success Punch Intertwined Arches on the border, and cut the window using Spellbinders Die Labels Seventeen, for butterfly i had used marrianne die Vlinder3 . Pattern Paper DCWV Garden Party Paper StackStampmulberry flowersmartha stewart punch monarch  butterflymagnolia lovely fence die, On mulberry flowers and on the card edges i've used Tim Hiltz Distress Ink-worn lipstick, for stamping i've used Ranger Archival waterproff ink-black.
Cream based paper with window cut i had made a background using stamps.
All these products are available at http://www.crafterscorner.in and some amazing offer on Martha Stewart, Ek Success punches and Spellbinders Dies. So order sooon before its is out of stock!!!!


Hope you will like my creation and don't forget to participate this month challenge-Make A Set
and the winner will receive 12x12 fiskar stamp.

Have A Nice Day!!!
Happy Crafting!!!

Tuesday, 18 December 2012

Card & Box Set and a Tutorial !!

Hi everyone,
This is Hussena here to share with you all a box & a card set...Keeping in mind this time's challenge theme which is Challenge # 3 "Make a Set"...So here's a look at what I have made :-

 
 A look at the box again :
                                                                     
Supplies used for the box :-
Base CS  -Stash
Pattern Paper- DCWV Garden Party Stack (Crafter's Corner)
Martha Stewart Doily punch - (Crafter's Corner)
The flowers & the small brown butterfly -Paper pieced from the DCWV Garden Party stack(Crafter's Corner)
Fiskars Good times Stamp -Crafter's Corner
Distress Inks used : Shabby Shutters & Broken China (Crafter's Corner)
Butterfly Die : Cheery Lynn Exotic Butterflies (Small) (Crafter's Corner)
Pearls & Ribbon- Stash

Supplies used for the Card :-

Base CS- Stash
Pattern Paper- DCWV Garden Party Stack (Crafter's Corner)
The white Cs is Embossed using -Marrianne Designsables Embossing Folder- Daisy (Crafter's Corner)
Martha Stewart Doily Punch (Crafter's Corner)
Distress Inks used : Shabby Shutters & Broken China (Crafter's Corner)
Butterfly Die : Cheery Lynn Exotic Butterflies (Small) (Crafter's Corner)
Flourish Die : Cheery Lynn Fanciful Flourish  (Crafter's Corner)
Tag Die :Spellbinders Ribbon Tag Trio -(Available at Crafter's Corner)
Blue Mulberry rose &  Leaves-( Crafter's Corner)
Ribbon -Stash


And now for the Tutorial for the box ...Its really a very simple & easy to make box tutorial ...And this is so perfect for holding small note-cards ,tags ,chocolates & as it is in  the Indian tradition even some cash for all occasions....So firstly let me get to the supplies you will require for this :-

                                                   
So as you can see the basic supplies that yu will need is some atleast some 12 * 12 inch cardstocks of any color , Paper Trimmer (Fiskars) ,Scoring  Board (Martha Stewart)  Border Punch (Martha Stewart Doily Punch) ,Ink for Stamping (Memento Tuxedo Black),Distress inks (Ranger) Blending tool  ,Good pair of scissors ,Double sided tape ,Some strong adhesive .

And now here goes the tute for it :-

Step 1 : For the Base Box : Start with a 7 1/2 inch * 6 inch piece of CS.


Step 2 :Score at 1 inch on all four sides of this CS.


Step 3 : With a pair of scissors put cuts on all four sides at the 1 inch mark as shown in the picture below :

                                                                         
Step 4 :Fold on all the four sides where you have cut out the tabs at the 1 inch :

                                                   
Step 5 :Glue all the four corners together using double sided tape or an strong adhesive :


Now for the lid of the box :

Step 1 :Take a 9 1/2 inch * 6 inch piece of CS & score at 41/4 inch & 51.4 inch.
                                          

Step 2 :Fold the scored ends using your scoring tool & the lid will look something like this :


Step 3 ;now stick the box to the base of the lid  keeping it in centre as shown in the picture below :

                                                   
Now the measurements of the Band which goes over this box :-

Step 1 : You will need 11 1/4 inch CS by 2 inches &  you have to score at 1 inch ,5 1/2 inch ,6 1/2 inch ,10 3.4 inch & 11 inch & glue it.

                                                                                                                                                                       
 Step 2 : After you glue the two ends of this CS ,it forms a perfect band which will go over the box easily ,but  before you stick the 2 ends of the band ,it would be better if you embellish it with pattern paper of your choice :


Now here's a look of the finished box with its band removed ...Its a perfect size for the card I have made which nestles into it :-

                                                         
 As you can see I have embellished my box using punched laces ,pattern papers & few other thing of my choice !!...You can create these boxes for any theme you want & these could make lovely gifts for your near & dear ones especially for the upcoming Christmas season as well!...Hope you all like the tutorial & if you have any doubts..Do leave me a comment & I will try & get back to you as soon as possible.

Most of the products I have used here is available at Crafter's Corner & Shalini is offering some really fantastic discounts on the Martha Stewart & Ek Success Punches...Make sure you check them out & place your orders before they are out of stock :)
www.crafterscorner.in (All craft supplies under one roof)
For any information please contact a : info@crafterscorner.in                                                                                    

Monday, 22 October 2012

CELEBRATING LOVE

Hello!!Hello!!Hello!!
my crafty friends,Kavitha here to share another dose of inspiration with you all and of course based on our challenge theme  Flower's and Celebration.

  I have made a card with lots of supplies that are available in crafters corner(what's not available??hehe).
I have used lots of liquid pearls in this card which is a new product in our store.There are endless possibilities to use them,but i am showing the basic thing for which they are meant for,yes making beautiful pearl effects with them.Liquid pearls dries as it is,that is they never go flat even after it dries.SO you can add some beautiful pearls to your project within minutes.Yes,the whole thing i have done around the die cut just took me 2 mins,inst it great.I am sure arranging real pearls will take more than 20 mins.And you can also create various size pearls with just one tube and these are also available in different colors.

Other supplies i have used are papers from DCWV garden party,beautiful die cuts from spellbinders-asian motif and Marianne leaves,Fiskars  Lasting love quote stamps,Beautiful curly mulberry roses and chipboard accents which all are available only at crafters corner at very reasonable rates.


 Hope you liked my inspiration,finally i want to thank you all again for showing us immense love and support:)
Keep them coming:)

If you have any question or doubt  regarding  any of the products used please drop in a comment or mail us at mshalini79@yahoo.com and Shalini will definitely get back to you soon!!

Happy crafting,


Friday, 19 October 2012

Flower's and Birthday wishes

Hi friends,
                Hussena here bringing you another inspiration for our current challenge at Crafter's corner which is Flower's and Celebration .This time I am sharing a card with you and I have done some stamping and layering on it.... and here's a look at it first :-

          And now a look at the insides too :-
                           
Supplies Used:-
 For this card a lot on my supplies are from Crafter's Corner....The Patttern paper is DCWV Garden party. It has some of the most beautiful paper's in it with delicate blossoms and butterflies and humming bird design ,I  used this paper as the base and  also fussy cut it to use as the scallop border lace and also have fussy cut the butterfly from this paper........I have then  layered it with a Spellbinder's Asian motif Die which is also available at Crafter's Corner...in fact Crafter's corner has some of the most extensive collection of dies at very reasonable prices :):) so do check it out!!! The peach flower and mulberry leaves are also from Crafter's corner they have recently stocked some beautiful Curly mulberry flowers and leaves you can check them out Here   I have used Martha Stewart daisy punch to create my border both outside as well as inside....I have used Memento Rich Cocoa to distress the edges as well as to stamp the sentiment.      

                          Hope you all like my card and if you have any question regarding  any of the products used please drop in a comment or mail us at    mshalini79@yahoo.com   and Shalini will definitely get back to you soon!!

                             And  I would like to Thank all our followers for the support and encouragement you have shown towards us and for all the wonderful enteries you have been submitting for our challenge :)    

                                 Have a Good day everyone :)