Followers

Showing posts with label Hussena. Show all posts

Saturday, 14 September 2013

Make a wish !

Hi Everyone,
Its Hussena here again to share with you a card  for our current challenge set by our DT member Mallika .Its quite an easy peasy one 3 2 1 .Where in  you have to use 3 different  embellishments,2 pattern paper's and 1 sentiment on your project.So based on this I am sharing a shabby chic card with you all which is what I seem to be making these days :) So here's a look at it :                                                              
                                                             
And here's another view of the card :                      
                     
I have used two different pattern papers from 2 different companies.The pale pink striped one is from Webster's pages where as the pale blue chevrons is from the MME Indie Chic Citron collection.
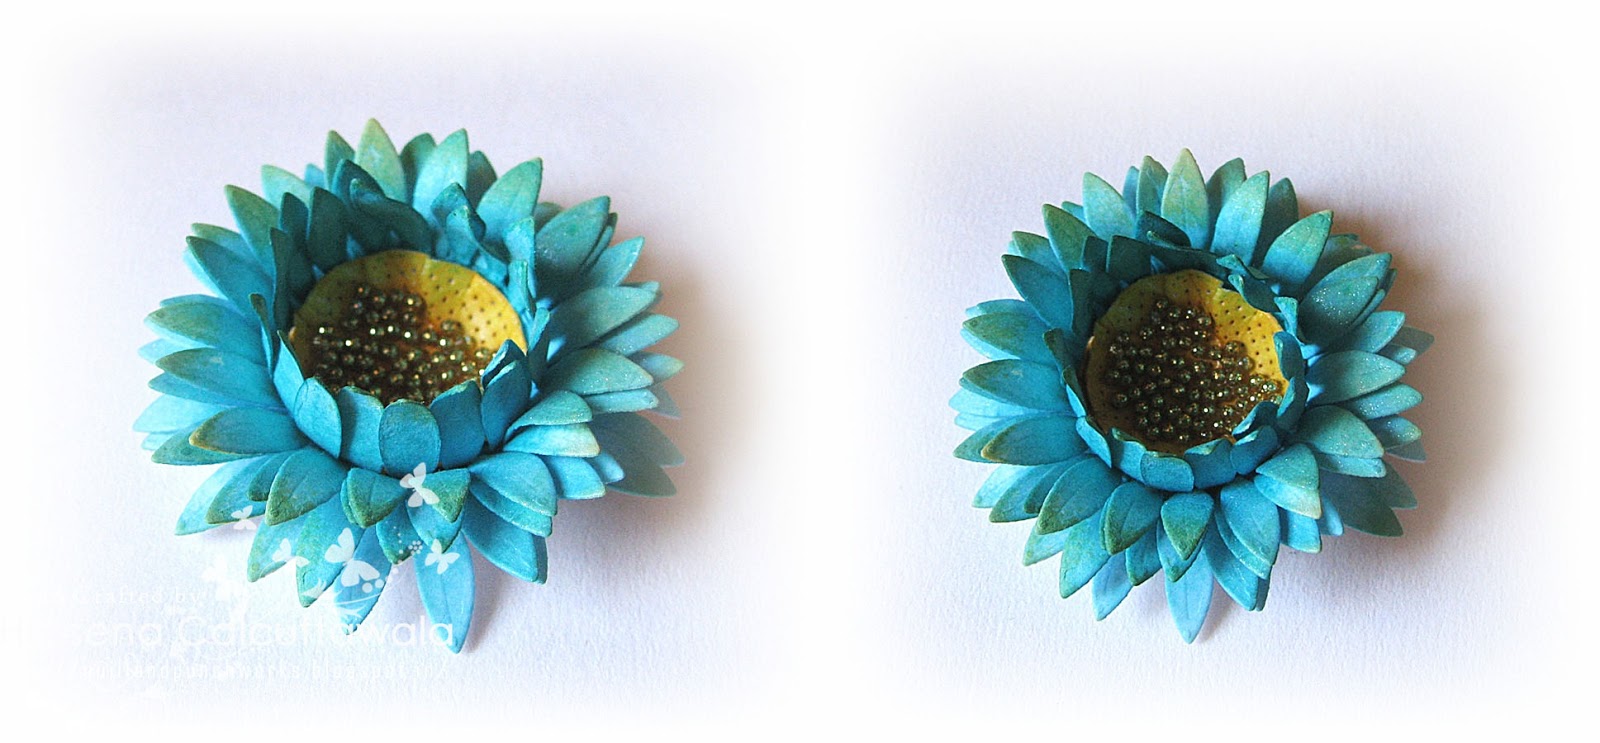
The blue flower again is made from Spellbinder's Rose creations die using Broken China Distress ink and the leaves and the foliage are also from Spellbinder's Foliage ides.
I have distressed the paper to give it a soft look and used the tulle to form the base of the frame. I love this combination of the Spellbinder's Fluer De Lis square die and the tulle. So soft and beautiful !
I am listing all the supplies for the card below. Please take a look.

Supplies used :
Pattern papers -Webster's pages, MME Indie Chic Citron .
Dies :
Spellbinder's Fluer De Lis Squares ,Spellbinder's Classic Square dies, Spellbinder's Rose Creations die, Spellbinder's Foliage die.
Memory Box Vintage Bird cage die, Memory box Nestled Bird.
Punches :
Martha Stewart Doily Lace punch.
Punch Bunch Blossom punch.
Stamps & Inks :
KaiserCraft Happy Birthday stamp.
Versafine Onyx Black Ink pad.
Distress inks -Broken China, Spun Sugar,Vintage Photo and Shabby Shutters.
Ranger Super Fine Clear Embossing Powder
Rose buds, Pearls and Tulle.

Do let me know your comments/suggestions regarding my card. Would love to hear your views on it :)

Please do play along our current challenge 321. There are some exciting prizes to be won this time!
And if you have any queries regarding any of the products used, do mail us at : info@crafterscorner.in
Have a nice day everyone!

Saturday, 24 August 2013

Some fun techniques with Lindy's Stamp gang mists!

Hi friends and fellow crafters,
This is Hussena here and this time it's my turn to share some fun techniques using the Lindy's sprays which is also our Product of the Month..As you all know,Pallavi has already shared a detailed review about what the Lindy's sprays are all about..They mainly come in four forms..One is the 'Starbursts',second is the 'Moonshadow',the 'Glimmer Spritz' and the Magcial's which is a powder form..The techniques I am sharing with you are really simple ones..But they do give some beautiful results..This is just to show you what different things you can do with your sprays besides using it in Mixed Media where you mix with the background to create your projects.
1. Emboss Resist.
For this technique,first take a piece of Cardstock,preferably water-color paper and distress it using any Distress ink of your choice..                                              
After you distress it,dry it completely using a heat tool or you can let it air-dry..Then,using a background stamp and the Versamark Embossing ink stamp on the distressed piece.                                                    
Then,sprinkle the embossing powder over the inked area and heat emboss it using your heat tool.
Then,choose the Lindy mist of your choice and spray completely over the embossed piece giving it a good coverage and wipe off the extra droplets and then using the same color distress ink which you had used earlier (In my case Scattered Straw),distress your panel again and you'll notice a beautiful background which also has a very beautiful shimmer to it!                                                                   
Here are the different background's I have created using this technique :-                                                     
And the close-up of these panels..Can you see hot they shine when the light hits it ? :-                                         
                                                             
2.Next technique,'Coloring your flower's using the Lindy's sprays'.

Take any color of the starbursts spray and spritz some of it in your palette...Then take any paper flower of your choice and using your paint brush color your flower's front and back...When it dries you will notice that not only the flower's are vibrant in color but they also have a dazzling shimmer to it..For those who love all things glitzy,they should totally try this :)


3. And the third technique I am sharing is 'How to color your ribbon' 

This is pretty simple ,just take your seam-binding ribbon,spritz some water on it to wet it,then scrunch it up and spray it liberally with  the Lindy starburst spray of your choice..You will instantly get a bright ribbon to match with your project as this dries really quickly and again it has a shimmer base to it                                 

Finally,ending my post with a tag I have made using all the 3 techniques that I have shared..I know the layout of this tag is quite similar to the one I had shared earlier..But right now,this is what I could come up with...  I 
promise I will come up with something new and interesting the next time round! :)
                                                                              
Supplies used :-
Lindy Stamp Gang mists -Hottie Pattotie (Used in all 3 techniques ).
Distress ink : Scattered Straw.
Hero Arts Flourish Background and Antique Brocade cling stamp.
Small white flowers,leaves and hat-pins -Crafter's Cormer (You can contact Shalini if you want to buy these..They are not uploaded on the website but she has them in stock with her).

Hope you enjoyed seeing these fun techniques and give them a try!
Do let me know if you like it :)
All comments/suggestions are welcome!
And please don't forget to play along our current challenge 'Anything goes' as you stand a chance of winning a set of Lindy's sprays..Yay! :)
Have a nice day everyone!

www.crafterscorner.in (All craft supplies under one Roof)

For further information please mail us at : info@crafterscorner.in

Friday, 19 July 2013

Another 'Thank you' card Inspiration :)

Hi everyone,
Its Hussena here bringing you a 'Thank you' card  for the inspiration for our current challenge set by our very talented and sweet DT member Sindhu who has set such an easy-peasy challenge for this month...I am sure you people will definitely give this challenge a try and win some yummy goodies in our prize package...Now coming on to my card I have made a layered card again and had lot of fun using the distress stains to color my flowers and leaves....If you have not tried the distress stains yet,I would really recommend you give it a try...I promise you,you won't be disappointed...The colors are so vibrant and the application is really easy and helps in making your projects that much more faster !
So here's a look at what I have created :


Now for the side View :


As you can see, I have created a frame with corners adorned with flowers...I have kept the sentiment as the focus of my card..The vibrant pink flower is made using the daisy die from Cheery lynn and colored with Picked Raspberry distress stain...This time I have colored the foliage using Mowed lawn distress stain...I so LOVE these new colors!....All of them are very beautiful especially Peacock Feathers !
I have colored my frame using this color :) And also gone ahead and colored the butterflies using Wild honey Distress stains ..I told you I am in love with this product :)

Supplies used :-
Pattern Papers-Cosmo Cricket.
Embossing folder-Darice.
Dies :
Spellbinder's Fluer De Lis Square.
Cheery Lynn Tropical flourish, Cheery Lynn Daisy strip.
Stamps :
Hero Arts Antique Engravings.
Inks :
Versafine Onyx Black.
Distress ink -Scattered Straw.
Distress Stains :
Wild Honey,Picked Raspberry,Mowed Lawn,Peacock Feathers.
Rose buds,daisies and pearls from stash.

Hope you all like my card...Do leave me your comments/suggestions...I love hearing from you :)
Have a nice day everyone ! And don't forget to play along our current challenge # 10 which is to make a "Thank You" card :)

www.crafterscorner.in(All craft supplies under one roof)
For further information please contact us at : info@crafterscorner.in                               

Sunday, 7 July 2013

Quick and easy Sunflower tutorial !

Hi everyone,
Hussena here to share with you a very simple and quick tutorial on how to make a flower using the Cheery Lynn Sunflower die!
Let's start with the supplies that you will need first :-
                
You will need :
Cheery Lynn Sunflower die/die-cuts (4-5 pieces).
A ranger craft sheet/Any laminated sheet.
Distress stains/Distress inks of your choice.
Ranger ink blending tool /Applicator foams.
Embossing tool (I have used the Fiskars dual tip one).
Embossing mat.
Perfect Pearls of your choice(This is not necessary)

And here's how you go about creating your flower :-

Step 1 : Take the flowers and apply the Distress stain color of your choice on one side of the die-cut...The distress stains bottles have a felt tip and you have to press it on your craft sheet first to get the liquid flowing and once that's done you will find that the stain comes out of the bottle evenly...So you can color your flower as dark or as you light as you want it....Similarly,color the centre of the flower which you have die-cut along with the flower using a contrasting stain color (Here,I have used Peacock feathers and Wild honey distress stains).                                                               
                                             
Step 2 : Now, emboss the underside of the flower from where you have applied the stain..Then,once that is done,turn the flower around and emboss the centre of it as shown in the picture.                                                                          
 Step 3 : Once the flowers are embossed ,start assembling them one above the other...Build atleast 3 layers in this way.                                            
                                                       
Step 4 : Once,the 3 layers are done,for the 4th layer cut a slit through the petals to the centre of the flower...And overlap the slit area and glue it,so the flower becomes one size smaller and now place this on top of the 3 layers.                                                      
Step 5 : Finally,for the last layer of the flower ,curl your petals inward first and then using your tip of the embossing tool,shape the petals by bending the top of the petals a little bit outwards as shown in the picture and also very importantly the last layer of the flower has to be colored using the distress stain on both the sides....As,this layer will show on both the sides.
Step 6 : Once the final layer has been placed,its time to emboss the centre circle of the flower.                                                             
Step 7 : I have added two layers for the centre circle,you can decide how many layers you want to put in your flowers...After,the centre of the flower has been embossed and placed I have distressed the edges of the flowers using the Scattered straw distress ink....It gives a nice tone to the flowers.                                                          
Step 8  :  This is how the end flower will look like...I have added glitter balls to the centre of the flower to give it a shine and finally also sprayed some perfect pearls on it.                                                        

And this is how I have used the flower on my card :-                                                                           
I hope you all liked the tutorial that I have shared.I know its a simple one so I hope you all give it a try :)..If you have any queries regarding the tutorial or the products used here,please leave me a comment below or mail us at : info@crafterscorner.in

I would love to know your thoughts on this tute so please do drop me a line :) ..I will appreciate your suggestions !

Have a nice day everyone!
www.crafterscorner.in(All craft supplies under one roof)
For further information please contact us at : info@crafterscorner.in


Thursday, 27 June 2013

Martha Stewart Scoreboard-A Review !!

Hi Everyone ,

Its Hussena here  and today I am  sharing with you some detailed review about the Martha Stewart Scoring Board and its various uses as well as a detailed look at the product itself.

So first a little bit about the  Martha Stewart scoreboard : Martha Stewart Score Board is made from an ivory colored plastic with the numbering in black and the signature Martha blue. Very easy to read. In addition a storage space has been provided at the top to keep the bone folder that comes with the board. Under the flap is a guide that tells you how to make standard sized cards and boxes. It  also tells you what size paper to start with and where to score.The board  has scoring indentations every 1/8th of an inch! It also open on the right hand side AND the bottom, so it will incorporate really large sheets of paper.


What does the Martha Stewart Scoring Board  Package consist of Well firstly you get the scoring board itselfa scoring tool (otherwise known as a bone folder,) and an envelope template. Also included is a chart with standard sizes of boxes, cards and envelopes..And believe me this chart is so very handy it really helps you with the different measurements for making envelopes and your Boxes... No more rulers and measuring, you simply lay your paper on the board, run the scoring tool down the groove and ta da your paper is perfectly scored for easy, neat folding. How great is that!!!
P.S : { Most of the images taken are from Google and Pinterest but I have also combined some of the pictures from my personal blog too! }

Okay here's a look at  how the board looks like front and back side  :  
                                                       
 As you can see on the back side there is a groove provided in which your envelope template fits in snugly and there is also  enough space for a pencil to fit in.
                                  What makes the Martha Stewart score-board more preferable over other score-boards is its unique bone folder which is quite thin and slides into the grooves provided deeply which results in much more crisper folds and makes your scoring more neatly finished.

As you can see there is a flap on the top of the score-board in which you can store your bone folder for easy-access and also the added incentive of it being right there where you want it when you take it out to create a project.....On this flap,are also the measurements for making boxes and cards which looks something like this :
                                                             

And here's a look at the envelope maker template along with the guide which comes in the package :
                                                                           

As you can see,the company people have provided you with various measurements to make different sizes of envelopes so that,you don't have to rack your brains trying to figure out the measurements for each of your different sized envelopes.

Now that you have seen how the score-board looks like and the different tools and accessories provided with it...
Here's a look now at the different things that you can do using these score-boards!

1.Making a rosette-You can make different sizes of rosette's for embellishing your card-making or any 3-D projects.There are several tutorials on how to make a rosette using the MS score-board and below I am showing you a very short tutorial for it :


And here's a sample of how I have used the rosette on my card and 3D projects :


2.Scoring to create a background on your cards : You can easily create interesting backgrounds for your cards by scoring them horizontally or vertically like I have done in my below card...I wanted to create a trellis-like effect and it was very easy doing it using the score-board! 
                                         
3. Simple scoring to highlight a card :


4. To make envelopes :(Image from Capadia Designs)
                                                    

Here's the sample of the envelopes I have made using the scoring-board and MS punches :
                                               

5.Making fancy-fold cards : Making all the difficult fold cards becomes a breeze using a score board  as you not only get perfectly scored lines but it also helps in figuring out the different measurements!

Here's an example by DT member Priya who is brilliant at doing fancy-fold cards!...Look how she's used her score-board to create the below card :
                                           

And below is my card :                         
Hope you all find this review useful ...From personal experience I really do recommend buying the MS Score board...I have found it's really good value for money and the old days when I used to a metal-edged ruler to score my work have been left far behind since I have laid hands on my MS Score-board :)

The Martha Stewart Score board is available at the Crafter's Corner shop at very attractive price of Rs 1550 only! :)
Like I said, its total value for money and a must-have for any crafter!..Makes your work so much more easier and faster and what's more it's one of the highest selling Score-boards available compared to others !

Have a nice day everyone!
www.crafterscorner.in(All craft supplies under one roof)
For further information please contact us at : info@crafterscorner.in


Tuesday, 21 May 2013

Flip-Card Tutorial using partial die-cutting!

Hi Everyone,
Hussena here to share with you a tutorial on how to make a flip-card using your dies and Big Shot..It's a really very easy way to make some fast and interactive cards to get the 'WOW' factor from your friends and family..So first let's gather our supplies and you all will need the following to make these cards below.


Supplies needed for the tutorial :-
                                  
Big Shot Machine
Spellbinder's Nestabilities Label 4
Martha Stewart Scoring Board
Fiskars Sure Cut paper Trimmer
Cardstocks
Pattern paper of your choice ( I have used the Prima Zephyr Paper Pad.)
Distress inks(Totally optional)
                                                               

And now for the tutorial :-

I have written the steps in the pictures itself..I hope this makes it easier for you all to understand it.
  
Step 1- Take a piece of cardstock measuring 7 1/2 inches by 4 1/4 inches.                                                                                        

Step 2 - Fold it in a zig-zag pattern.                                            

Step 3 - Your card should look like this now.                                          
Step 4 - Now measure,cut and glue your pattern paper on to the front of your card.                                                     
Step 5 -Now place your die on the smaller side of the card with it's centre point aligning with the 2 3/4 inch scored line and stick it with either a Washi Tape or any repositionable glue.                                                
Step 6 -Now make your cutting sandwich for this you can refer our DT member Mallika's post on how to create a cutting sandwich for your dies...Place your acrylic plate only up to the 2 3/4 inch score line and run it through your Big Shot..This will allow you to only partially die-cut one end of your card which is required for the flipping mechanism.                                             
Step 7 -Now that you have cut one end ...Turn your card around and place your acrylic plate on the  3 3/4 inch score line and again partially die-cut it...Please take care to place your acrylic plates to the the required scored line...otherwise you will end up cutting up the entire piece.                 
Step 8 -After you have die-cut both the ends,your card will look like this below....Now, peel off the pattern paper from the die-cut ends...Don't worry if you mess up a bit..This will later on get covered up.                                        
Step 9 -Now using the same label die, die-cut  two pieces of cardstock....One plain and other colored....The plain one will be attached to the back side where as the colored one will be in the front of your card.                              
Step 10 -Attach the white cardstock on the front side and when you flip your card this will go on the back.                         
Step 11- Attach the colored cardstock on the back side as shown.                                                      
Step 12 -Once both the die-cuts are attached, this is how your card will look.                                          
Step 13 -As you can see,when the card is opened, the white die-cut piece comes in the front where you can write your message.                                
Step 14 -Once the card is closed, this is how it will look.                                              
Step 15 -Here are my sample cards before I have embellished them.                                              


Supplies used for embellishing :-


Hope you all like my tutorial..If you have any queries do leave me a comment below and I will try to get back to you as soon as possible!..
And don't forget to participate in our current challenge 'Summer Sundae' to win some lovely prizes

www.crafterscorner.in(All Craft supplies under One roof)
For further information please contact us at : info@crafterscorner.in