Followers

Showing posts with label Decoupage. Show all posts

Thursday, 10 January 2019

Cadence cream foil bond and DMC metallic foil

Hellooo there!

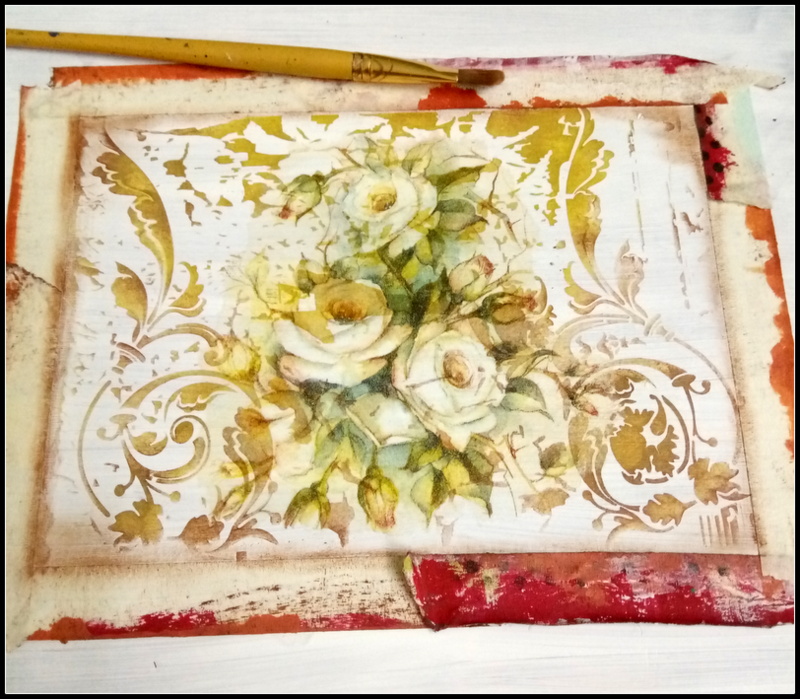
This Thursday I have a video tute on how to give gilding effects to your projects using the Cream foil bond from Cadence and the foil sheets from Dress My Craft!

This gilding effect gives a lovely rustic finish to your projects.

You can use the foil bond(glue) with stencils or do a free hand pattern with a brush or your fingers, allow to dry, stick the foil sheet and pull it...tadaa...you have a lovely gilded effect left on the surface!
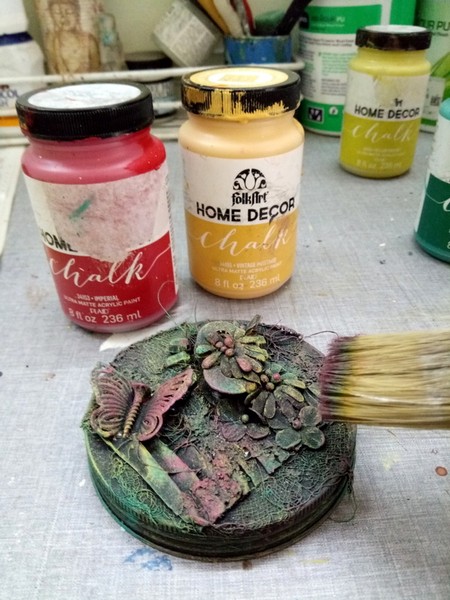
Here is what I did with it today!

A desk top accessory which says "BLOOM" using the gilded effect.


There are more pictures in the video below.
The tutorial is here...enjoy and let me know what you think!


I have lot of pictures too in the video where I have used the foil bond on various projects. Do have a look.

That's it for today.

Until my next creative journey,
Happy crafting and recycling.
Cheers.
Rupa

Products from the store

Decoupage tissues
Very chalk paints from Cadendence -October mist
Very chalky paint- purple lilac
Cream foil bond from Cadence
Foil sheets from Dress my craft

Decoupage glue from Cadence

Thursday, 28 December 2017

Butterflies on my tray with DMC stencils!

Hello...its the last Thursday of the year and I am here with my new project with DMC stencils.

These stencils are an amazing lot, the size is A4 and then stencil has more than one pattern in it and so it's easy to play around with it.

I have used some scrap wood to make a rustic serving tray today and the highlight is the DMC stencils!

I built a tray from scratch using some scrap wood .

Next, I went about creating the faux palette look using chalk paints. This time I wanted a distressed shabby chic look!
Once the palette's took shape, I placed the script stencil from DMC and used a stencil brush to load color. This helped in giving a lovely faint effect, not too bright.


The same stencil had some faded dots and color splat designs, which too I have used in different place.


I then took out another stencil with numbers on it, and randomly stenciled these in blue!


Time to work on these steel handles. I sanded them and sponged in red chalk paint.


Once dry, I dry brushed with blue paint and distressed the edges with black Archival ink. They were ready!

I fixed the handles and then decoupaged some butterflies on the tray here and there, as if they were flying all over!


The tray was given 3 coats of water proof varnish with sufficient time to dry between coats . I finally sanded it a bit for a smooth finish and here it is, all ready to serve a cuppa!


 I love how the butterflies took to the scripted background and the faux palettes. Almost like home!!!

The number add more character to this tray!!


So here it is my rustic, shabby chic serving tray for the New year using DMC stencils! Wanna cuppa?? Cheers!!!
Wishing you all a very happy, colorful and creative 2018.
I will see you next year with more inspirations.


Until then,
Happy crafting and recycling.
Cheers,
Rupa

Products from Crafters Corner

Thursday, 14 December 2017

DMC Stencils grab bag!

Helloo...
Rupa here this THURSDAY with an upcycled project using the newly launched stencils by Crafters Corner!

Yes...these are DRESS MY CRAFT STENCILS (set of 12) amazingly intricate stencils.


These are A4 size stencils and can be used in many many ways...your creativity, your imagination and these stencils can create some amazingggg projects!
Here is one stencil that I have played with for this entire project! The beauty of these stencils is that there a a lot of elements in one stencil, there is a focal point and in the back ground, there are other small elements too which can be used separately or as a whole!

For today's project, I have upcycled an old wooden stool, a heirloom from my native place which is sure  to be more that 75 yrs!


Well at the end, this looks even more antique and precious and ofcourse a statement piece!


Let's jump start to the process...


I start by sanding the top and then apply a coat of gesso. Once dry, I have used the stencil and done a double shaded stenciling using chalk paints.

Next, using modepodge, I have decoupaged a floral tissue on top of the stenciled area. It amazing how the stencil work is seen thru the tissue!


Here is a close up of the tissue decoupaged on top of the stenciling! I love how vintage it is already looking! 


 I have then masked all the 4 sides and then done some distressing using  brush and paint.

I stenciled some little elements from the stencils on all the four sides and repeated the decoupage of smaller prints on the 4 sides.


Using some home made modelling paste and the same stencil, I have created texture on all the 4 sides. The intricate pattern of the stencil gives a nice, crisp texture!


Once the modelling paste is dry, I mask the sides again and have used chalk paints to created a shaded look .


Time to remove the masking tape and revel the final look! I did some dry brushing to highlight the textures and also to give some age to this project!


Then sealed the entire project with 2 coats of varnish and the stool was ready to make an appearance!


I love how this ONE STENCIL has helped me give this project an antique and priceless look! You can get creative and use the stencil in more than one way! I have combined decoupage with stenciling to create this project and loved the outcome!
Do let me know your thought about this project and GRAB that BAG of STENCILS today!


I will see you see you soon with more inspirations on these stencils!

Until my next creative journey,
Happy crafting and recycling.
Cheers.


Thursday, 20 July 2017

Fusion play with PLAID!

Helloooo...
It's Thursday and Rupa here with my PLAID PLAY for this week.
Are you ready???

I have up cycled  an empty coconut oil glass jar today and yes...this one has travelled all the way from London cos I just loved the it! Here it is...


It's been with me for over a year now and I was wondering what to do with it! Having played with Chalk paints on wood and other mediums I thought why not try MIXED MEDIA with it???
Sounds interesting... and so was born this project!
 A long pictorial post...sit back and enjoy!

THE PROCESS...
This the entire PLAID family that helped me in this project!


STEP 1- Once the jar was cleaned, I took the lid and layered it with lots of found objects lying at home...old bobbins, gauze, nails, buttons, flowers and old butterfly pendant.


STEP 2-I also made a texture paste with gesso and DMC frosted sugar and applied it randomly over the lid.


STEP 3- I covered the entire thing with black gesso. Now my little canvas is ready to take on the paints!!!!


STEP 4- I started with the first color Vintage mustard chalk paint. I was liking it!
  

STEP 5- The next colo to hit was yellow crochet! I was likiiiing it!


Next was Grotto...LOVE it!


Next comes a combo of vintage mustard and Imperial...I am loving it now!


Finally...some color splats with sheep skin and few highlights too with it...
I was LOOOOVING what I was seeing!!! What say???


So you see, MIXED MEDIA is possible with chalk paints too and with PLAID you have an awesome range to choose from!


Here is how the lid looks after a coat of Satin finish varnish.


So what next???
I was left with the base...

STEP 6_ I gave the glass jar a DIRECT coat of Imperial chalk paint. The red was really vibrant!


STEP 7- I then applied some Folk art crackle medium liberally all over the jar and just left it to DRY ON IT's OWN...yes I did not use the heat gun! I kept myself busy in another project, so happy me.


STEP 8- Next comes my fav, sheep skin...


magically the cracks begin to appear when the paint comes in contact with the dried crackle medium! Have a look!.


STEP 9- Once this coat was dry, i mod podged a lovely tissue using ANTIQUE MATTE MODPODGE...my current favorite!


 Yes after my previous video tutorial here...I am just not able to get over the antique look of this modpodge gives!


STEP 10- The tissue just takes on the light back ground, yet reveals the red cracks thru the print. I have intentionally scrapped off some cracks to give a distressed look to the jar.


Some more shots of the decoupaged tissue thru the crackle!


STEP 11- I gave another coat of the antique matte modpodge to give more depth and color o the project and finally sealed the entire project with a coat of SATIN VARNISH from Home decor, Plaid.
Here is the final project...


I am so in love with the entire look of this little coconut oil jar...so glad I could do justice to the long travel that it had taken, lol!
Wait, it's not over...I wanted more to this jar than just a deco piece and so I drilled some holes on the lid...if you see closely, you can see it...

....and I lit a candle inside!!!! HAVE A LOOK...


I couldn't stop clicking...as the look was so surreal and I was just pinching myself...the birds were glowing and the light passing thru the holes on the top...should I say more????


The antique feel and warmth of the birds on the base along with a mixed media fusion on the top was an experiment, first of its kind from me!


Hope you liked is and I would love to hear your comments...

CAN WE CALL THIS CHRISTMAS IN JULY...with that, I take leave and will see you next eek.
So go ahead play with your chalk paints and not to forget that antique matte mod podge, GRAB it!

Until my next creative journey.
Happy crafting and recycling,
Cheers,
Rupa.
Products from PLAID


Thursday, 1 June 2017

Crackle play with PLAID.

Good morning!
The beginning of a new month and also a Thursday! I am here to share with you a PLAID project using their CRACKLE medium.


I have done a comparison  about Folk art and Home decor crackle medium both of which are from Plaid.

Here is the completed project using Home decor crackle medium.


Here is the you tube link to the same.


Do get back to me with your experiences about using this product and also if you do have any query.

I will see you next week with another Plaid play.

Util my next creative journey,
Happy crafting and recycling.
Cheers,
Rupa

Products from Plaid

  Modpodge matte
Chalkpaints
 satin finish varnish
Multi surface paints
Mini daubers