Followers

Showing posts with label Plaid crafts. Show all posts

Thursday, 28 September 2017

Reverse decoupage and crackle on faux glass with Plaid

Hello...It's THURSDAY and am back with another tutorial! This time its a video and as always playing with PLAID and different techniques is so enjoyable and the element of surprise is always the upcycled item !

Have you ever thought of using a serving tray as a home decor or utility item...well that's my project for today..


I have done the reverse decoupage and crackle effect on faux glass to alter an old serving tray!


Do give your feedback and here are some pictures too.

The video link is here.


Do give the technique a try and I will see you soon.

Happy Dussera to all.

Until my next creative journey,
Happy crafting and recycling.
Cheers,
Rupa.
products from PLAID


Thursday, 14 September 2017

Mono printing and Faux tile play with PLAID!

Hellloooo crafty folks!
So happy to be back this Thursday and share with you my Plaid play for this week.
Have you heard of mono printing?? You probably would have using a Gelli plate, but did you know that the Silicon mat from Mod Podge can be used as a printing press to create your own designer paper???

I have a full length video to explain the same and just not that, I also am going to show you the FAUX TILE TECHNIQUE here! Yes, it is 2 in one today...sit back and enjoy the video.

Here is what  I created in the end....


Do give this a try. The video link is here...

I will see you next week with another Plaid play.
Until my next creative journey,
Happy crafting and recycling,
Cheers.

Products from Plaid


Thursday, 31 August 2017

Plastic play with PLAID!

Hellooo...It's Thursday and am back with another tutorial today.

By now you all know my love for recycling and more so when I upcycle plastic, which are the real trouble makers to the land fill...do you agree???

It always gives me immense satisfaction if I can reduce atleast that little bit from land fill and why not if they can be given a beautiful second life...Here is what I am talking about. I have upcycled 4 fabric softener bottles this time!


Here is how they have become after some Plaid play!!


Let's get into the process..

I first removed the labels from the bottles, cleaned them and drilled holes on the bottom with a drilling gun. The holes enable proper water drainage as this is going to be a planter.

I then went about wrapping some cotton and jute chord on both sides of the bottles. I intend to use the horizontal space in the bottle.

I then decoupaged some tissue bits on the twine area with Mod podge. This is nice way to use up your tissue scraps too!


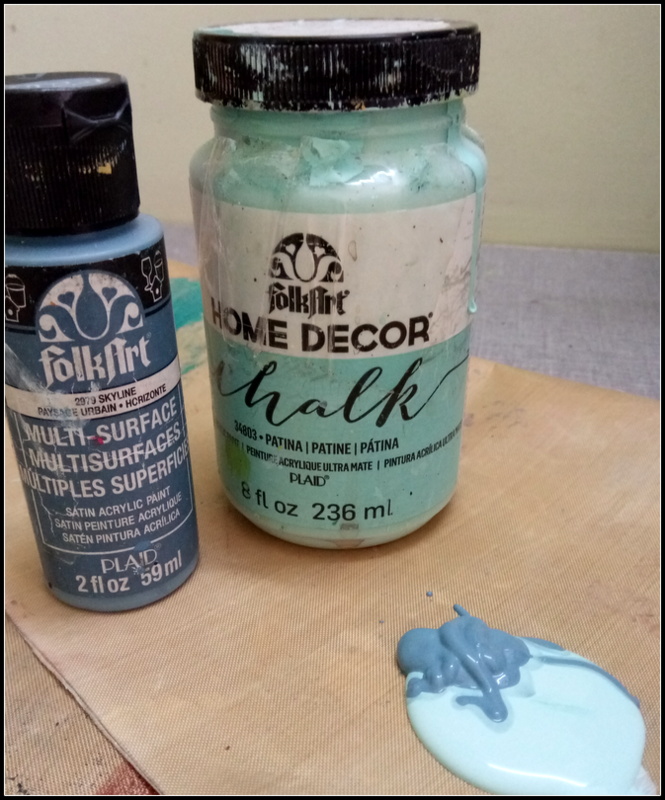
It was time to take out some chalk paints. I used vintage mustard for this bottle and used a sponge to color it.


 For another bottle, I mixed some chalk paint(patina) with Multi surface paint and worked on the decoupaged area.


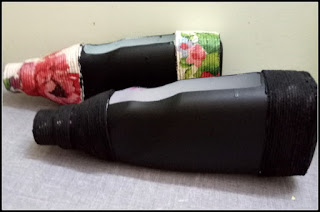
For another set of bottles, I covered it with black chalk board paint from my stash.


I dry brushed some summer porch (chalk paint) on the black twine and it gave a beautiful effect!


Once all the bottles got painted, I covered them with OUTDOOR SEALER from Plaid. This will protect the planter from rain and shine! I also fixed some bottle caps as legs and they were good to go!

Once dry, I put in soil and potted some plants into it and watered it too! These now look amazing sitting pretty on my window sill!

Here is a look at each one of them...Do let me know your favorite! I love the one with the blue bird and the chalk board one with the writing (good day) in red!


The dry brushed one with money plant!


The caption says it all!


My current favorite is red and so this one definitely adds charm to my room!


The color blue is always soothing and if it has some delicate flowers and a butterfly...no guesses!!


Birds are always beautiful, what say???


Keep smiling!
Well, with that we come to the end of this post! I can't be happier than this to have transformed 4 plastic bottles today and more so because they lend some greenery inside my house!

This is to tell you that the chalk paints and multi surface paints adhere well to plastic bottles and I have used them directly onto the surface even without gesso.
So go ahead and experiment and lets see what is it that you can upcycle today.

I will see you soon with another plaid play.

Until my next creative journey,
Happy crafting and recycling.
Cheers,
Rupa

PRODUCTS FROM PLAID

Thursday, 24 August 2017

Faux metal and rust play with PLAID!

Hellooo and welcome to another Thursday!

My today's Plaid play is all about FAUX GALVANIZED METAL technique using chalk paints and then to give it a rusted finish using the Plaid texture paints in Dark rust and light rust.
I have upcycled a few items of this project and you can see it all in the video tutorial

Here is the entire family together!


It's so easy to do amazing faux techniques with the wide range of chalk paints available at Crafters Corner!
A closer look at the faux metal and rust look...


For the you tube link on the making of today's project, click here.


I hope you give this technique a try and do let me know your view on the same.
I will see you next week with another plaid play.

Until my next creative journey,
Happy crafting and recycling.
Cheers,
Rupa

Products from Plaid

Liquid Leaf -silver
Chalk paint- sheep skin
Chalk paint- castle
Satin finish varnish
Dark rust - painted finishes
Light rust - painted finishes


Thursday, 17 August 2017

Romantic play with PLAID!

Hellooo...
It's THURSDAY and am here with my plaid play for this week! When it's a mile stone birthday or a wedding anniversary you do want to make something special and if its worth a display at home you want to be doubly sure that it catches every body's attention!
Today I have upcycled 2 bottles with some romantic chalk paints, Imperial and River walk (they do sound romantic, don't they???) teamed it with a collage frame.

Here is a look at the complete family on display...


If you like it...do scroll further to see the entire work in progress! I had a great time making this and I hope you do too !

The process

I started by coating the bottles with gesso and then doing some texture work on it. I have stuck some adhesive pearls and also hand drawn some texture using texture paste through a cone.

Once dry, I gave the bottles a coat of River walk, chalk paint. I love the beige color. it is so vintage already!

As the base color dried, I took some multi surface paint, Bark brown and applied it around the textured area. Immediately spritzed some water and wiped it using a rag cloth. This gave some depth to the textures area and ofcourse made it more vintage!

It was time to take out the red! Look at the vibrancy here...love the IMPERIAL. I coated this in the central patch, allowed it to dry and distressed the inner edges with brown again.

I followed the same technique but reversed the colors in the other bottle.

Here is how both the bottles look after a coat of satin varnish. Not done yet, they wanted company! So decided to make a picture frame to compliment these bottles..

I took out paper scraps in tones of red, black and beige and cut them to small patches to fit the frame. Once I liked the collage, I went about adhering it with mod podge,. The base of the frame was given a coat of black and I gave some spacing between the paper tiles, which gave it the mosaic look.

That's the frame done! I have a chipboard sentiment that I tinted with the wood tint and gave a metallic brass highlight.
The frame and the bottles were given a coat of Home decor satin varnish and now they were ready to pose as a family.


I hope you enjoyed the tutorial today and experiment with the wide range of chalk paints available with Crafters Corner. Whatever be the occasion, there are colors to match.

I will see you next week with another plaid play, meanwhile do let me know your views on this project.
Until my next creative journey,
Happy crafting and recycling.
Cheers,
Rupa

Products from PLAID


Thursday, 10 August 2017

DMC play with Plaid!

Hellooo...
It's THURSDAY and am here with another Plaid play for today. This time its a pictorial, so sit back, relax and enjoy the tutorial.

I have up cycled a shoe box this time and played with the new HYDRANGEA LAWNS paper pack from DMC to alter this box along with Chalk paints from Home decor, Plaid.
Are you ready???
This is the shoe box before the makeover...


and here it is after a few hours!


Lets move on to the process....

I started by giving a coat of black gesso wherever necessary.


Next I applied candle wax on areas I wanted the distressed look, especially the edges.

I then applied the crackle medium from Home Decor on the rim and allowed it to dry. I have given a generous coat of the medium!

As the crackle was drying, I took Sheep skin chalk paint and did dry brushing where I had applied the black gesso.

Next came Yellow crochet...I did dry brushing of the same.

It was time to use up the lovely papers from DMC paper pack. It was a difficult choice which one to choose...but then I was quick enough to select this horizontal pattern which was perfect for the sides of the box. I used Mod Podge gloss to adhere the same.

Once the paper was stuck, there was a lovely distressed border around the edges. I used the scrapping tool to distress further where i had applied the candle ax. This reveled the black layer beneath. I love this distressed look and would like to emphasize that this tool can be used for distressing on card board too!

It was time to apply the top coat  where the crackle medium was applied. Its amazing how the cracks appear magically when the top coat is applied. here I have used Sage. It just compliments the paper so well!

A closer look at the cracks and the distressed edges!

It's stencil time! I had this Paris stencil in my stash and with sheep skin and the stencil brush, i managed this task in minutes!

An aerial view of the stencil work. The distressed edges gives a beautiful shabby chic finish to the lid. Agree????

I then added a metal handle to the lid and also a rope handle to the sides. This makes it easy to carry the box now! The black corners for the lids are foam pieces given a distressed look. This helps to cover the ugly openings on the sides of the shoe box. 


Finally, gave a coat of satin varnish to the box, inside out and it was ready to be flaunted! This is the finished box and all set sit on the coffee table now. This can be an accent piece on the table and maybe even a conversation starter...you never know!!!

 A few pics of the box all done up! The box when opened has more DMC papers to flaunt! I have one on the inside lid and another scripted one on the base of the box.


 It's a perfect setting for the coffee table to keep those little knick-knacks...what say???


With that, we come to the end of this tutorial and I thank you for your time to sit through this. I hope to get you scrapping tool soon and this awesome paper pack and may be even a new show for your spouse, lol...and alter that box, NOW!!!

I will see you next week with another Plaid play.
Until my next creative journey,
Happy crafting and recycling.
Cheers,
Rupa

PRODUCTS USED
Mod Podge Gloss
Plaid Home decor chalk paints
Plaid scrapping tool
Home decor Satin Varnish
Stencil brush
Plaid Home decor Crackle medium
DMC Hydrangea Lawns paper pack