Followers

Showing posts with label Chalk paints. Show all posts

Thursday, 2 August 2018

chippy paint effect with Cadence

Hellloooo and a very warm welcome from Rupa here!

 I was on a break and so happy to be back here and share my projects and tutorials with you.

I am going to working with CADENCE products and show you lots of DIY's on home decor and textile...isn't that exciting...I am loving the DT kit that came my way with all the yummy products.

So for today I have a home decor project, a quick and easy one with just a few products from Cadence, some recycled stuff, ofcourse and here we go....

Sit aback and relax and watch the pictorial as I describe this CHIIPPY PAINT home decor project!


How do you like it???

This is what I started with... I had this lovely vintage tin gifted empty by a friend, lol! I wanted to showcase it as a planter with a difference and so this project was born! I also made a stand for this with wood scraps and as you can see the products I have used are the BETON EFFECT relief paste, DORA PERLA GOLD RELIEF paste and the ARTIST CANVAS stencil from DMC and some paints from my stash...that's it!


Step1- I painted the frame with a teracotta color chalk paint from my stash and let it dry.


Step2- I used the DMC stencil and the Beton paste and did stenciling in random places.. The beauty of the paste is its full of fibre and gives a nice texture and dimension.


 Step3- I added some green acrylic colors to the paste to get some moss and applied that too randomly! The paste took to colors with ease and no time I had moss growing in my stand, lol!


 Step 4- I did some dry brushing with black paint to tone down the colors and to give the stand a weathered look. I emphasized the nooks and corners with black brushing and also ran over the died moss and stenciling.

Step 5-Then came the beautiful GOLD relief paste...this is like butter with granules!
 What a lovely gold it is, immediately lifted the look and enhanced the project and took it to the range of an antique piece!

Look at the gold butter...yummm!


 I allowed the relief pastes to dry naturally...yes it did test my patience but it was worth the wait! I further aged the stand with more black dry brushing and on the gold paste too, so that it looked old!


Have a look at some the pics...the final result is that of an antique, vintage, weathered, chippy painted stand!!! I AM LOVIN the look...it looks even more natural in real!


The combination of the Beton paste and the Gold relief paste is the main reason for this look!


And this how this whole project looks...I am happy I could give the vintage planter its due home with these Cadence products.


I couldn't stop clicking pictures, it was actually difficult to get the best angle and side!


That brings us to the end of this simple DIY home decor project and I hope you will give it a try. These products are a  definite buy buy if you love the vintage, grungy weathered kind of looks.
I appreciate your being on this page today and would love to hear your feedback and comments!
Until my next creative journey,
Happy crafting and recycling.
Cheers.


Thursday, 18 January 2018

Say it with DMC Squares!

Hello crafty folks!
 This Thursday I bring you another project with the newly launched DMC stencils.
You can use then in so many ways, for mixed media with texture paste or paints, sprays, inks, use blending foam to blend in inks, use as an embossing folder if you have a Big Shot plus!

Today I have upcycled 2 items for my project!


 When a man challenges you to do something, you take it seriously don't you and if it's your husband, am sure you will do that extra mile to accept it!


Firstly, I accepted to give his worn out mobile cove a makeover...have a look at the condition that it was!

For this masculine project, I took DMC BROKEN EDGES stencil, I loved how random and uneven they are! Perfect for a man!
Here is how I went about it...

I gave 2 coats of gesso with a sponge to the leather cover which gave an even and neat coverage.

I then stenciled with some chalk paint. I have used Plaid Home decor paint in the color sage! It's a kind of greyish blue and I wanted something classy for the man!
I love this pattern! It's like an unsolved puzzle and the fact that its so asymmetrical is adding more dimension to the background!


 Keeping the masculine theme in mind, I heat embossed with black and used up these grungy men stamps from Stampers Anonymous!


They look so dashing in black don't they??? Especially with that back drop! I brought in the nest color highlight in red and distressed the edges with another fav chalk paint( Inperia), also from Plaid.


I wanted the cover to be a contrast in terms of color and style from the original and as I always I wanted my project to speak out! Hence, I stamped this quote and heat embossed it too.

I am immensely satisfied with the way this project turned out and the icing on the cake was when my husband said "When can I start using this!"  I had to ask him to wait for a couple of days as I took time to give 4 coats of out door varnish as I knew the wear and tear this one is about to handle, lol!


I am looking forward to hearing what his colleagues will say about this and more so, what you have to say about this one!
As for the Ferraro rocher box, i did some mixed media on it after a coat of gesso, I added some texture paste thru stencil.


I used up sprays from my stash and aslo decoupaged some floral tissue to compliment the colors.


I have used chalk paints to color the box and have retained the partition inside so that now it can be used as trinket box!

 
So using, One stencils, I have done 2 projects in different styles. Do let me know your views about the same.

I am on a break for a month and will get to you soon with some amazing projects!
Until my next creative journey,
happy crafting and recycling.
Cheers,
Rupa

Products from the store
DMC broken edges stencil
Ranger black embossing powder
Plaid Homedecor chalk paints


Thursday, 28 September 2017

Reverse decoupage and crackle on faux glass with Plaid

Hello...It's THURSDAY and am back with another tutorial! This time its a video and as always playing with PLAID and different techniques is so enjoyable and the element of surprise is always the upcycled item !

Have you ever thought of using a serving tray as a home decor or utility item...well that's my project for today..


I have done the reverse decoupage and crackle effect on faux glass to alter an old serving tray!


Do give your feedback and here are some pictures too.

The video link is here.


Do give the technique a try and I will see you soon.

Happy Dussera to all.

Until my next creative journey,
Happy crafting and recycling.
Cheers,
Rupa.
products from PLAID


Thursday, 31 August 2017

Plastic play with PLAID!

Hellooo...It's Thursday and am back with another tutorial today.

By now you all know my love for recycling and more so when I upcycle plastic, which are the real trouble makers to the land fill...do you agree???

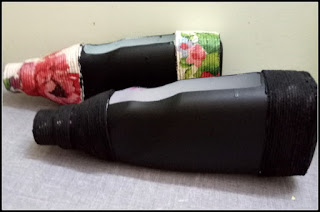
It always gives me immense satisfaction if I can reduce atleast that little bit from land fill and why not if they can be given a beautiful second life...Here is what I am talking about. I have upcycled 4 fabric softener bottles this time!


Here is how they have become after some Plaid play!!


Let's get into the process..

I first removed the labels from the bottles, cleaned them and drilled holes on the bottom with a drilling gun. The holes enable proper water drainage as this is going to be a planter.

I then went about wrapping some cotton and jute chord on both sides of the bottles. I intend to use the horizontal space in the bottle.

I then decoupaged some tissue bits on the twine area with Mod podge. This is nice way to use up your tissue scraps too!


It was time to take out some chalk paints. I used vintage mustard for this bottle and used a sponge to color it.


 For another bottle, I mixed some chalk paint(patina) with Multi surface paint and worked on the decoupaged area.


For another set of bottles, I covered it with black chalk board paint from my stash.


I dry brushed some summer porch (chalk paint) on the black twine and it gave a beautiful effect!


Once all the bottles got painted, I covered them with OUTDOOR SEALER from Plaid. This will protect the planter from rain and shine! I also fixed some bottle caps as legs and they were good to go!

Once dry, I put in soil and potted some plants into it and watered it too! These now look amazing sitting pretty on my window sill!

Here is a look at each one of them...Do let me know your favorite! I love the one with the blue bird and the chalk board one with the writing (good day) in red!


The dry brushed one with money plant!


The caption says it all!


My current favorite is red and so this one definitely adds charm to my room!


The color blue is always soothing and if it has some delicate flowers and a butterfly...no guesses!!


Birds are always beautiful, what say???


Keep smiling!
Well, with that we come to the end of this post! I can't be happier than this to have transformed 4 plastic bottles today and more so because they lend some greenery inside my house!

This is to tell you that the chalk paints and multi surface paints adhere well to plastic bottles and I have used them directly onto the surface even without gesso.
So go ahead and experiment and lets see what is it that you can upcycle today.

I will see you soon with another plaid play.

Until my next creative journey,
Happy crafting and recycling.
Cheers,
Rupa

PRODUCTS FROM PLAID

Thursday, 24 August 2017

Faux metal and rust play with PLAID!

Hellooo and welcome to another Thursday!

My today's Plaid play is all about FAUX GALVANIZED METAL technique using chalk paints and then to give it a rusted finish using the Plaid texture paints in Dark rust and light rust.
I have upcycled a few items of this project and you can see it all in the video tutorial

Here is the entire family together!


It's so easy to do amazing faux techniques with the wide range of chalk paints available at Crafters Corner!
A closer look at the faux metal and rust look...


For the you tube link on the making of today's project, click here.


I hope you give this technique a try and do let me know your view on the same.
I will see you next week with another plaid play.

Until my next creative journey,
Happy crafting and recycling.
Cheers,
Rupa

Products from Plaid

Liquid Leaf -silver
Chalk paint- sheep skin
Chalk paint- castle
Satin finish varnish
Dark rust - painted finishes
Light rust - painted finishes