Followers

Showing posts with label Art alchemy. Show all posts

Wednesday, 23 May 2018

Mini Mixed Media: Fly High (Video Tutorial)

Greetings Everyone

How have you been?
It's me Isha here, Today I have mini mixed media project to share with all and for this I have used loads of Prima Marketing products.
All will be listed down below at the end of the post.

But Before that did you see CRAFTERS CORNER is proud to present you yet another amazing products for the first time in INDIA from CADENCE 

Buy all the latest supplies under one roof at CRAFTERS CORNER.

It's impossible to explain creativity. It's like asking a bird, 'How do you fly?' You just do. Eric Jerome Dickey
Read more at: https://www.brainyquote.com/topics/fly
Let's get back to today's project,

It's impossible to explain creativity. It's like asking a bird, 'How do you fly?' You just do. Eric Jerome Dickey
Read more at: https://www.brainyquote.com/topics/fl
"It's impossible to explain creativity. It's like asking a bird, 'How do you fly?' You just do.-Eric Gerome Dickey"

Take a look


Its super rustic and grungy and with minimum products you can achieve great textures.
I have a video tutorial on how I created the back ground which I will be linking below

                                                                        TUTORIAL


Did you like it ?
Here are some closed shots and details 


I hope I was able to inspire you all.
Keeping checking the space for some amazing inspiration from my fellow team members.

Have a nice day
Happy Crafting
XOXO
Isha

List of supplies:
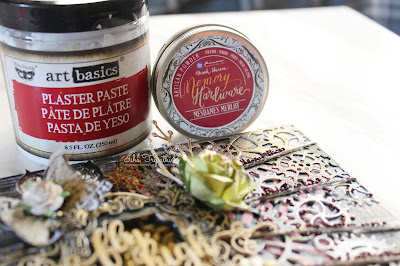
Prima Art Basics Plaster paste
Mesdames Merlot artisan powder
Antoinette Pink - Artisan Powder
French Sage - Artisan Powder
Liquitex Gesso White
Palette Knife
Mudra chipzeb Elegant Frames - Chipboard Cutouts
Mudra chipzeb Words #1 - Chipboard Cutouts
Black Gesso
Opaque Matte - Modeling Paste
Art Alchemy Wax- Vintage gold, brocade green, silver and white gold
Mulberry micro mini roses
Mulberry flower green
Steampunk gear dies Memory box
Dove craft heat gun

Thursday, 19 April 2018

MIXED MEDIA TAGS : (PICTORIAL)

Greetings everyone

How have you been :) I hope great.
Did  you see the last post by my fellow team mate which was all about mixed media. She has explained so beautifully and in precisely in a very simple way what mixed media is all about. So I decided to carry on the theme and try my hands on mixed media again.

Surprisingly my DT kit for the month was super amazing, take a look


 Isn't it awesome, I just love impasto paint and art alchemy brilliance wax.
And this is my first set of super intricate chipzeb by Mudra, let me tell you these are beyond amazing super think and such fine cutting details totally blown away by the quality of the same.

So finally I decided to make set of mixed tags using these crazy supplies.
{All supplies used will be mentioned down below along with the links, so don't worry sit back and enjoy post}


Tda ... Here is my take on mixed media tags. I have simple tutorial and lets get started....


STEP BY STEP : TUTORIAL 

Step 1: 

To make my tags I used Sizzix Alterations tag die and white card textured card stock from my stash.

Step 2:
Select your choice of metal embellishments scraps resins etc etc whatever you want to you use, Just to let you know there is no LIMITATIONS.

Once I have selected my embellishments, I like to place them randomly and play around till the time I find perfect places for each one of them.

Step 3:
Now I have pasted all the embellishments using art basics 3D Gloss gel.

Step 4:
Once the gloss gel dries up, cover the entire tag with gesso. I have used single layer of liquitex white gesso.


 Step 5:
Now once the gesso dries up, apply impasto paints till your heart drop. I just love these two gorgeous colors from art alchemy and in fact store has the one of the awesome collection of impasto paints.


Step 6:

This is really one of the awesome products I have used, Memory Hardware by Frank Gracia. Love the muted tones. I have used Blue and pink color here.
In the above image the tag on the left I have dusted the artisian powder and I don't know whether you can spot the difference between the two tags but the one on the left looks more vintage and has a matte effect.

What is the product all about- 

Prima Marketing Frank Garcia Memory Hardware Artisian Powder. Use this fine and delicate colorized powders on resins, wood, paper, clay and more to create a vintage look! Great for revealing texture, detail and cracks. Mix with gesso or modeling paste or mix with water to create a custom spray. ( source: https://www.crafterscorner.in)


Step 7: 
Lastly to add some glamour to my tags I have brushed whole loads of art alchemy White gold wax on the chipzeb and all over my tag.


I hope you liked my tags and I was able to inspire you all.
Happy Crafting
And do keep checking the space for more exciting inspirations.

Supplies used:-
TAG DIE SIZZIX
Marquise Blue - Artisan Powder
jade impasto paint
 Raspberry pink impasto paint
Mono Multi Liquid Glue
Mudra Chipzeb
Metal Embellishments
Art stones - Finnabair


Saturday, 23 July 2016

A black makeover

Hello everyone! Hope you all are doing well! Today I'm here to share a brand new tutorial with you covering mixed media techniques and how to alter a LaLa Land crafts shadow box card! Let's see first what it looks like! 
Here are few different angles for to admire :P


Look at these gorgeous pearls from the store....
Omg they are so killing!!!!


Do you guys like it? 
I am sure this is adorable :P

So let's get started 
Here is my base to start with ...
I picked up this beautiful La La Land photo frame to alter......
Since it was a steampunk theme so i followed the same thoroughly....

Here is what the package looks like. It comes will all these pcs along with an instruction manual telling how to assemble it.
Its an ultimate to piece to adore , alter , or gift...


I started with my Prima chalkboard paint ....though we have many more beautiful shades but i decided to choose black n golden....
So i chose the black color!!!
The first thing I did was to paint all the pcs with Black chalkboard paint by prima. I absolutely love the chalkboard range by prima marketing these are amazing and the finish is excellent and our store has recently got all the lovely colours!  
I am sure you will drool over them!!!


Next i started assembling the Base. I've used glitter glue for this step as it dries clear and is mess free. 
U can use glossy accents or tacky glue too but i think i m addictive to this glue :P


I've taken a very grunge looking chipboard pc from Dusty attic and I started painting it with a gold paint by Dusty attic
Next i added 2 of these paints by Prima marketing on top of that piece. 

Taking a piece of chipboard for the photography I've made a border using Rose gold paint by prima marketing 

Next i stenciled the Base using Gel beads paste (micro fine beads)by Liquitex and layered 2 paper clay 
embellishments and some fishnet that is  available at Crafters Corner
Check my previous post to learn how to make embellishments using Prima moulds with paper clay!


now I'm adding some more textures to my piece I'm using this gorgeous pearl string from our store and next i have randomly added some glitter glue and covered it with Prills 
Do check below in pictures :


To give an awesome glaze i used the new Art anthology dimensional magic.


Here i have joined the picture with the frame.
Now comes the top part of the frame.
Now taking this thread i am attatching this beautiful key from the store.......

I have played randomly with them doing stenciling and using some chipboards from the store.
Then i added them on the front base and adhere them with glossy accents.
Here comes my final beads to be added .....
Yayyyyyyyyyyyyyyy....
I love them ....


Do check this list to know more about the products used :
Hope you will enjoy this !!!!!


PRODUCTS USED
Steampunk frame
Chalkboard Black
Couture Creations Non Stick Mat
Designer Dries Clear Adhesive 2oz
Liquitex Glass Beads Acrylic Texture Gel 8oz
Microbial
Plastic Palette Knife Set 5/Pkg
Ranger Heat It Tool - European Version
Sorbet - Dimensional Paint - Dazzle
10 Metallique Steampunk Copper
11 Opal Magic Rose/Gold
12 Vintage Gold - Dusty in Colour
13 Cog Cluster - Chipboard Cutouts
14 Royal Key 2
15 Copper Glass Glitter
16 Gold Leaf
17 Gold Prills
18 Memory Hardware Glass Pearls
19 Time Travel Stencil
20 Ink Black - Wire Thread
21 Iron Orchid Designs Paper Clay
22 Vintage Art Decor Mould Baroque #3
23 Natural - Decorative Fish Net
24 Pearl Bead Strings

Love Anchal 

Thursday, 2 June 2016

Prima Marketing - Paper clay and Vintage Art Decor Mould

Hello everyone! How are you all doing? Well I'm so excited for today's post!! 
A lot of you know I'm a huge fan of Prima Marketing and I absolutely loveeee their products from their papers, embellishments to their cutting dies! Their entire range is to die for! 
CHA 2016 Prima marketing came up with a lovely product range 
A product I had been desperately waiting for was Prima Marketing Paper Clay and Prima Marketing IOD  Baroque Moulds

And FINALLY ITS HERE!! 


Prima Marketing came up with 6 Gorgeous moulds they designs are amazing they have a very vintage- shabby chic feel to them. These moulds are food safe so they can be used for decorating cakes as well. They also came up with a special clay to be used in these moulds for making Gorgeous embellishments and its called Paper clay its a very light weight clay and it air dries. The results with this clay are great! For todays post I will also be using Art Alchemy paints and Aritisan Powder which is another great product by Prima! 
So without any more delay 
Lets get started! 


Take out the clay from the packaging and cut of a medium size piece


Make sure you pack the clay back properly and store it in a Air tight container. Since the  paper clay is an air dry clay you don't want to leave it out.


I started with dividing my clay in three pcs and then working them. Make sure you knead the clay a bit before using. When working with the clay you have to be careful not to over work the clay . Just work with it till it becomes little warm and soft.  


Here's how it will look  once done. 


Now I took a small piece of the clay and started pressing it in the mould 


Move around the clay with your fingers and make sure you have a clean edge to the design 


To any uneven level or any cracks I like spraying the clay with a little water and then making it as flat and even as possible 


Here's how it looks. If your clay gets dry while you are filling the mould You can spray the clay with  little water and work it between your hands it will become soft again. 


This is how it will look when semi dry . You can see the edges turning white - means the clay is drying. 

Once its semi dry I flip the mould.
 I like drying my molds upside down I just feel it makes it easier for me to take out the embellishments


Now slowly pull the mould upwards to release the embellishments. You have to be very careful while doing this step. The clay is a little brittle and if you don't remove them carefully the pieces might break but don't worry we have a way to fix it in case it happens! 

Ooopssiee see what happened while removing this delicate one from the mould.
But don't worry we have a trick for this :p
Option 1 is to just glue it to your project in pieces but nah that's no good there should be a way to fix this right?
Soo what you have to do it take a soft paint bush and a mini mister with some water. Spray on the cracked area join the pieces and rub your paint brush over it applying little pressure.
And Voila you are done! 

Now you can use these embellishments in their original colour or colour them up using various mediums I am going to show you two New Prima products I used to colour these beauties


I am using Parthenay Astisan Powder - color Umber here 
This is an amazing product perfect for adding a vintage touch to your embellishments 


Take some powder and using a brush dust your embellishment I like using circular motions while doing this step as it helps getting the powder in all the edges


This is how it will look when done. You can use it as it is now or follow the next step. 


Take a damp cloth you can use a wet wipe too for this step and slowly buff up the piece 


removing the powder from the top layer of the embellishment 

Creating a two tone embellishment :)


The next medium I used is The Art Alchemy Paints- I've used 2 colours Opal Magic Rose Gold 
and Metalllique Steapmunk- Copper Both the paints are amazing the only difference is the Rose Gold has a translucent finish and the Copper has a opaque finish. 
Ive tried the copper paint on various surfaces and the look is amazing I hihgly recommend eveyone to invest in these paints! They are perfect for adding some glam to your projects and they work great for mixed media!

Hope you all enjoyed today's post! Feel free to ask any questions. 

Have a good day!
Lots of love
Anchal Sapra


PRODUCTS USED