
Hi everyone,
Hussena here to share with you a very simple and quick tutorial on how to make a flower using the Cheery Lynn Sunflower die!
Let's start with the supplies that you will need first :-
 You will need :
Cheery Lynn Sunflower die/die-cuts (4-5 pieces).
A ranger craft sheet/Any laminated sheet.
Distress stains/Distress inks of your choice.
Ranger ink blending tool /Applicator foams.
Embossing tool (I have used the Fiskars dual tip one).
Embossing mat.
Perfect Pearls of your choice(This is not necessary)
And here's how you go about creating your flower :-
Step 1 : Take the flowers and apply the Distress stain color of your choice on one side of the die-cut...The distress stains bottles have a felt tip and you have to press it on your craft sheet first to get the liquid flowing and once that's done you will find that the stain comes out of the bottle evenly...So you can color your flower as dark or as you light as you want it....Similarly,color the centre of the flower which you have die-cut along with the flower using a contrasting stain color (Here,I have used Peacock feathers and Wild honey distress stains).

Step 2 : Now, emboss the underside of the flower from where you have applied the stain..Then,once that is done,turn the flower around and emboss the centre of it as shown in the picture.
 Step 3 : Once the flowers are embossed ,start assembling them one above the other...Build atleast 3 layers in this way.
 Step 4 : Once,the 3 layers are done,for the 4th layer cut a slit through the petals to the centre of the flower...And overlap the slit area and glue it,so the flower becomes one size smaller and now place this on top of the 3 layers.
 Step 5 : Finally,for the last layer of the flower ,curl your petals inward first and then using your tip of the embossing tool,shape the petals by bending the top of the petals a little bit outwards as shown in the picture and also very importantly the last layer of the flower has to be colored using the distress stain on both the sides....As,this layer will show on both the sides.


Have a nice day everyone!
www.crafterscorner.in(All craft supplies under one roof)
For further information please contact us at : info@crafterscorner.in
Hussena here to share with you a very simple and quick tutorial on how to make a flower using the Cheery Lynn Sunflower die!
Let's start with the supplies that you will need first :-
Cheery Lynn Sunflower die/die-cuts (4-5 pieces).
A ranger craft sheet/Any laminated sheet.
Distress stains/Distress inks of your choice.
Ranger ink blending tool /Applicator foams.
Embossing tool (I have used the Fiskars dual tip one).
Embossing mat.
Perfect Pearls of your choice(This is not necessary)
And here's how you go about creating your flower :-
Step 1 : Take the flowers and apply the Distress stain color of your choice on one side of the die-cut...The distress stains bottles have a felt tip and you have to press it on your craft sheet first to get the liquid flowing and once that's done you will find that the stain comes out of the bottle evenly...So you can color your flower as dark or as you light as you want it....Similarly,color the centre of the flower which you have die-cut along with the flower using a contrasting stain color (Here,I have used Peacock feathers and Wild honey distress stains).
Step 6 : Once the final layer has been placed,its time to emboss the centre circle of the flower.
Step 7 : I have added two layers for the centre circle,you can decide how many layers you want to put in your flowers...After,the centre of the flower has been embossed and placed I have distressed the edges of the flowers using the Scattered straw distress ink....It gives a nice tone to the flowers.
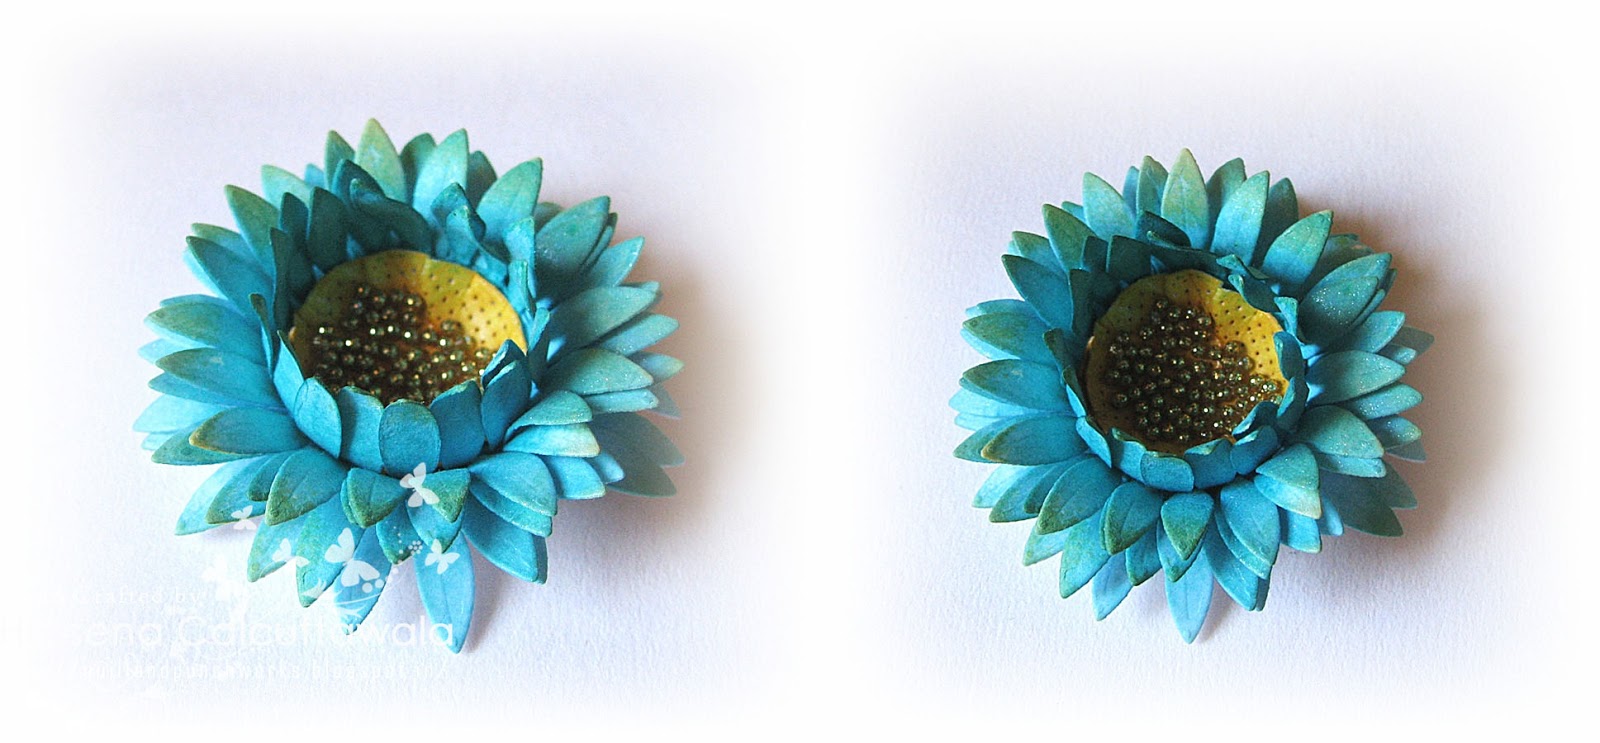
Step 8 : This is how the end flower will look like...I have added glitter balls to the centre of the flower to give it a shine and finally also sprayed some perfect pearls on it.
And this is how I have used the flower on my card :-
I hope you all liked the tutorial that I have shared.I know its a simple one so I hope you all give it a try :)..If you have any queries regarding the tutorial or the products used here,please leave me a comment below or mail us at : info@crafterscorner.in
I would love to know your thoughts on this tute so please do drop me a line :) ..I will appreciate your suggestions !
www.crafterscorner.in(All craft supplies under one roof)
For further information please contact us at : info@crafterscorner.in
This is sooo lovely..! Thank you so much Hussena for the detailed tutorial.. I am soooo tempted to buy this die now!
ReplyDeleteYou made it look so simple to make such a b'ful flower..
Thanks Hussena for the tutorial, love your flower and the card!!
ReplyDeletethanks for the tutorial hussena !! love the sunflower :)
ReplyDeletebeautiful flower Hussena..thanks for sharing the tute !!
ReplyDeletesuch a beauty, thanks for the tut hussena
ReplyDeleteawesome tutorial and lovely flowers and colour combination
ReplyDeleteSo well explained tute! Thanks soooo much for granting my wish! :D
ReplyDeletelovely flower..
what a stunning creation...n thanx a lot for sharing.
ReplyDeletethanks Hussena for sharing this cute sunflower making tutorial! always loved your flowers! :)
ReplyDeleteLoved ur tute Hussena....how easily have done this amazing beautiful sunflowers...thanks a lot 4 sharing
ReplyDeletebeautiful!! thanks for the tute:)
ReplyDeleteSo pretty, Hussena! Great tutorial!
ReplyDeleteYou have made it look so easy!!! Thanks Huseena.....it looks really pretty!!!
ReplyDeleteYou have made it look so easy!!! Thanks Huseena.....it looks really pretty!!!
ReplyDeleteAbsolutely lovely flower and a fabulous tutorial.I love the idea of the glitter balls in the center.Looks like real pollens.
ReplyDeleteWOnderful tutorial ..I had loved the bloom since I saw it on your card..and how nice of you to make a tut for it ! Thanks a lot !
ReplyDeleteWow this is very clever! Love it!
ReplyDeletebeautiful flower, Hussena's flower secret is revealed, thanks for sharing dear
ReplyDeleteHey Hussena, thanks so much for sharing, love your attention to detail!
ReplyDelete