I was so excited to see all the beautiful beautiful flower dies Shalini released and even though it is hard to pick a favorite....the
There are a total of 14 dies in this set and it is perfect to make roses ranging in size from tiny rose buds to really huge blooms!
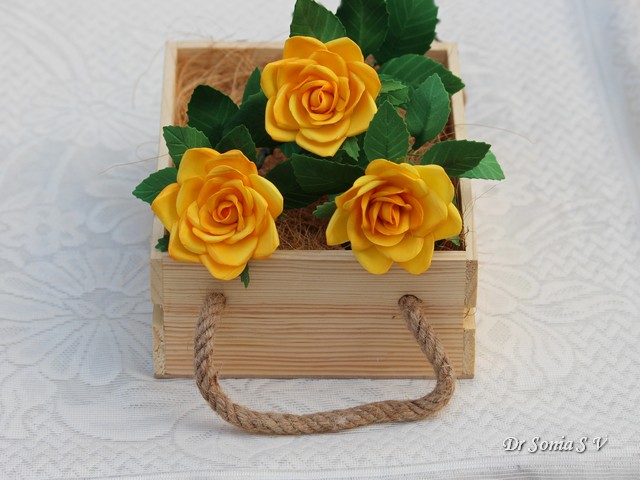
Foamiran Roses and Leaves Tutorial
You can use just 2 sizes of petals to make large foamiran roses. Die cut 5 sheets of foamiran at a time using the petal dies.This not only saves time but helps to thin the foamiran even further!
 |
| Foamiran Rose Tutorial |
Die cut at least 2+3+5 [these are the petals in each layer from inside to out] =10 small petals and 5+7 [outer 2 layers of petals]= 12 larger petals. Always cut a few extra petals as foamiran is very thin and it is inevitable to tear a few petals as you work especially if you are impatient like me!
 |
| Foamiran Rose Tutorial |
Use a coloring media of your choice to shade petals if you wish. For these roses I lightly shaded the upper part of the petals with
Mungyo Artists Soft Oil Pastels. I shaded the small petals slightly darker.
Tip: Shading the central petals darker helps to give more depth to your flower.
 |
| Foamiran Rose Tutorial |
Shape the petals into a cup shape using your fingers or a ball tool. If you want to save time you can heat your petals by touching the petals to an iron and your petals will quickly curl into a cup shape but this does tend to make your petals thicker !
Tip: Using your fingers is faster but make sure you don't have nails on your fingers as otherwise you will get nail marks on your petals!
 |
| Foamiran Rose Tutorial |
Take a forceps and grasp the upper edge of your petal as shown.
 |
| Foamiran Rose Tutorial |
Twist the forceps to the back as shown.
 |
| Foamiran Rose Tutorial |
Heat this edge on the iron box for a few seconds
 |
| Foamiran Rose Tutorial |
Remove and curl it into place using your fingers again.This is how the back of your petal will look now.
 |
| Foamiran Rose Tutorial |
Do the same for the other side of your petal.
 |
| Foamiran Rose Tutorial |
Sometimes as your heat the petal the cupping may smoothen out...then use your ball tool/finger again to cup the central part again.
 |
| Foamiran Rose Tutorial |
Don't be frustrated if you tear a few petals in this shaping step !! Shape all your petals in this way. You will need around 10 small and 12 large petals to make your rose.
 |
| Foamiran Rose Tutorial |
The easiest way to make a rose is by starting with the bud. You can use a crunched up cotton ball, aluminium foil , clay or even a paper ball as your center.
I used the pointed
Styrofoam buds from Dress My Craft for my rose center...love that these come in many sizes,have a wire stem to hold and the shape is just perfect!
 |
| Foamiran Rose Tutorial |
Glue 2 petals overlapping each other around the central Styrofoam bud.
Tip: the quickest glue for foamiran is hot glue but be very sparing in the amount of glue you use and only apply at the lower part of the petal...that way you wont see unsightly white blobs of glue when you make your flower!
 |
| Foamiran Rose Tutorial |
For the 2nd layer use 2 to 3 petals. The easiest for beginners is to use 2 petals in the 2nd layer as trying to get in 3 petals is a tight fit ...so don't be frustrated if your rose center doesn't look as cool as you wanted it to!
 |
| Foamiran Rose Tutorial |
Add 4 to 5 layers in the 3rd layer. Working in 5 petals in easier
Tip: Once you have made one or 2 flowers you will quickly understand the right amount of overlap to get that perfect petal arrangement!
 |
| Foamiran Rose Tutorial |
Add the outer 2 layers in the same way...overlapping the petals as you glue.
 |
| Foamiran Roses and Leaves |
If you are making a bouquet or a home decor item the under-surface of the flower will be visible...add a calyx using the calyx die in the set.
 |
| Foamiran Rose Tutorial |
Scrunch up the die cut calyx to make it look more natural. Turn your rose over and apply a blob of glue on the center . Add your calyx, curling it to overlap and cover the center and stem of your rose.
 |
| Foamiran Rose Tutorial |
How to make Foamiran Leaves
 |
| Foamiran Leaf Tutorial |
Once again die cut 5 sheets at a time ...this helps to make the leaves thinner.
 |
| Foamiran Leaf Tutorial |
You can draw,use mould or even stamp to add veins to the leaves but here is a super easy way to add lovely veins.
Place the leaves on a perforating pad [ used in parchment craft and flower making] or a thick mouse pad and run the pointed tip of the
Dress My Craft golf tool on the leaves to make your veins.
 |
| Foamiran Leaf Tutorial |
It is so quick to make your leaves using this method!
Tip: Hold your tool in a slanted fashion rather than vertically up...this way you will not tear through the delicate foamiran.
 |
| Foamiran Leaf Tutorial |
If you are making a bouquet you need to add leaf stalks...sharing a quick tip to make your job easy and fast: Insert floral wires an inch or so into the glue bottle, twirl and remove it.
Tip : Use a quick drying tacky glue for fast and mess free results. I used Aleene's tacky glue here.
 |
| Foamiran Leaf Tutorial |
Stick the wire on the under-surface of your leaf[ the surface with the less prominent vein markings]
 |
| Foamiran Leaf Tutorial |
It is faster and more fun if you batch process a bunch of leaves in one go!
 |
| Foamiran Leaf Tutorial |
Leave undisturbed to dry . Be patient!!
 |
| Foamiran Leaf Tutorial |
And voila...your beautiful leaves are ready to go on your floral arrangement!!
 |
| Foamiran Roses and Leaves |
I hope you liked this project and found the tips and techniques useful.