Followers

Thursday 27 September 2018

Fridge magnets with DMC sparkling dust

Hellooo...
This Thursday am back with a video tutorial.

A fun tutorial on how to convert plastic lids into FRIDGE MAGNETS!!!

Very little things required but the finale is the DMC SPARKLING DUST which seals the deal here and takes this project to an entirely different level..

Believe me or not...

Here is video tutorial...Have a look and let me know.


Your feedback is so valuable and appreciate you all taking the time to do do.

Thanks for stopping by!

Until my next creative journey,
Happy crafting and recycling.
Cheers,

Rupa

Monday 24 September 2018

ColorFull AlbumNote Book

Good Evening Crafters,
This is Suzna, Today i'm sharing a colorful small travel note books. Especially for kids. Look at these soft colors
I love it :) 


I love mixing collection of paper clips, color threads and keep it in colorful envelops...:) how cute it is......See my envelops (4.5X6"), i added few fussy cut images....and stamped butterflies too.


So are you ready to make this?
May be you wont get exact same papers. Now a days many craft companies are launching different theme paper pads. These are my favorites brands DMC, G45 , Prima, Echo park, Simple stories, and Trim craft. 
So I Select colorful paper pad for this. Actually I am planing to buy Simple stories, but most of them out of stock in CC. But dont worry :) CC have many brands and i got this :)
  

This is double side design paper pad
side 1 (below)


Side 2


I took few papers (3 no ) very thin color papers. This is A4 size. I cut it half and i score the line on center.... fold it together again like book. So size of my book is 4X6inch and total no of page is 12.


Next step is trim the design papers
My note book approximate size is 4.1X6 inch
So i trim my papers to 6X12 inches, and score the line depends on my color paper size. 


Last part of design paper, i make it as pocket :)


Folding all papers and arranging like layers one by one. Here i use some color tread to attach all papers. I feel that is too Easy way of binding.


For decoration i'm adding few cards, That is from the same paper pad collection


Use thick thread, like embroidery threads


Now its come like small colorfull book. 


And finally i had to end my album design with paper clips. It is best option, cheap and cute one for closer the open cards :) instead of using magnet, used color clips :)


Thanks for stopping by..... 
I hope that you enjoyed my cute travel Album book
Hugs 
Suzna
To see more creation MyInstagram


Supply used

Score Board: Check Brand new DMC Score board
Paper-embellishments: From Simple stories
Echo Park paper 12X12"
Light weight color papers are from local stationary shop
Red Tacky tape
Brand New DMC Paper cutter


Sunday 23 September 2018

DMC Floral Layout

Greetings Everyone

How have you been?
I am back again with my madness for Dress My Craft Banner Punch 
These punches are amazing and versatile.

Today I am have made some embellishment for my scrapbook layout using the Dress My Craft Banner Punch 
It's indeed very self explanatory and there is no rocket science in making these cute little embellishment.


Here is my scrapbook layout!!
How is it ??

I am in love with DMC Floral Symphony Paper collection, it's chic beautiful and it does have beautiful soft colors to work with and the outcome is always amazing.


As you can see I have made those banners using my Dress My craft Banner punch and in no time I was able to make them.
Here is  a closer look for the same-


 How to make these banner- 

- Take any piece of cardstock I have used the scraps here and randomly cut in different sizes and finally trimmed the edges using DMC banner punch.
-I have layered each banner with different pieces of banner pasted on top of another.
- lastly I have used Dress My Craft Rainbow glitter and used them on the edges and prima art stones (mini) and colorful glitter balls. they have been adhered using prima soft mat transparent gel.


I am in love with Dress My craft Rainbow glitter and I have used them all over my layout. 
here are some close ups of the same.


Dress My Craft Rainbow Glitter 
I hope you like this easy peasy layout. I am linking all the products used at the end of the post.

I really hope I was able to inspire you all, Keeping checking the space for more inspirations by my fellow team mates.

Have a Nice day 
XOXO
Isha 


Product List :


Wednesday 19 September 2018

TREAT BOXES : DRESS MY CRAFT RECTANGULAR TAG PUNCH

Greetings Everyone

How have you been .....
Today I have some really cool fun project to share with you all ... TREAT BOXES!!!

Since the festivity is around the corner and we definitely love to give gifts to our near and dear ones.
Keeping this idea in mind I decided to make cute treat little boxes using Dress My Craft Rectangular Tag Punch.

Have a Look

Making these treat boxes were super quick and I love love love my DMC Rectangular tag punch

I have Video Tutorial for you all, showcasing how I created these.
The idea is really very simple and with the same method/idea you can make different types of treat favor boxes.

VIDEO TUTORIAL 


I hope I was able to inspire you all and if in case you still not able to decide to buy your tag punches well it is the time BUY ONE now.... and believe me you wont regret buying it.


XOXO 
Isha 


Product List/Supplies used- 


Thursday 13 September 2018

Cadence Textile Sprays

Hellloo...

Rupa here this THURSDAY, with a video tutorial.

Today I am going to be showing you lot of things that can done with the Cadence Textile sprays.


Firstly, these sprays come in a range of colors.
They can be used easily along with stencils or free hand.
They are permanent and are washable.
Iron on reverse of fabric when dry to seal the colors.
Mild hand wash is only recommended.

Here is what all I have created with the sprays.


Enjoy the tutorial here and as always would love to hear your feedback.


But remember to grab your sprays from Crafters Corner and show your creativity.
This festive season should give you a lot of reason to work with these for some unique gifting! Think about it.

Products from the store...
Cadence textile sprays
Cadence stencil adhesive spray
Cadence Trendy shadow alphabet stencils
DMC stencils
Cadence fabric glitter gold relief paste

Until my next creative journey,
Happy crafting and recycling.
Cheers.
Wishing all the viewers a very HAPPY GANESH CHATHURTHI.


Tuesday 11 September 2018

Triple Punches Review and Projects

Projects with Dress My Craft Punches
            Hi friends,Dr Sonia here and I am very excited to share a review post and project ideas on my first love Craft Punches . I was so thrilled when I came to know that  Shalini  launched Craft Punches under her brand Dress My Craft !
Shalini always maintains a high benchmark for the products she stocks in her shop and even higher standards for products under her brand Dress My Craft  so even before I got my hands on the new punches I knew they would be fabulous !!

And these punches have truly exceeded my expectations and that is not  just the "DT" in me speaking but a paper-crafter who loves fabulous tools !!

In this post I will demo the Triple Punches and show you how versatile they are with a couple of projects.
Triple Punches
Special Features of the Triple Punches 
  • Size : They are pretty large and sturdy Punches and can punch  paper widths of upto 2.5 inches 
  • No limit to the length of paper you can punch!
  • Mechanism :All 3 Triple Punches act by the  "Lever mechanism" which is personally my most favorite punch mechanism as not only is it easier to punch paper using lever punches but it also gives cleaner cuts
  • Can hold in hand and punch! Because of the levering mechanism you can hold the punch and punch with your hand instead of having to always set it on a surface to punch.This is an advantage when you want to use the negatives of the punch-outs as shown in my video.
  • Layering Punches- The base of the 3 punches have markings of 1.5, 2 and 2.5 inches on wedges to fit papers of these 3 widths-  this makes layering of your punched out tags and banners super easy. 
  • Wedged Paper feeder
    Triple Punch Mechanism
    The wedges on the paper feeder base are an especially useful feature as if you cut your paper to size and feed it into a wedge say 1.5 or 2 or 2.5 inches...you can easily align the edges of your paper so that you dont get a wonky or crooked tag/banner.
  • Another advantage of the  wedges is it allows you to easily align paper widths such as 1 and 3/4 or 2 and 1/4th to make layering quicker and easier.
  • Nonskid Base : The base has built in nonskid discs which is especially handy when you are working with big punches such as these.
  • Heavy duty Punch : The punches can easily punch papers of 300g and it even smoothly punched ivory sheets!
  • Punches Thin Paper too- now you may be wondering why am I listing this as an advantage of these Dress My Craft punches...well surprisingly some heavy duty punches  give jagged edges with thin paper as they are meant to be used with card-stock! Happily the Dress My Craft punches give fabulous cuts with thin paper too!
  • Cut pieces are useful too! I  am sure there are many of you who like  to waste as little paper as is practically possible when you craft. I love it when I can creatively use the negatives and little bits which are left  with the main punched design . When you scroll down you'll see how easy it is to create chevrons and beautiful patterns with the negative bits of the triple punch designs!
Ok now that I have talked to you about the salient features let me show you some project ideas to show the versatility of the Triple punch designs

Apart from the obvious tags and banners here are more ideas

  1. Layered Bookmarks
  2. Mini Album/Box Closure Mechanism
  3. Business/ID Card Holder Box
  4. Accordion Box
  5. Organiser/Gift Basket
Bookmarks

When I got the triple punches a few days back I was frantically making notepad holders as Teacher's Day gifts and these layering punches were quite  handy to quickly make some gorgeous matching bookmarks for my daughter's teachers. 

I used the Rounded Tag Punch to create the layered bookmarks. It is very easy to create layers quickly using the wedges and marking.
Crafty Tip
If you are using the increments of 0.5 inches width strips....increase your paper strips by 1/4th inch only to get the perfect margin.


One big time saver with this tag punch is the hole which also punches perfectly with the rounded top shape. You just have to add an eyelet and a thread to finish the  bookmarks!

The lemony bookmark was created by punch through very thin paper and it was layered on Dress My Craft Textured pink card-stock which is of 300g!


The chocolate bookmark below has a base made of ivory sheet through which the Tag punch worked beautifully.

I played around with the measurements of the strips to get borders of different widths.

Love how the punches work beautifully with different papers. The Blue bookmark was made with Dress My Craft Hydrangea Lawns and the pink one with Lemoncraft Fresh Summers...both papers varying widely in thickness but punched out beautifully with the tag punch.

The raspberry set was made with DCWV papers

The  green one below was made with Lemoncraft papers

In case you are interested in how I made the Shaker Notepad Holders here is the link : Teachers Day Gifts
 Box / Mini Album Closure

 The shape of the Rounded Tag is just perfect to make a stylish closure mechanism!

I created a acetate window box from this project : Foamiran Flowers Hanging Decoration and made a secure closure using the Rounded Tag punch.

 You just have to add an eyelet and thread a ribbon/twine to create the closure.

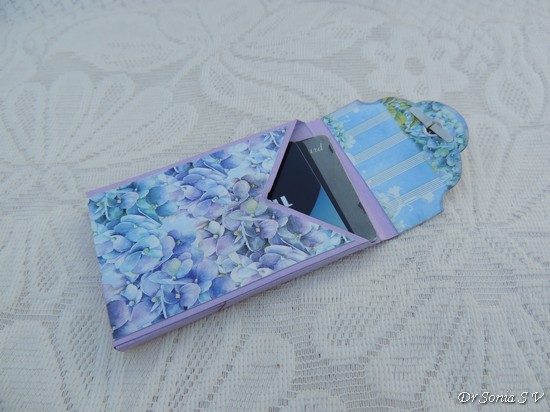
ID Card/Business Card Holder


These cute Mini Flip top boxes are designed to hold ID/Business Cards. They are made from  10 and 1/4  x 4 inch pieces of card-stock using the rounded tag punch.

Accordion Boxes

 This box looks similar to the boxes shown above but is much easier to make and is quite roomier too.

It is an accordion box which is 1/2 inch thick and you can size it at different lengths to hold tags, I love you notes, small photographs etc.


I designed them to hold Membership cards.


 The base is made from a single strip of cardstock measuring 2.5 x 10 and 1/4 inches

  Accordions on the sides allow partition of the inside of the box

 And the accordions allow the holder to expand when you open it.

The dimensions are perfect to hold Membership/ID cards and will make such cute gifts!

Chevron Pattern


Here are the backsides of the boxes showing how you can use the negatives of the punch-outs to create chevron patterns. They would look beautiful in cards too.
And here is a video showing the punches in action and a Tutorial to make the accordion holders


Organizer Baskets/ Gift Basket

Because the Tag Punch can punch through really thick paper...it is fabulous to make Mini Organisers or Gift baskets. These cute Organisers  have wooden dowel sticks threaded through eyelets in the tags and you can carry them around by holding the rods.


 You can make them as long as you want. These are 4 inches long and are perfect to hold tiny bottles of nail polish [above]  or crafting supplies such as Alcohol Inks [below]!

I hope you liked the project ideas and before I bid adieu don't forget to check out this post on the  Use and Care of your Craft Punches 
Supplies
Punches :-Banner Punch ,Rounded Tag Punch ,Rectangular Tag Punch 
Papers : Dress My Craft Floral Symphony, Dress My Craft Hydrangea Lawns, Dress My Craft Pastel Pink Textured Cardstock, K and Company Tim Coffey Cottage Garden Specialty Paper, Acetate
Dies : Gina Marie Picket Fence,Elizabeth Craft Designs 728 Bunch of Flowers,Magnolia Doohickeys Vintage Box Lacing Coffee