Followers

Showing posts with label altered clock. Show all posts

Monday, 13 March 2017

Altered Clock Frame

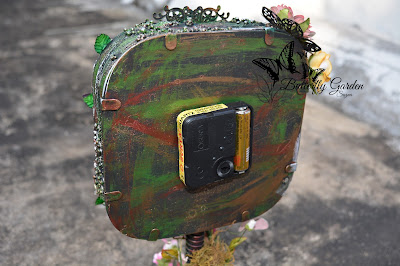
Hi everyone! It's Suzna and I'm back with crazy creative project. Yes mixed media Prima Marketing metal frame.Today I'd like to show you one of the projects I decided to put real clock inside frame - I'm sure you remember my Altered tuna tin art   


I create texture and color for backgrounds…its basically the same way do in canvas.
So today I will Show you and Give you Ideas how to make your own Altered frame
Here I have basic tutorial pics.

Step 1. Choose your favorite metal frame from Prima Marketing  


Step 2. Which is very flexible to remove and attach the frame like this 

Step 3. Make a hole in center for attach the clock motor.


Step 4. Select clock design depends on needle
  
 
I choose numbers

 
Step 5. Cover the whole frame area with a coat of black Gesso


Step 6. Decorate 2 sides of the frame with flower

 
Step 7. By using mode podge & 3D matt gel i attach the bandage cloth and prima art stone on the outer side of frame
 
  
Stencil design on background 


Step 8. Again 1 layer of black gesso, and thine layer touch up with white gesso   
 
Step 9. Randomly start coloring with Prima acrylic metallic colors, Mainly outer part of frame - Royal red, Emerald green, Steampunk copper & Olive green.
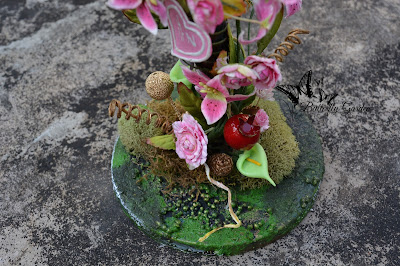
Inside frame : Aqua rose, Viva inka gold 
 

Step 10. Once it done coloring, i decorate my frame with metal charms, Prima flowers, preserved mosses etc 

 
Below image you can see, I attach Prima metal charm : bottle cap. But my clock needle cant move, so i removed that design and i choose thine metal round design charm 
 
Adding more texture with plaid craft product.


Few more decoration 
 
Inside view is so dark, so i painted with Prima acrylic Aqua rose 
 

I hope you are a bit inspired and you enjoyed 
Some more close ups 


Thank you for stopping by
Hugs 
Suzna

Supplies Used


Wednesday, 11 February 2015

Make your own resin embellishments

Hello everyone

Are you all ready for some ice resin fun.  I want to share with you all some more projects using ice resin. And to make it more fun i will combine them with various mediums.

Here is a detailed start to finish video of how to make resin embellishments on your own  here.


And here is what i have created with my resin embellishments. A shabby chic altered clock for valentines day.


Materials used


Thanks for visiting 
Don't forget to subscribe

Ciao 
Ashmita Roy

Saturday, 6 September 2014

Altered Clock

Hello everyone!
As you all know the theme for this month is - All about Embellishments! What a super fun theme for an embellishments addict like me hehe!
I decided to alter the Tim Holtz Assemblage Clock!
Hope you all like it!

 That super cute nest is from the store!


Instructions- I started with painting the base with gesso and paints, then layered it with some laces from my stash and finally decorated it with various charms, pretty mulberry flowers and resin flowers available at the store! We have some gorgeous collection of charms! From that cute 3d sewing machine to that royal key you'll find all at the store!

Hope you all liked my project dont forget to leave some love!
Hugs
Anchal Sapra

PRODUCT DETAILS
Ideology Assemblage clock
Liquid pearl
Prima Swirls
Resin Flowers
3d sewing machine charm
Angel wing charm
Bird with nest charm
Dress charm
Hanger Charm
Princess comb charm
Hand mirror- oval
Key charm
Light pink micro roses
Poppy rose flower

Tuesday, 13 May 2014

Altered Clock Tutorial

Hello everyone!
How are you all doing? I hope you all are enjoying the awesome tutorials my fellow DT's are posting! So today its my turn to post a video tutorial for all of you. I'm so excited!
The project that i will be making today is this altered Tim Holtz clock. Isn't is pretty? I wanted to make something rusty and grunge! I've used a few new products in altering this clock.


The first new product i have used is the Prima color bloom sprays! They are sooo awesome! I've fallen in love with them. We have all 22 shades available at our store. Do check them out at Crafters Corner- Color Bloom Sprays!

The second new product i used is Studio 490- Metallic Gold Embossing paste This is an awesome product its similar to the molding paste we use but it comes in gold and it has one awesome quality. If you use the embossing paste over a background created with mists or distress inks it absorbs some of it and adds the colour to its own tinge.

Now moving to the video. Here it is! Sit back and watch . P.s- ignore me getting out of focus at times i move my project a lot while working. Incase you have any query please feel free to ask. I'd love to help!


List of supplies used-
1) Tim Holtz Assemblage Clock
2)Prima Bloom spray- Worn Leather
3)Prima Bloom Spray- Gold Foil
4)Tim Holtz Die cuts
5)Studio 490 Gold Embossing paste
6)Prima Fairy Rhymes Crystal swirls
7)French pasty doily die
8)Distress ink- Rusty Hindge
9)Distress ink- Tea Dye
10)Chandelier Charm
11)Clock charm
12)3D Bird cage charm
13)Tiny Bird cage
14)Tonic Scissor
15)Craft Sheet
16)Ranger heat tool
Mullberry flowers, lace from my stash.

Hope you all enjoyed the tutorial.
Dont forget to take part in our current Challenge#16- Something Special!!

Thanks for stopping by!
Hugs
Anchal Sapra