Followers

Showing posts with label textures. Show all posts

Saturday, 24 February 2018

Mixed Media Canvas & Layouts: Guest Design Post by Preeti Datta

Hi folks!

Preeti Datta (aka Dutt Preety) here. Good Morning :) 
I am thrilled & honored to be back on the Crafter’s Corner Blog as a Guest Designer. 
Very grateful for this opportunity. Thanks a ton to Shalini di & the whole team at Crafters Corner.

I will be sharing 3 projects today; a Vintage Themed Mixed Media Canvas & 2 Mixed Media Layouts. 

I’ve used Dress My Craft's gorgeous products: Stencils, Glitters, Beads, Papers, Flowers & other craft supplies from the Crafter's Corner store

Let's get started. 

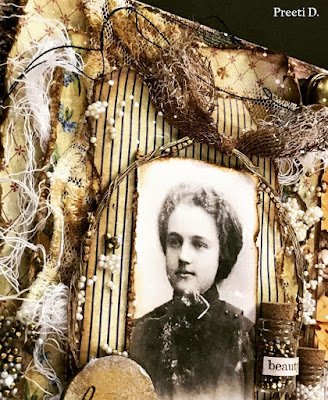
1. Vintage Mixed Media Canvas- "Dream"


Here are some close-up photos to reveal the intricate details :- 


Collage of the Process Photos: 


Synopsis of the Process: Prepared the canvas (10 by 8 inches) with Prima's Heavy White Gesso and added texture through DMC's Swirls & Couture Fashion stencils & Prima's modelling paste. Created the composition in the background with laces, then added color with Lindy's sprays. For more texture & details, did background stamping with a Prima stamp & Potting Soil Archival Ink, added DMC's pearl micro beads, golden antique beads, DMC rainbow glitter using Prima's 3d Matte Gel, made a wire embellishment with DMC's golden antique beads & prepared the Dusty Attic chipboards by heat embossing them & adding some DMC rainbow glitter chunks to them. Also, added tiny glass bottles with DMC's pearl micro beads, golden antique beads, stickers, thread, antique brads & rolled up book paper cigars. For creating the layers, used papers from DMC's Teenie Weenie Paper pack, fussy cut elements from DMC's motif sheets, added gauze & lace. In the end, created ink splatter, distressed the edges of the canvas with Vintage Photo Distress Ink & added a little shine using Inka Gold & Prima waxes.

2. Mixed Media Layout- Celebrate


Here are some close-up photos of the layout:


Collage of the Process Photos:

Synopsis of the Process: Prepared the base with Prima's Heavy White Gesso & then applied Prima's Modelling Paste through DMC's Alphas Stencil. Added color using ink sprays & distress inks/oxides. Added more interest to the background by stamping with archival inks & sponging on distress oxides through DMC's Thumb Print & Couture Fashion Stencils. Then prepared the elements for layering & embellishments by using DMC's Dots N Stripes Paper Pack & Motif Sheets. Further, gathered all the elements for layering like flowers, die cuts, laces, twine, gauze, DMC's 3D Fairy flowers (altered the color by applying gesso and then coloring with sprays) pollens etc and created a composition. In the end, added texture & shine to the flowers and in places around the layout, using DMC's Pearl Micro Beads, DMC sequins, Little Hearts, Rainbow Glitter, Microfine Glitter Powder & Rainbow Glitter Chunks using Prima's 3D Matte Gel. 

3. Mixed Media Layout- Dream Big


Here are some close-up photos of the layout:


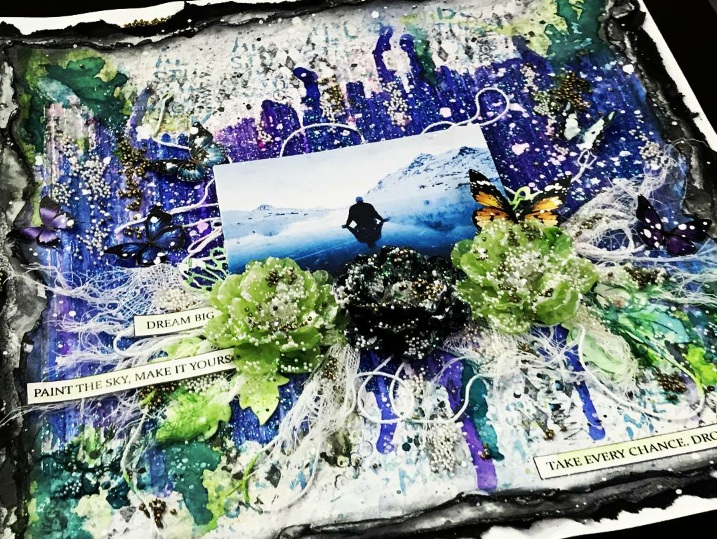
Synopsis of the Process: Prepped one of the Pattern Papers from DMC's Hydrangea Lawns Paper Pack with Prima's Clear Gesso and applied Prima's Modelling Paste through DMC's Thumbprint Stencil. Then added  DMC's Rainbow Glitter & Microfine Glitter Powder to add sparkle to the background. Sprayed on a spray sealer (to bind the glitter to the layout better) then deckled the edges of the paper & adhered it to other deckled & distress edged papers to create a layered 3-D look.  For the main composition, used DMC's 3D Fairy Flowers, twine, gauze & die cuts. Fussy cut the butterflies & titles from DMC's  Motif Sheets. Did background stamping & added color to the background with ink sprays. Added texture & shine to the flowers and in places around the layout, using DMC's Pearl Micro Beads, Golden Antique Beads, DMC sequinsRainbow GlitterMicrofine Glitter Powder & Rainbow Glitter Chunks using Prima's 3D Matte Gel. In the end, created white ink splatter. 

That's all for today :) 

In case, you'd like to check out my first GD post where I shared 8 Simple Mixed Media Cards (using DMC stencils & glitters), please click HERE.

I'm very grateful to Crafter's Corner for this experience. I had so much fun playing with the supplies. I highly recommend that you check out their website, HERE and also, their brand- Dress My Craft for it’s Stencils, Glitters, Sequins, Flowers, Pattern Papers, charms, miniatures etc They have a plethora of cool options to choose from. Buy a few to try them out, experiment and see the quality for yourself. I'm sure you'll love them :) 

Please don't forget, there is a great deal on DMC stencils via a Grab Bag Offer,wherein you can pick up all 12, A4 sized DMC stencils at a discounted price, please click HERE to check it out. 

Have a great weekend!
Thanks a lot for your precious time :)
Stay Blessed
Preeti Datta
Blog
Instagram

Thursday, 11 August 2016

Mixed Media Stencilling Tips

Hi friends, Dr Sonia with the finale to the Stencils Series. In case you missed the earlier posts here are the links : Stencils Part 1Stencils Part 2
              Mixed Media can be scary for a beginner as  mistakes  are bound to happen...you may not like a portion of the  smudged stencilled design or the area where your ink was over - sprayed , the starkness or the dullness of the colors etc etc. But a few tricks can help correct mistakes, transform looks and help you create works of art!
While making the first project shared in this post I experienced disappointment and frustration and nearly threw it in the dustbin but fortunately the extremely knowledgeable Shalini guided me as to what was wrong with it and how to salvage it!
In this post along with the step by steps ,will share some of the tips on preventing and correcting mistakes in Mixed Media projects.

Mixed Media Wall Hanging
Supplies
Ranger Texture Paste
Collage Clay
Palette knife
Heartfelt creations Delightful Daisies Stamp and die
Heartfelt Creations Botanical Wings stamp and die

My mixed media plaque celebrates life and enchanting nature with a butterfly and an angel encompassed in a semicircle of soft vellum flowers!

Vintage white and coppery gold balanced the bright raspberry pink in this wallhanging!!
One corner has vintage scroll resin embellishment and crackle texture created with clear rock candy and highlighted with Distress Inks .

The flower was created using Heartfelt Creations Rose stamp , Distress Inks  , Art Anthology sprays and Diamond dust.

The lower corner has typical mixed media texturing created using buttons, die cuts, pearls and resin embellishments

 And here are some of the steps in the creation of this mixed media art.

I recycled a sturdy cake base to create my mixed media plaque. After a nice coat of gesso painted the base with Folk art Vintage White paint.

Used a mask stencil called Carabelle Studio Papillon Stencil with Distress Ink and got the mask of the stencil design!

Replaced the stencil and applied strawberry collage clay


Collage clay has a thicker texture compared to Ranger Texture paste but you can get a nice coating using a palette knife


Was not happy with the pink look of the collage clay so used Art Anthology sprays and Pink embossing powder in patchy areas.

The butterfly was starting to build up in texture and sparkle!


I was unhappy with the stray smears of ink left by the spray and the dull look of the white so painted over the butterfly with a contrasting Folk art Apple green
Tip : If you are not happy at a point during your mixed media work...add a different type of media like sprays or paints or embossing in same or contrasting colors....it can help totally change the look of your project!

Added more texture with glass Beads gel, chunky glitter and tiny drops of  resin!

Mounted the butterfly onto a curved piece of chipboard to make it sturdy as well as to make it more dimensional when adding to the plaque.


Tip : to bring about a cohesive element in your work use something throughout like splatters of white ink,a same shade of  distress ink or the same color of embossing powder like I did here. 

In this mixed media plaque I have used the same Gold embossing powder on the leaves, flowers, wood grain, stamped sentiment and on the key which forms the body of the butterfly.

My "celebrate " sentiment is also mounted on a curved board before attaching to the base. It has oodles of texture created using embossing powder, glass beads gel and star sequins!

The wood grain was created using the Carabelle Studio Effet Bois  stencil and texture paste . Sprinkled Ranger Gold embossing powder on the wet texture paste and heat embossed to get a beautiful golden wood grain.
Sharing how this project looked like at one stage.....

It was okay but there was something wrong with it!! Fortunately before I dumped it I asked Shalini's opinion and she very clearly told me to get rid of the decoupaged bird however beautiful it looked !
I covered up the bird and the stamped music background with Folk Art vintage white and added a few bits and pieces and could completely transform the look!!

Hope you agree it looks much much better now!!
Mixed Media Wooden Vase
Supplies Used

The Crafters Workshop Mini Tuscan Wall Stencil

Altering a wooden object is such fun and the most common way crafters opt for is decoupage.But if you want to try something more unique and fun...bring out your mixed media supplies and go for it!!!

Apply  a nice coat of gesso on the wooden vase. Gesso is very important here as otherwise your crackle paste can simply fall off at a later!
Once the gesso is dry, choose  your stencils and  crackle paste and gently and carefully apply a uniform coat over your stencil.
Tip : A fairly flat coat of crackle paste will give a better end result  unlike texture paste where you dont really have to bother to get a super flat application.

Tip : The more delicate your stencil is, the more careful you have to be as the paste is not very thick and can easily ooze out of the stencil borders if you are not careful.

Gently lift off your stencil and inspect your stencilling.
 A bit of  my crackle paste has oozed out into the space between the bricks of the arch.Such a mistake can be corrected  by taking a fine paint brush and gently lifting off the excess paste.

I used a beautiful petal stencil on the lower part of the vase and if you are working on stencilling different parts either wait till your first stencilled design is dry or be extra careful you dont smudge the earlier pattern.

When you stencil over an edge you can get tiny overhanging peaks as you can see in this picture...correct this by running your fingers along the edge in one sweeping motion!

Once dry you get a beautiful crackled design

On the upper part of my vase I had used the delicate Carabelle Studio Geometry but as you can see the stencilling is not very crisp in certain areas and the crackle effect is hardly visible !
Tip : Use special effect pastes such as crackle pastes on larger stencil designs and not on delicate patterns.

I loved the color of the platinum crackle paste and it has a lovely rich and elegant look!


Though the crackle effect is soo beautiful ....the contrast was not there and I wanted a more vibrant look...in retrospect I thought I could have stencilled the crackle paste on a darker background but I could still salvage the project!!

I thought of the new Art Anthology's Sorbet paints [can be applied on multiple surfaces ]and I smeared some of the gorgeous Red Velvet Sorbet  all over my vase using my fingers to move the paint around and into the cracks!

This paint has glitter elements added to it and your project will shimmer!!

The Sorbet did change the color of my crackle design but then it looked yummy!


I used a variety of cream white clay and resin embellishments to enhance the contrast!

 How does it look my friends?


I hope you enjoyed both the stencilled creations!!