Followers

Showing posts with label Canvas. Show all posts

Monday, 16 April 2018

Triangular Mixed Media Canvas- Live Beautifully (with Pictorial)

Hi friends!!
Happy Monday :)

Mixed Media is a beautiful style of art and it is a huge field with so many sub-categories. It is a great way to give a new life to old, discarded things around the house & make something beautiful out of them. In this style of art, multiple media are used to create one piece, for example, acrylic paints, sprays, dye inks, gesso, gel medium etc We usually try to create a lot of texture and dimension using different techniques, products & tools. 

I'd like to share a Triangular Mixed Media Canvas- "Live Beautifully" today. It was a lot of fun to make. For the canvas, I wanted it to have nice, cool, fresh colors preserving some white space so I chose blues with a little bit of yellow. I created dimension by adding chipboard pieces in between all the layers (while adhering them). 

Mixed Media Canvas- "Live Beautifully"

Here are some photos of the canvas:


Pictorial: Step by Step Photos of the Process

1. Applied Prima's Heavy White Gesso to the canvas and then applied Modelling Paste through Tim Holtz Gothic Stencil using a palette knife

2. Altered the color of the flowers by spraying them with Lindys Sprays

3. Created clay embellishments with IOD mould and air dry clay. 
(Tip: Sprinkle some powder in the moulds before adding the clay to make de-moulding easier)

4. Added blue shades of color to the canvas using different mediums, sprayed with water to create an organic look & also created ink splatter 

 5. Heat embossed the Dusty Attic Chipboards

6. Altered the butterfly chipboard by applying heavy white gesso and then sprayed with Lindys Spray
(used this method as I wanted the butterfly to match the color of the flowers)

7. To emphasize the relief/raised surfaces of the clay embellishments, applied some blue paint to them with my fingers and then some white gesso to tone down the color and give them a shabby look

8. Colored some bandage gauze with Lindys Spray

9. Created the composition and adhered all the elements with 3D matte gel. 
Added texture to the canvas with a paste of art stones, 3d matte gel & platinum glass glitter

10.In the end, added a few art pebbles with glossy accents & created white splatter with watered down white gesso. 

(If anything is currently out of stock, please email info@crafterscorner.in to place a preorder)

4. Lindys Gang Sprays- Yellow Hues, Blue Hues
11. Dusty Attic Chipboards- Live Beautifully, ATC frame #3, Flutterbies #1
17. Finnabair- Glass Glitter- Platinum
20. Ranger's Super Fine White Embossing Powder, Lemon Yellow Embossing Powder

Also, if you would like to check out my first three blog posts (in the series of Beginner's Guides), please click on the below topics.


As always, we love to see your gorgeous creations using supplies from the Crafters Corner store, so please do share them with us in our Facebook Group- Crafters Corner Showcase using the apt hashtags #craftwithcrafterscorner #dressmycraft #crafterscornerindia, on Twitter and/or on Instagram. And please remember to like/follow Crafter's Corner Facebook Page, Instagram & Youtube Accounts for updates on sales, giveaways, free tutorials and new product information. 

Hope you have a great day!
Thanks a lot for your precious time :)
Stay Blessed!

Friday, 9 March 2018

Easy WaterColor Background Canvas layout

Hello friends!
I have a Easy Water Color Canvas to share today which I made for baby girl.
When I start with canvases my very first steps are something like this, so... to all those people who want to start with mixed media / light Color / Watercolor .. Here you go. Give this a try and you will love it :)


Step 1: Canvas Size 8 x 10 inch, I prepped the surface with some Gesso 

Step 2: Use any flower design stencil to get  beautiful texture look :) 


Step 3: Then i start coloring with Prima water color: I choose Only 2 shades of colors 


Step 4: I used the ball pen for highlighting my texture.


Step 5: I stamped the random area of my canvas.


Step 6: I select few beautiful stuffs from stash for decorating my canvas. 


Then Finally


How is it, Isn't this really easy?
Try it out and Share your beautiful creation
I hope you liked my project.
Have a great Day
Hugs
Suzna
 
Supplies Used

Liquitex Modeling Paste Acrylic Gel Medium
Floral Frames - Chipboard Cutouts
Wildflower #3 - Chipboard Cutouts
Magnolias - Stencils
Acrylic Tube - Gesso
Prima_marketing Flowers
Messy - Stamp
Gabi’s Texture - Stamp
Watercolor-14-color-set
Kuretake-gansai-tambi-set-assorted-Water colors

Saturday, 17 February 2018

Follow your Heart : Golden Canvas

Good Morning Everyone

Someone told me always Follow your Heart, so for today's post I have small canvas which I have made to gift to someone who always follow her heart .....


Its super easy and quick to make, and I find it perfect to gift someone just to remind them how special they are.

I have a step by step pictorial - How to build this GOLDEN CANVAS 

STEP 1
I have taken small canvas 8x8 inches and have applied one layer of Black Gesso.

 STEP 2 
Once gesso dries up, cover the entire surface with texture paste clear crackle
and allow to air dry or you are impatient like me use your heat gun to expedite the process.


Look at these cracks.... 

STEP 3

;
 Once the crackle dries, I have applied texture paste silver antique using ranger stencils bubble.

STEP 4  
 Once dried up, apply randomly brillance wax ( any color of your choice)

STEP 5  
Take Dress My craft pattern papers any print of your choice, cut thin strips and distress the edges all around the strips and squares using Vintage Photo.

 I have randomly pasted the pattern pieces around.

STEP 6 
To tone down or give the frame antique look the I have used ranger gold embossing powder


 Its time to assemble all the flowers and frames on canvas.
The pink big bloom is handmade and for the same I have used DMC glitter and thread pollens.
Rest other flowers are from Prima.

VIOLA its done :)


 I hope you liked my super easy canvas and I also hope was able to inspire you all.
Please find below list of supplies used to make this canvas.

XOXO
Isha 

Products used- 
Canvas - from stash 


Thursday, 23 November 2017

Miniature Mixed Media Canvas


Hello My Dear creative souls,

Today I would like to show you a mini canvas created especially for Dress my craft Ceramic miniatures. I always love to try something different. Here is my another project, Miniature Mixed Media Canvas. I loved it!!! I really had fun with these cute minis.


Of course i took few tutorial pics 

lets start from beginning
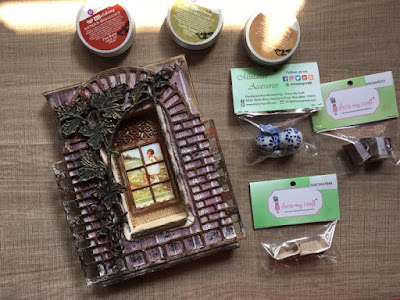
1. I took 5X7" reverse side of canvas, Dusty attic chipboards, and one pattern paper for BG 

2. Here i used 3 different design of Dusty attic chipboard. From that one is negative side of Arch window Dusty attic cut.
I used 3D liner for IVY leaf design. 

3. Then i paint black gesso on chipboard cuts with sponge. not brush  

4. Prima wax are giving perfect result after black gesso. So i like to use those paint with my finger. I dont have much collection of wax. I would like grab more...:-) 

5. Then Start decorating with Dress my Craft minis, flowers and pollen.  


Then Finally 


I really appreciate you drop by and hope you all have a great day!
Hugs
Suz
 
Supplies Used
 
Dusty Attic Chipboard Cuts
Mulberry-flowers-leaves/micro-rose-buds
Mulberry-flowers-leaves/micro-roses
Craft-toppings: Art stones, Spanish Moses
Polish-wax Prima Marketing
Gel-medium-spatula: Black and White Gesso
Adhesivestape Plaid Craft Mode podge
Pollens-fillers
Miniature-mug-with-handle
Miniature-terracotta-deep-dish
Resin-cabochons/colored-sparrow
Resin-cabochons/dove-bird