Followers

Showing posts with label water colour. Show all posts

Monday, 16 April 2018

Triangular Mixed Media Canvas- Live Beautifully (with Pictorial)

Hi friends!!
Happy Monday :)

Mixed Media is a beautiful style of art and it is a huge field with so many sub-categories. It is a great way to give a new life to old, discarded things around the house & make something beautiful out of them. In this style of art, multiple media are used to create one piece, for example, acrylic paints, sprays, dye inks, gesso, gel medium etc We usually try to create a lot of texture and dimension using different techniques, products & tools. 

I'd like to share a Triangular Mixed Media Canvas- "Live Beautifully" today. It was a lot of fun to make. For the canvas, I wanted it to have nice, cool, fresh colors preserving some white space so I chose blues with a little bit of yellow. I created dimension by adding chipboard pieces in between all the layers (while adhering them). 

Mixed Media Canvas- "Live Beautifully"

Here are some photos of the canvas:


Pictorial: Step by Step Photos of the Process

1. Applied Prima's Heavy White Gesso to the canvas and then applied Modelling Paste through Tim Holtz Gothic Stencil using a palette knife

2. Altered the color of the flowers by spraying them with Lindys Sprays

3. Created clay embellishments with IOD mould and air dry clay. 
(Tip: Sprinkle some powder in the moulds before adding the clay to make de-moulding easier)

4. Added blue shades of color to the canvas using different mediums, sprayed with water to create an organic look & also created ink splatter 

 5. Heat embossed the Dusty Attic Chipboards

6. Altered the butterfly chipboard by applying heavy white gesso and then sprayed with Lindys Spray
(used this method as I wanted the butterfly to match the color of the flowers)

7. To emphasize the relief/raised surfaces of the clay embellishments, applied some blue paint to them with my fingers and then some white gesso to tone down the color and give them a shabby look

8. Colored some bandage gauze with Lindys Spray

9. Created the composition and adhered all the elements with 3D matte gel. 
Added texture to the canvas with a paste of art stones, 3d matte gel & platinum glass glitter

10.In the end, added a few art pebbles with glossy accents & created white splatter with watered down white gesso. 

(If anything is currently out of stock, please email info@crafterscorner.in to place a preorder)

4. Lindys Gang Sprays- Yellow Hues, Blue Hues
11. Dusty Attic Chipboards- Live Beautifully, ATC frame #3, Flutterbies #1
17. Finnabair- Glass Glitter- Platinum
20. Ranger's Super Fine White Embossing Powder, Lemon Yellow Embossing Powder

Also, if you would like to check out my first three blog posts (in the series of Beginner's Guides), please click on the below topics.


As always, we love to see your gorgeous creations using supplies from the Crafters Corner store, so please do share them with us in our Facebook Group- Crafters Corner Showcase using the apt hashtags #craftwithcrafterscorner #dressmycraft #crafterscornerindia, on Twitter and/or on Instagram. And please remember to like/follow Crafter's Corner Facebook Page, Instagram & Youtube Accounts for updates on sales, giveaways, free tutorials and new product information. 

Hope you have a great day!
Thanks a lot for your precious time :)
Stay Blessed!

Friday, 9 March 2018

Easy WaterColor Background Canvas layout

Hello friends!
I have a Easy Water Color Canvas to share today which I made for baby girl.
When I start with canvases my very first steps are something like this, so... to all those people who want to start with mixed media / light Color / Watercolor .. Here you go. Give this a try and you will love it :)


Step 1: Canvas Size 8 x 10 inch, I prepped the surface with some Gesso 

Step 2: Use any flower design stencil to get  beautiful texture look :) 


Step 3: Then i start coloring with Prima water color: I choose Only 2 shades of colors 


Step 4: I used the ball pen for highlighting my texture.


Step 5: I stamped the random area of my canvas.


Step 6: I select few beautiful stuffs from stash for decorating my canvas. 


Then Finally


How is it, Isn't this really easy?
Try it out and Share your beautiful creation
I hope you liked my project.
Have a great Day
Hugs
Suzna
 
Supplies Used

Liquitex Modeling Paste Acrylic Gel Medium
Floral Frames - Chipboard Cutouts
Wildflower #3 - Chipboard Cutouts
Magnolias - Stencils
Acrylic Tube - Gesso
Prima_marketing Flowers
Messy - Stamp
Gabi’s Texture - Stamp
Watercolor-14-color-set
Kuretake-gansai-tambi-set-assorted-Water colors

Tuesday, 23 June 2015

Easy techniques with Ken Oliver Crafts Color Bursts

Hello everyone!
Jaya here with you all today :)

Today I will be sharing some easy to follow techniques with Ken Oliver crafts color busrts.
These are the newest addition to the Crafters corner shop and in fact a must try... Especially for all the mixed media artists- beginners and professionals... and all those people who love to try out watercoloring.

What are color bursts?


Color Burst is an amazing concentrated microfine watercolor powder that lets you create beautiful watercolor techniques like never before! This versatile powder can be used with so many fun techniques! 

Spritz your project with water and sprinkle on Color Burst and  you can create amazing designs. 
Sprinkle Color Burst on dry paper and then spritz with water for a completely different look. Dissolve in water and spray from a mister bottle to create your own custom mists.
 The possibilities are endless! 


The best part-

1.Very economical. Each bottle contains around 8 grams  of concentrated pigment powder that is enough to last you for a long time! 

2.A single bottle of pigment powder can give varied results of mist color from lightest to darkest depending on the amount of dilution.

3. As there are 6 colors- 3 primary and 3 secondary, there is an endless possibility of mixing and making your custom made mists in the color you want.

4. Mix a little amount with water in a mister and add some perfect pearls to it to create your own customised glimmer mist.


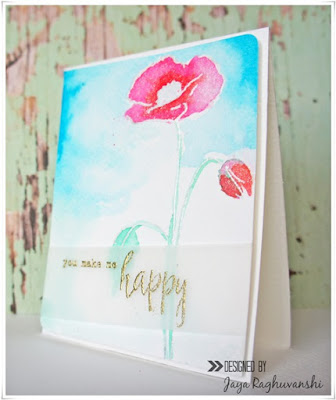
Here is a projects I did using the 
Ken Oliver Crafts color bursts and Altanew Stamp- Painted Poppy


The background demonstrates the effect of color bursts when used as pigment powder and the stamped images show how you can achieve beautiful water coloured effect with these pigment powders.

HOW?

This is actually a 5 minute card.
1. For this card the background was done using the Color bursts.( Please see the video ). Simply sprinkle some Orange Color burst on the Brustro watercolor paper and spray some water using the Rangers mister bottle

2. After the background was dry, I stamped the rose image using Versamark black Onyx and my new stamp set from  Altanew Stamp- Painted flowers.

3. I heat dried the stamped image and then simply went inside the flower image with Ken Oliver crafts Crimson color  diluted with a little water and leaves with diluted Pthalo Green Color bursts. 

I painted the flowers and leaf images rather randomly without worrying about the details.

5.I adhered this cardstock piece to my base using some double sided foam tape


The second card I tried -


I am certainly not much of a card maker and the mixed media work I do is far from being CAS usually. My fellow DT members Neha and Nupur are my huge source of inspiration when it comes to making anything CAS. 
So here is a card I tried and believe me, other than the embossing this is once again a surprisingly quick to make card.

The trick is using Ken Oliver crafts color bursts to watercolor embossed images.
 You really don't have to worry about the water coloring to be accurate.
The embossing resists these inks and you automatically end up with these gorgeously painted images!
I used the Altanew stamp- Painted Poppy


 You can see the video to get an idea of how I painted the image. 

HOW?

1. I stamped the image on Brustro watercolor paper using Versamark watermark ink and sprinkled the rangers white embossing powder. I heat embossed this using the Rangers Heat it tool.

2.  I taped the watercolor paper to my Inkssentials craft mat along all the four edges 
3. Next I dabbed the flower image with lots of water containing myself only inside the embossed flower image.

4. I diluted a very small amount of the Alizarin crimson color burst with water directly on my Inkssentials craft mat ( very easy to lift color from my Inkessentails craft mat and even easier to clean!)

5. I dabbed the centre of the poppy flower with the Alizarin crimson color and without picking up any more color I continued to blend it towards the edge of the petal using ore and more water. The colors blend beautifully into the watercolour paper and there isn't much you need to do from your side ;)

6. I used diluted Pthalo Green color to color the leaf and stem of the image.

7. For the sky background, I soaked the paper with lots of water and the simply dabbed the diluted Ultramarine blue color burst on the edges of the cardstock and blending with more and more water( without picking up any more color)  as I went inwards.

8. Heat dry and mount this on the card base using foam tape. Finish off with a sentiment and some Wink of Stella- Clear on the petals.

For the sentiment, I used a Altanew clear stamp- Painted Poppy sentiment and embossed it on vellum using the Rangers gold heat embossing powder and  Rangers heat it tool.


And the third project-


Finally... I have this galaxy canvas I made using the Ken Oliver Crafts color bursts,  Prima heavy black gesso, Prima heavy white gesso and white pen

HOW?

1. This canvas was done in at different time intervals to achieve this look. The blue you see here is the Ultramarine blue mixed with some white ink, the burgundy color that you see is the  Alizarin Crimson color mixed with the blue . There is also a hint of yellow in there which is basically the Orange Color Burst diluted to an extent.

 2. I went over and over the background around 4 times to get this look.

3. I gave a random coat of Prima heavy white gesso to some areas ( see the top right corner) that I painted with Color bursts to give the appearance of  clouds.Since the color bursts are meant for porous surfaces, they cloud not coat the area properly thereby giving a cloud- like finish.

4. Once satisfied with the galaxy background, I splattered it with Prima heavy white gesso ,  I also tried embossing some spots with Rangers White embossing powder. Once all this was dry I went over some white stars with white pen to create sparkle like effect.

5. Finally I embossed my sentiment in Rangers White embossing powder.


There are numerous techniques you can try out with these powder pigments.
 Here are the 6 colors you get them in-
Violet
Ultramarine blue
Pthalo Green
Lemon Yellow
Orange
Alizarin crimson


Picture courtesy- Google


 I have a short video for you all regarding how you can try out various techniques with these Color bursts. Will upload it soon.There are many more that I still have to discover. 
This is just the beginning!


Supplies use from Crafters Corner-

Ken Oliver crafts Color bursts-

 Altanew stamp- Painted Poppy
Altanew Stamp- Painted flowers.
Rangers gold heat embossing powder
Rangers White embossing powder.
 Rangers heat it tool.
Brustro watercolor paper
 Inkssentials craft mat
Versamark watermark ink
Versamark black Onyx 
double sided foam tape
Wink of Stella- Clear


That's all from me today!
Hope I inspired you today to try out these new products.
Thank for stopping by!

Hugs
Jaya


Monday, 11 May 2015

Penny Black... love continues...

Hello Friends,


Neha here with more Penny Black stamps. This time I am using their photo polymer clear stamp set 'Sprigs'. There are various twigs and branches in the set which we can use as a focal point  or to create backgrounds. They are great as silhouette too. They are very good quality stamps which takes all inks pretty well. 

Card : 1


This is totally inspired by Jill's card HERE. I don't remember how many times I have seen that video. Her ease with water colors is amazing.

Ok, back to my card... 

1.Paint the background- slope, sky- with various distress inks. Let it dry.

2. Ink the stamp with 2-3 shades of yellow distress inks. Add brown color to trunk & branches. You can use distress ink with brush, distress markers or any water based marker. I have use tombow markers as I don't own any distress markers. Spritz the stamp with water and stamp on the dry background.

3. At this point you can manipulate your image with thin paint bush and distress inks. Add more colour to trunk and blooms for some dimension. Let it dry.

4. I used hero art's stamp (Woodland leaves and grass- one of my first stamps. ) for those bare trees in the background - it will add depth to the scene.

5. Add some birds and sentiment. I love this quote stamp by Verve stamp. Yup, no one's life is perfect - just like my card... ;) ...hope you will find it wonderful though!


Card : 2

They says inpiration is everywhere. In this case, I was inspired by a lid of Versafine Ink pad.


And here is my take on the inspiration.


1. I chose the Kaisercraft sentiment as it is very bold and will give good contrast.

2. Select a die which will frame the sentiment well. Cut a copy paper with same die for a mask.

3. Deboss the center of cs panel with the same die. 

4. Mask the center with die cut paper. Stamp images around it with various inks. Just make sure you space them out evenly .
 

5. Remove the mask and stamp sentiment.


Card : 3


Here, I have tried 'Layered Batik Resist' technique. I was inspired by very talented Dina Kowal's tutorial here. She is the queen of various techniques and an awesome artist. I even own few Impression Obsession stamps designed by her.  I followed exact same steps but with distress inks. Make sure you allow each layer of ink to dry thoroughly, before adding embossing powder.   


Card : 4


  Last year I took one of the Online Card Classes to learn how to use pattern paper. Yes, I get confused when i have to use pp. I love them but never can use effectively. I used Penny Black pattern paper - Painted Blooms .

1. I clear embossed one of the image on a piece of pp. Apply distress inks in shades of blue. The embossed part will resist the ink. 


2. Sandwich pp between folded copy paper and heat it with mini craft iron to remove the clear embossing. Now, you have your own, altered pp. The patterns peeking through the stamped image is just magical.

3. Add twine, butterfly charm and sentiment to finish off.


Card : 5


I love this sentiment from 'Heartfelt' set - and designed the card around it. I used different shades of grey to capture  essence of the sentiment. Add some butterflies and blings to give finishing touch.


Card : 6


1. Cut the white cs panel with mft Polaroid frame dies and emboss it.

2. Place the panel on card base & mark the position of windows. Remove the panel and stmap various images with choice of your inks. I have used distress inks and tombow markers for the same.

3. Adhear the panel on card base & add die cut frames .

4. For the glitter boarder, stick red double sided tape on the base, pour some glitter, burnish with finger, tap off excess glitter. Add the sentiment.


Card : 7


I have created night scene with them here. They are detailed and delicate so even if you use as silhouette, they won't overpower the scene.


  Background is created with distress inks and masking. Silhouettes are stamped with some grey and black inks. (you can do first and second generation stamping with just black inks too). Moon is winked** with clear wink of stella glitter pen. 


Card : 8


This last one is my favourite one. I always like to mix florals and geometrics.


1. Cut a circle form a colored cs. Stamp stripes in black. Let it dry thoroughly.

2. Rub some anti static powder. Stamp & emboss floral image in gold.

3. Emboss sentiment in copper, add ribbon and pop the circle with foam tape.

Close Up:


These stamps are good as fillers too. Combine them with you favorite floral stamp to make a bouquet. I wanted to try it but ran out of time. Please share if you do that. Let me know how you like this 'one set many looks' series.

 Keep crafting...keep sharing....! 


Supply List :

 Stamps :   Penny Black - Sprigs, Penny Black - Heartfelt, Kaisercraft - True Friendship

Inks :  Distress Inks, Versamark,  Versafine Black,  Mama Elephant-moon light

Embossing Powder :     Clear, Gold,  Copper           

Tools : Stamping Buddy,  Mini Craft Iron,  Heat Gun, Wink Of Stella, red tape, glitter,  , Nonstick Mat, ink blending tool

Die :     Spellbinder - Circle