Followers

Showing posts with label flowers. Show all posts

Monday, 16 April 2018

Triangular Mixed Media Canvas- Live Beautifully (with Pictorial)

Hi friends!!
Happy Monday :)

Mixed Media is a beautiful style of art and it is a huge field with so many sub-categories. It is a great way to give a new life to old, discarded things around the house & make something beautiful out of them. In this style of art, multiple media are used to create one piece, for example, acrylic paints, sprays, dye inks, gesso, gel medium etc We usually try to create a lot of texture and dimension using different techniques, products & tools. 

I'd like to share a Triangular Mixed Media Canvas- "Live Beautifully" today. It was a lot of fun to make. For the canvas, I wanted it to have nice, cool, fresh colors preserving some white space so I chose blues with a little bit of yellow. I created dimension by adding chipboard pieces in between all the layers (while adhering them). 

Mixed Media Canvas- "Live Beautifully"

Here are some photos of the canvas:


Pictorial: Step by Step Photos of the Process

1. Applied Prima's Heavy White Gesso to the canvas and then applied Modelling Paste through Tim Holtz Gothic Stencil using a palette knife

2. Altered the color of the flowers by spraying them with Lindys Sprays

3. Created clay embellishments with IOD mould and air dry clay. 
(Tip: Sprinkle some powder in the moulds before adding the clay to make de-moulding easier)

4. Added blue shades of color to the canvas using different mediums, sprayed with water to create an organic look & also created ink splatter 

 5. Heat embossed the Dusty Attic Chipboards

6. Altered the butterfly chipboard by applying heavy white gesso and then sprayed with Lindys Spray
(used this method as I wanted the butterfly to match the color of the flowers)

7. To emphasize the relief/raised surfaces of the clay embellishments, applied some blue paint to them with my fingers and then some white gesso to tone down the color and give them a shabby look

8. Colored some bandage gauze with Lindys Spray

9. Created the composition and adhered all the elements with 3D matte gel. 
Added texture to the canvas with a paste of art stones, 3d matte gel & platinum glass glitter

10.In the end, added a few art pebbles with glossy accents & created white splatter with watered down white gesso. 

(If anything is currently out of stock, please email info@crafterscorner.in to place a preorder)

4. Lindys Gang Sprays- Yellow Hues, Blue Hues
11. Dusty Attic Chipboards- Live Beautifully, ATC frame #3, Flutterbies #1
17. Finnabair- Glass Glitter- Platinum
20. Ranger's Super Fine White Embossing Powder, Lemon Yellow Embossing Powder

Also, if you would like to check out my first three blog posts (in the series of Beginner's Guides), please click on the below topics.


As always, we love to see your gorgeous creations using supplies from the Crafters Corner store, so please do share them with us in our Facebook Group- Crafters Corner Showcase using the apt hashtags #craftwithcrafterscorner #dressmycraft #crafterscornerindia, on Twitter and/or on Instagram. And please remember to like/follow Crafter's Corner Facebook Page, Instagram & Youtube Accounts for updates on sales, giveaways, free tutorials and new product information. 

Hope you have a great day!
Thanks a lot for your precious time :)
Stay Blessed!

Friday, 16 March 2018

Trio of Floral Cards

Hi friends !
Good Morning :)

Preeti Datta (aka Dutt Preety) here. How are you this fine morning ?

Today, I have a Trio of Floral Cards to share with you.
I wanted to create 3 different cards with the same stamp set, "Adore You" by Altenew. This stamp set is one of my favorites and definitely a must have for your cardmaking and other crafting projects. I used similar supplies & color scheme for the 3 cards to show that we can get a different look by making slight alterations. I've used Zig Clean Color Real Brush Markers for watercoloring. They are currently on sale at Crafters Corner, so, it is a great time to grab them! All the supplies from the store are linked at the end of this post for your convenience :)

Let's get started.

Card 1: Happy


Photo Tutorial:

1. Stamped the flowers and leaves from Altenew's Adore You Stamp Set onto Watercolor Paper with Versafine Onyx Black ink 

 2. Watercolored the images with Zig Clean Color Real Brush Markers & Koi Water Brushes.
Tip: Keep a few tissues nearby to dab off excess color/water 

3. Did ink smooshing on Dress My Craft Floral Oriental White Cardstock by scribbling blue markers onto a piece of acetate, spraying it with water and then smooshing the colors onto the paper. Did this a few times to get an organic look of ink splatter. 
Tip: Dry the colors before adding more layers of color on top
 

4. Fussy cut the images with the Cutter Bee Scissors
Tip: Darken the edges of the cut images with a black marker for a finished look 

5. Die cut the ink smooshed cardstock with the largest out of the Gina Marie Designs Rounded Stitched Rectangle Die set and also die cut the word happy a few times in black using Altenew's Happy die. Then stuck the die cuts together (to form a dimensional sentiment) using Ranger's Multi Medium Matte. 

6. Assembled the card by creating a floral cluster with the fussy cut images. Before adhering it to the stitched panel added some black thread under it for texture and interest. Then adhered the cluster with a few foam mounted elements and some adhered with glue. Then adhered the dimensional sentiment & foam mounted the panel onto the A2 sized card base. Finally, embellished the card with a few Nuvo Drops.

Card 2: Thank You (Clean & Simple Style- CAS)


Process:

1. Added a striped washi tape to the right side of the beige colored card (A2 size).
2. Created a floral cluster & adhered some of the elements with foam tape & the rest with glue
3. Stamped the sentiment with Versafine Onyx Black Ink
4. Embellished the card with a few Nuvo Drops

Card 3: Have a Beautiful Day


Process:

1. Created watercolored stripes with zig markers and a water brush on a rounded stitched rectangle die cut. Also created a little splatter with black ink to add interest to the background. 
2. Stamped the sentiment in black from Altenew's Floral Frames Stamp Set
3. Created a floral cluster with the water colored & fussy cut images. Then adhered the floral cluster to the panel.
4. Foam mounted the panel onto an A2 sized white card base.
5. Finally, embellished the card with blue sequins 

Supplies from the Crafters Corner Store

19. Altenew's Happy Die & Floral Frames Stamp (on Pre-Order)

We love to see your gorgeous creations using supplies from the store, so please do share them with us in our Facebook Group- Crafters Corner Showcase using the apt hashtags #craftwithcrafterscorner #dressmycraft #crafterscornerindia, on Twitter or on Instagram. 

Thanks a lot for your precious time :)
Hope you have a great weekend!
Stay Blessed

Saturday, 24 February 2018

Mixed Media Canvas & Layouts: Guest Design Post by Preeti Datta

Hi folks!

Preeti Datta (aka Dutt Preety) here. Good Morning :) 
I am thrilled & honored to be back on the Crafter’s Corner Blog as a Guest Designer. 
Very grateful for this opportunity. Thanks a ton to Shalini di & the whole team at Crafters Corner.

I will be sharing 3 projects today; a Vintage Themed Mixed Media Canvas & 2 Mixed Media Layouts. 

I’ve used Dress My Craft's gorgeous products: Stencils, Glitters, Beads, Papers, Flowers & other craft supplies from the Crafter's Corner store

Let's get started. 

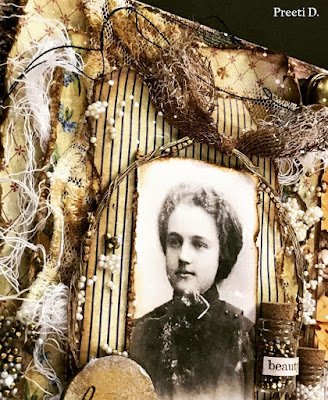
1. Vintage Mixed Media Canvas- "Dream"


Here are some close-up photos to reveal the intricate details :- 


Collage of the Process Photos: 


Synopsis of the Process: Prepared the canvas (10 by 8 inches) with Prima's Heavy White Gesso and added texture through DMC's Swirls & Couture Fashion stencils & Prima's modelling paste. Created the composition in the background with laces, then added color with Lindy's sprays. For more texture & details, did background stamping with a Prima stamp & Potting Soil Archival Ink, added DMC's pearl micro beads, golden antique beads, DMC rainbow glitter using Prima's 3d Matte Gel, made a wire embellishment with DMC's golden antique beads & prepared the Dusty Attic chipboards by heat embossing them & adding some DMC rainbow glitter chunks to them. Also, added tiny glass bottles with DMC's pearl micro beads, golden antique beads, stickers, thread, antique brads & rolled up book paper cigars. For creating the layers, used papers from DMC's Teenie Weenie Paper pack, fussy cut elements from DMC's motif sheets, added gauze & lace. In the end, created ink splatter, distressed the edges of the canvas with Vintage Photo Distress Ink & added a little shine using Inka Gold & Prima waxes.

2. Mixed Media Layout- Celebrate


Here are some close-up photos of the layout:


Collage of the Process Photos:

Synopsis of the Process: Prepared the base with Prima's Heavy White Gesso & then applied Prima's Modelling Paste through DMC's Alphas Stencil. Added color using ink sprays & distress inks/oxides. Added more interest to the background by stamping with archival inks & sponging on distress oxides through DMC's Thumb Print & Couture Fashion Stencils. Then prepared the elements for layering & embellishments by using DMC's Dots N Stripes Paper Pack & Motif Sheets. Further, gathered all the elements for layering like flowers, die cuts, laces, twine, gauze, DMC's 3D Fairy flowers (altered the color by applying gesso and then coloring with sprays) pollens etc and created a composition. In the end, added texture & shine to the flowers and in places around the layout, using DMC's Pearl Micro Beads, DMC sequins, Little Hearts, Rainbow Glitter, Microfine Glitter Powder & Rainbow Glitter Chunks using Prima's 3D Matte Gel. 

3. Mixed Media Layout- Dream Big


Here are some close-up photos of the layout:


Synopsis of the Process: Prepped one of the Pattern Papers from DMC's Hydrangea Lawns Paper Pack with Prima's Clear Gesso and applied Prima's Modelling Paste through DMC's Thumbprint Stencil. Then added  DMC's Rainbow Glitter & Microfine Glitter Powder to add sparkle to the background. Sprayed on a spray sealer (to bind the glitter to the layout better) then deckled the edges of the paper & adhered it to other deckled & distress edged papers to create a layered 3-D look.  For the main composition, used DMC's 3D Fairy Flowers, twine, gauze & die cuts. Fussy cut the butterflies & titles from DMC's  Motif Sheets. Did background stamping & added color to the background with ink sprays. Added texture & shine to the flowers and in places around the layout, using DMC's Pearl Micro Beads, Golden Antique Beads, DMC sequinsRainbow GlitterMicrofine Glitter Powder & Rainbow Glitter Chunks using Prima's 3D Matte Gel. In the end, created white ink splatter. 

That's all for today :) 

In case, you'd like to check out my first GD post where I shared 8 Simple Mixed Media Cards (using DMC stencils & glitters), please click HERE.

I'm very grateful to Crafter's Corner for this experience. I had so much fun playing with the supplies. I highly recommend that you check out their website, HERE and also, their brand- Dress My Craft for it’s Stencils, Glitters, Sequins, Flowers, Pattern Papers, charms, miniatures etc They have a plethora of cool options to choose from. Buy a few to try them out, experiment and see the quality for yourself. I'm sure you'll love them :) 

Please don't forget, there is a great deal on DMC stencils via a Grab Bag Offer,wherein you can pick up all 12, A4 sized DMC stencils at a discounted price, please click HERE to check it out. 

Have a great weekend!
Thanks a lot for your precious time :)
Stay Blessed
Preeti Datta
Blog
Instagram