Followers

Showing posts with label cas cards. Show all posts

Sunday, 7 May 2017

MFT- Soak up the Fun

Good Morning Lovelies..

Hope you all are doing great, Isha here back again with MFT stamps and dies .
Today I am going to showcase another fun stamp set from My favourite brand My Favourite Things- Soak up the Fun and its coordinating Die set. 


SUPPLIES USED


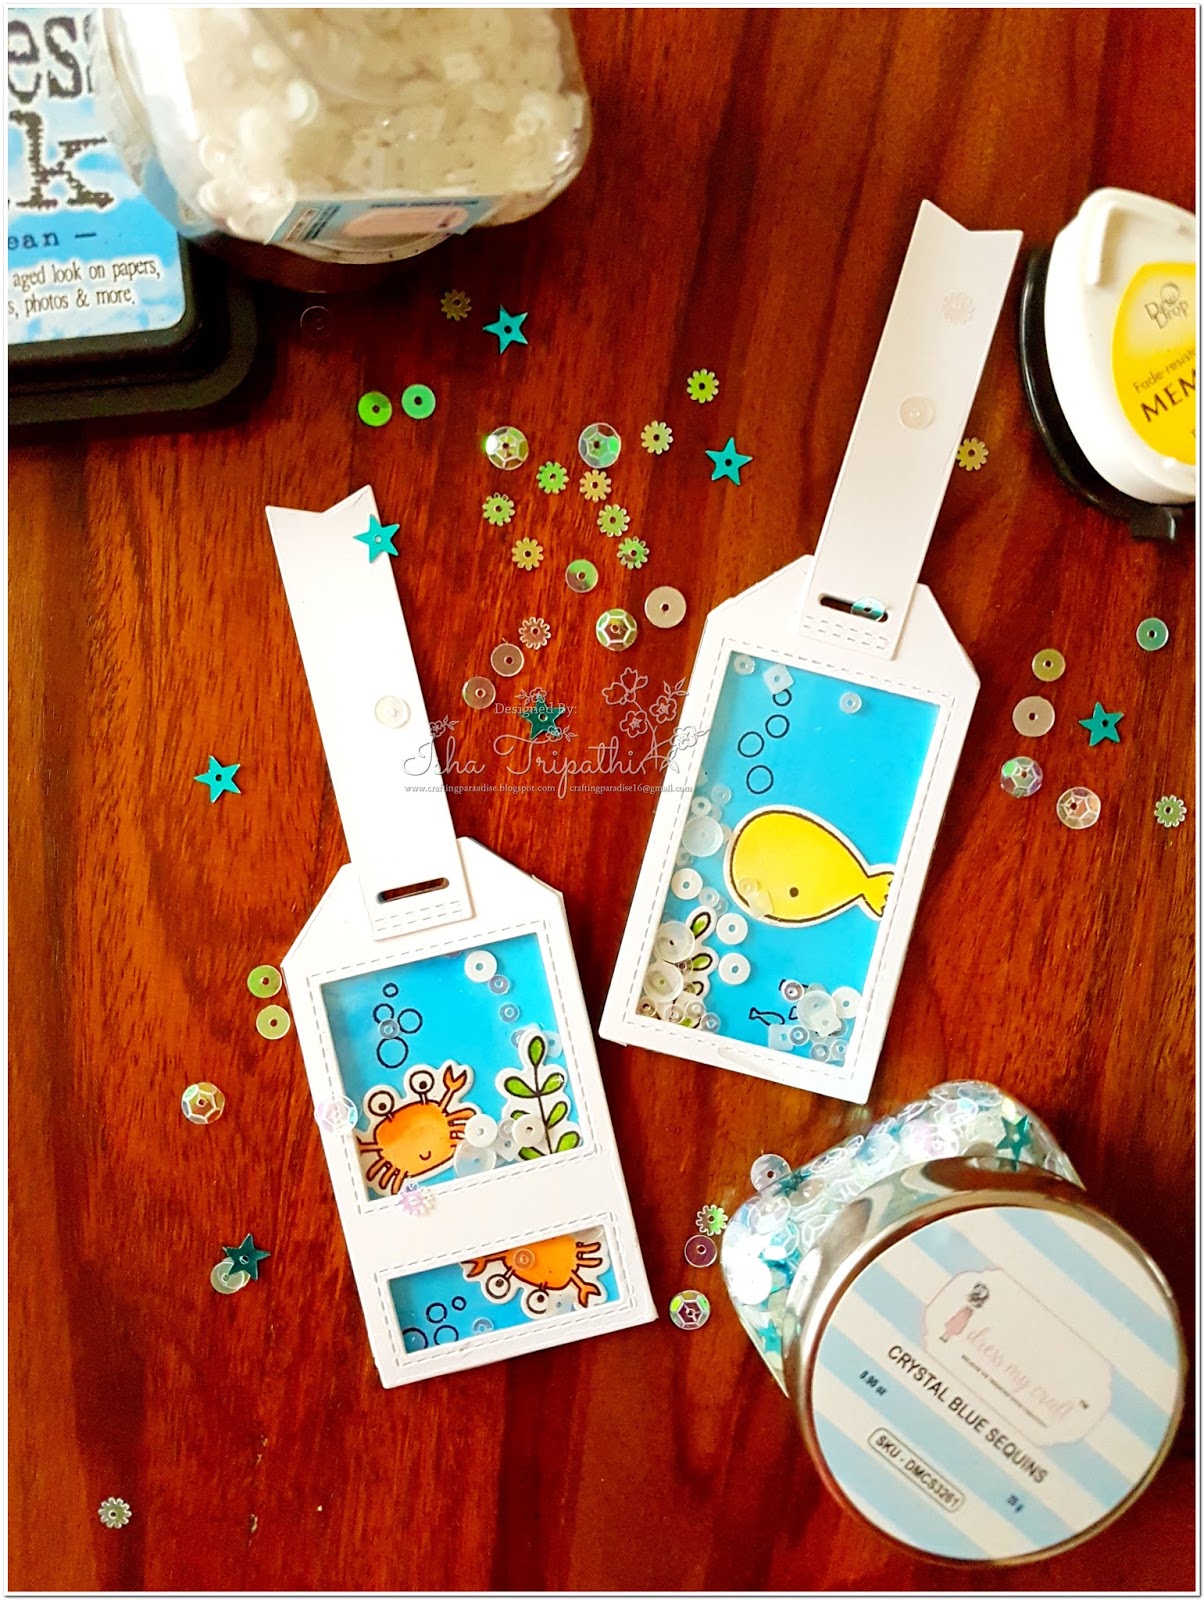
In my last Mft post I have showcased Tag builder blue print 5 die set, continuing with the same I have created two fun cute little tags. 
I will be showing you How I have created the same. 
Let's get started ....

STEP 1
Firstly I have stamped, water coloured the cute little sea critters from the stamp set and with the help of coordinating die set I have cut them.

Next I have taken 2 One is a solid tag with a stitched perimeter, a second features stitching and a die-cut rectangular window, and a third includes two die-cut windows with stitched perimeters

STEP -2 

Now take any distress ink of your choice, I wanted to created under water scene therefore I have shade of blue - salty ocean distress ink.
Rub the ink pad against the craft sheet- spritz water over the ink- drag the tags in the inks- heat set the tags.


STEP-3

Once the inks dries out, place your critters/images basically I am just doing my positioning how I want my tag to look.
Once through glue down the images. 


STEP-4

Paste the images and cover the window tags with a sheet of acetate


STEP-5 

On the edges of window tag apply 3d dimensional foam tape.
Next add yummy sequins inside the base tag and paste the window above it and seal the tag.


Viola Tags are ready :)


Hope you like these cue little tags.

Moving with this stamp set I have created few more simple fun and cute little projects.


 For the above card I have simply water coloured the background and used some dress my craft sequins and cute little elephant image and sentiment from the Mft stamp set - soak up the fun.


This one is my favourite from the stamp set. I have created this shaker card using loads of dress my craft sequins.


For the above project I have hand drawn the waves using versamark pen and used white embossing powder and heat set it. Background is distressed and water coloured. Critters and sentiment from the stamp set- soak up the fun .


I hope you all like it and was able to inspire you all.

Have nice day
XOXO
Isha.

Wednesday, 19 April 2017

Playful with MFT stamps & Die

Good Morning Everyone...

I hope you all are doing good!!
Today I am going to showcase MFT - My Favourite Things Stamp and Dies, recently they are the hottest selling brand around Indian Crafting space.

MFT came into existence in the year 2006 and MFT - My Favourite Things offers fresh and fun range of stamps and dies.
For the month of april I got the opportunity to play around with the MFT stamps & dies. I always wanted to try something which is simple and clean and with them I got the opportunity to do the same.
Their stamps are super fun and adorable, lets get started....


SUPPLIES USED - 
My Favourite things stamp set- playful pups 
Distress inks 


          I have stamped the Playful pups stamp set using Archival ink jet black on the Card stock... and water colored the images using Distress inks (please avoid my coloring, I am super bad with it)


Once coloured I have cut the images with its coordinating Die.

Now moving over to Blueprint Tag builder die 5 
"This 18 piece set includes: Traditional tags (3) 1 3/8” x 3 ¼”, Fishtail flag 5/8” x 2 ¾”, Fishtail label ½” x 1 7/8”, Banner ½” x 3 ¾”, Peek-a-boo heart border/confetti 1 ½” x ¼”, Peek-a-boo XO border/confetti 1 7/8” x ¼”, Arrows A 2” x ¼”, Arrow B 2” x 3/8”, Looped border 1 ¼” x 3/8”, Reinforcement A 5/8” x 3/8”, Reinforcement B 5/8” x ¼”, Hearts (5) ½”, 3/8”, ¼”, ¼”, ¼”.- MFT WEBSITE (source)


This set includes three tags, each featuring distinct accent details. One is a solid tag with a stitched perimeter, a second features stitching and a die-cut rectangular window, and a third includes two die-cut windows with stitched perimeters. The square window produces a secondary frame with double stitched border. Additional accents include a narrow fishtail flag, dimensional banner, reinforcement options for the tags, a peek-a-boo heart border, and a variety of small shapes and confetti elements.- MFT WEBSITE (source)


Below is the referral image depicting to what ways you can coordinate the tags, In total 8 ways you can play with dies and assemble the tags, but I believe possibilities are endless.


I have created some really simple cards using the above mentioned craft supplies and I am totally loving them. The paper stack is basic stripes and I personally feel it looks amazing.


In the above Image I used the yummy Dress my craft sequins Little hearts to complete the look of my card. In the below image I have used the confetti die cut from the die set and added some more sequins from Dress my crafts.


Colouring these tiny little images was so much fun and I find them adorable. Playful pups stamps set is really adorable.

Moving to tag builder die set I have made some simple and cute tags, you can make your own fun little tags and are just perfect. I really loved the crisp deep stitched edges this die gives. 


                                                        Some more tags 


I hope you liked my basic card and tags, I personally felt doing clean and simple cards is way more tough then the other cards .


Hope I was able to inspire you all to take out your favourite stamp sets and enjoy water colouring them. Don't forget to leave some love.

I shall be back soon with some more techniques and ways we can use this Blue print tag builder die.
Keep watching the space.

Have a nice day 
XOXO
Isha.

Monday, 13 February 2017

GET DAZZLED WITH SEQUINS

Hi Crafty Friends !!!

Welcome to the Crafters Corner Blog. It's Anita here with another long post on SEQUINS !!!!!

Dress My Craft has a whole new range of Sequins in the Crafters Corner store and these will surely mesmerize you with their beauty. They are a mix of many shapes and colours are of superior quality.

Let me show you these jewels in most beautiful jars that will make you crave for more.


There are 10 colours and one heart shaped one and all of them have been pre mixed to have different shapes and colours. These Sequins are packed in wide mouth transparent jars that are light weight and  can be stacked on top of each other. This makes it very easy to take out the sequins from the jars and also put them back , thus avoiding wastage.

You can check the entire range here.

I have created some quick projects for you using these sequins showing how even simple and easy projects can be made beautiful just by adding the sequins. Do have a look at them and you will believe me that adding sequins to them has made them look awesome.

Did you watch me live on Facebook where I talk non -stop showcasing these jewels and my projects. Well! here is the link in case you missed it.

Also follow the video tutorial here where I show you what lies inside the jars  and also how to make two cards .

So sit back and relax as I show you my creations with Dress My craft Sequins.


Video Tutorial


 Say it with Hearts
I have used felt hearts here. Just add the tiny hearts to make your card look special!!

 Birthday Wonders

Blissful Babies


Shaker balloon card


Cuppy Cakes Tags


So , I hope now I have convinced you enough to get these dazzling sequins on your table. Grab your jar from Crafters Corner Store. Do let me know if you enjoyed this post. Keeping crafting and have a fabulous week ahead.


Thursday, 14 July 2016

CLEAN & SIMPLE IMAGINATION !!

Good Morning Beauties

Oh let's wish CC a very happy 4th Birthday :)

Its Isha this side, Today I will be sharing how we all can do best of minimum supplies. Yes when I had my DT kit in my hand, first reaction was WOWW its super cute and adorable. Once I was done admiring the cuteness of supplies second thought popped in and I was like What I am gonna do with all this :P
Doing something clean and simple was never my forte,but I tried to move out of my comfort zone and given a shot, Hope you all like it!! But before that I would like to share my DT kit with you all
woot woot curtain raiser, its show time :P God I am so dramatic ....LOL


My DT Kit :D

I am trying my hands on something really simple and clean , & in fact I loved the way it all turned out. For this post I have used these super cute stamps from Imaginisce stamps and some gorgeous Jolee's boutique stickers.

Without wasting time let's get started ....
I have made some BOOKMARKS or you can use them as tags as well.
have a look 


I am totally in love these stamps sets, they are so much fun to work with, this is perhaps one of the most adorable work of mine:P
Let's get started ...


For this book mark I have use distress inks for my background, then have used cloud stamp and ginger bread house stamp set on this bookmark, for this I have stamped the images in pattern paper and fussy cut the same. 


Similarly I have used milk carton stamp, doll and apple for these book marks, I have used some loose pattern paper from my stash for the base. Finally have decorated these with cute little Jolee's boutique stickers.

Once I started enjoying myself doing these simple and fun projects, I decided to do more of these. So I decided to make some CARDS ( tried hard to put in efforts to make clean and simple)

CARD -I


 For this card I have used apple mini stamp set, simply stamped the image for creating background of my card and stamped another image -coloured it with distress inks and fussy cut it to add extra dimension to my card. And last but not the least have hand written the sentiment.

                                                                      CARD-II


This is my favourite card, I really loved the glue mini stamp set. I have created the background using the stamp set and used the same technique I did for the first card, Have added dimension with fussy cut images, and hand written sentiment :)

CARD-III


 This card was really tricky for me to do... I have used this pattern paper from my stash which was perfect for night theme.. I have done simple stamping using WRMK Kitty stamp set with black archival ink.

Last but not the least I have tried my hands on shaker card. Mind you guys its my first attempt.
I am in love with this doll <3, Oh she is name as Frankenbridge !!

I have simply cut the center with help of paper knife and used regular acetate sheet. Added some sequins and patter paper circles along with Frankenbridge, and finally covered sealed the acetate sheet with layering another over the same.Finally have used doily punch to add edges.

Viola !!
Isn't it interesting!! I never knew it could be so much fun playing around with these cute little tiny miny stamps.


I hope you liked my post and was able to inspire you all with my work.
see you next time 
till then take care 

Loads of Love 
Isha 

Supplies used - 


Friday, 26 February 2016

SIMPLE IS BEAUTIFUL

HELLO.....

I am really excited to share with you a fantastic news with all my blogger friends and crafters. I have been selected as one of the semi finalists for the Heartfelt Creations design team.
This is indeed a very happy news for me and why not !!! I have been working really hard to bring out the best from this brand.

Heartfelt Creations is one of the leading craft brand in the world and their stamps and dies are really beautiful, giving us a wide variety to work for our projects.
Be it flowers or scrapbooks, cards or altered art, any project, if adorned with Heartfelt flowers, bring out their beauty immensely. This is one reason I love working with Heartfelt Creations.
Over these days , you have seen many projects of mine with heavily layered flowers, neckpieces-----yes!!! they can be used on jewellery too !!!!! Layered 3D cards and layouts all look beautiful with these flowers.... BUT......... these stamps and dies can be cleverly used to make some quick cas cards too.
CAS CARDS !!!! WITH HEARTFELT CREATIONS !!!!! you must be think , I'm kidding.
No dear friends, I am not ... here are few cards that I made that are Simplicity personified.
They are classy simple cards yet they look beautiful. Now CAS cards are certainly not in my comfort zone. Actually, truyly speaking, CAS CARDS SCARE ME !!!!! I find them extremely difficult to visualize. But then as a versatile crafter, I took it as a challenge. SO ..... over the next few days , I will be focussing on CAS cards with Heartfelt Creations.
NOW I AM NO CAS QUEEN  !!!! So please excuse me, if I do not follow rules of cas card making.
I hope you will like my simple creations and help me to make more of these.

Today, I took the new release-The Sunrise Lily collection. and used it to make three CAS cards.
Please have a look .


In this card, I have stamped the image from Sunrise Lily Swirls cling stamp set with Versamark Embossing pad  and heat set it with White Embossing powder from American Crafts. Then I added some texture by using the stencil Stripes by Tim Holtz and Rangers Texture Paste.
Then I distressed the entire card front with Worn lipstick and Candied Apple Distress inks. And then, I spritzed some water on top with a mister and let it dry. Then sentiment is from Sunrise 'lily wishes stamp set. Then I adhered this piece on to my card front. And finally I used some Wink of Stella clear Glitter pen to add some shimmer and finished it off with sequins from my stash. And my first CAS card is ready.


Now on to my second card.

For this card, I stamped the image with Sunrise Lily Swirl stamp on to the left side of the card turning it at various angles , with Archival Jet Black ink pad.
Then , I took a 4 mm black strip of cardstock and adhered it to the left side leaving 1 inch from the side. Then , I watercoloured the image that was seen on the right side of the strip to add some colour and break the monotony of the card. Finished it off, with some speckled dots with my Zig marker.
and finally heat embossed the sentiment with black embossing powder. Sentiment is from Sunrise Lily flute stamp set.


And finally for my last card, I cut out the vase and lily bunch image from the Sunrise Lily paper pad and did fussy cutting. Then layered two images together to give it a 3D look. The base of the lily vase is distressed with Hickory Smoke and Pumice Stone distress inks. Sentiment if from Sunrise Lily Flute stamp set and heat set it with black embossing powder.

So I do hope my cards fit into the CAS category. I do believe they are clean and simple so I guess, I have done justice to this.

All the products are readily available at the Crafters Corner. Just click on the product name described above to go to that group in the store.

DO HOP ON TO THE HEARTFELT CREATIONS BLOG AND CLICK ON THE VOTING FORM AND VOTE FOR ME IF YOU LIKE MY WORK.
You can see my work on my blog http://craftingforever-anita.blogspot.in/
Please follow us here and on my blog and do leave some words of inspiration . I really, really get inspired by your good words.
Thanks for stopping by.

Thursday, 28 February 2013

CAS Card By Mallika

Hello Folks ,
Today I have prepared a CAS Card .
I have always been the heavy embellished one . Making this one was a real challenge . Recently I have been in love with the CAS cards  .
This card has been made using Spellbinders Rose Creation dies .
I have used following distress inks -
Gathered twigs
Walnut Stain
Festive Berries
Vintage photos .
Sometimes I really wonder "kya cheez banayi hai TIM ne ?? "Distress inks totally transform the project .
I have been very nervous about heat embossing , But this month all my fears have gone .
The sentiment has been heat embossed using Ranger Heat Tool and Ranger black embossing powder .
The flower have been doodled using some flourish stamp and Versa mark pen and versa mark ink pad .  The are embossed using large embossing tool on perforating pad  .
For any queries regarding this mail to info@crafterscorner.in

Regards
Mallika