Followers

Showing posts with label Mallika. Show all posts

Wednesday, 6 March 2013

Adjourning Squares By Mallika

Hello Friends ,
This is Mallika here from Aola Handmade Cards again with a project .
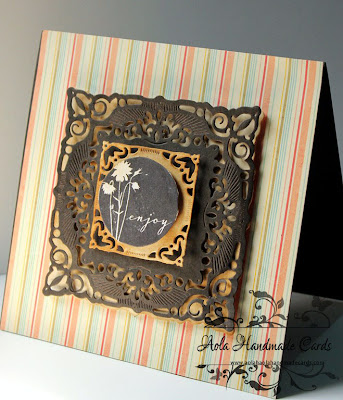
Our this month's theme is Image Stamping . Keeping focus on that I have made a card using my latest spellbinders Die and New hero art release Stamps .
Now on to the card .
I have tried to follow the theory of minimal in this one .
Supplies used -
Tonic Trimmer 
Adjourning Squares Die 
Hero Arts Stamps Untitled Word Shadow 
Distress inks - Vintage Photo , Gathered Twig , Walnut Stain . 
Papers - Howdy Doody 

I hope you all will like it .
If you have any queries please get back to us at info@crafterscorner.in .
If you have any queries regarding this card please write in the comments
Hugs
Mallika


Monday, 11 February 2013

Mannequin tutorial


 Hello Friends ,
Today my post is Totally inspired by products from Ranger Industries  .
I am going to show you , How to make mannequin by using the sewing room die by Tim holtz and heat embossing technique .
Items You will need -
Big shot machine { only INR 4499 }
Metal adapter Plate 
Tim holtz sewing room die 
Spellibinders Dlite Medallion
Embossing powder Black 
Versa Mark watermark Ink Pad 
Versa Marker  Watermark pen 
Ranger Heat gun { works on Indian Voltage}
Distress ink { Gathered Twigs }
Ink blending tool 

Step 1 -
Chop out 5 pcs of Dress forms from The sewing room Die .


Step 2 - Now take any swirly / floral stamp , apply some Versa mark ink and stamp it on the dress form . 


Step 3 - Apply black Embossing powder and heat it with Ranger heat embossing gun . Where ever you can see space empty fill it in with versa mark watermark ink . 


Step 4 -  
Apply gathered twig distress ink . 

Step 5 -  Now simply fold these dress forms into half vertically . 


Step 6 - Now simply  stick these dress forms one by one . 

Step 7 - Now you will have you dress form mannequin ready . 
I have complimented it along with a tag made by spellbinders delight ! 


If you have any questions please  mail us at info@crafterscorner.in
Regards 
Mallika 

 This is what I did with mine mannequin - My own custom Nameplate  ! 
Enjoy the Journey 


Saturday, 26 January 2013

Tri Shutter Album Tutorial

Hello Friends ,
This is Mallika from Aola Handmade Cards , again with a post as part of the DT for Crafters Corner .
In this post I will be teaching you , how to make a Tri shutter Album .
I was always fascinated to make a mini album , and somehow this time I took out time to make mine .
This is what you will create . It opens up . It is a perfect valentines gift
As the picture says , It requires two tri fold cards .
I will be teaching you step by step on how to make this .

Things you will need -
Tonic Trimmer 
Martha Score Board 
Atg Glue Glider 
Tim holtz Hanging sign Die 
Mulberry flowers 
Distress inks - I have used Gathered twigs { The new distress ink of my godfather Tim Holtz }
Magnolia Tilda Stamps - I have used Classic Bridal Couple 
Cherry lynn dies - Butterflies and Magic Mirror .
Assorted stamps


Step 1 -
Cut your cardstocks
2 pc of 6 by 12 inches
2 pc of 6 by 6 inches
1 pc of 6 by 8 inches .


Step 2 -
Take your distress inks and distress the edges .


Step 3 -
We will now make two tri shutters
Now take the 6 by 12 inches pc of Cardstock  . Align the longer side with the score board and Score it at
2 , 4 , 8 , 10 inches . Do this to other 6 by 12 inches of cardstock too .


Step 4 -
Now take 6 by 12 cardstock . Rotate it diagonally . From 1 3/4 inches cut down a line from first score line to last scoreline . Rotate the cardstock by 180 degrees and do the same .
Apply the above step to both the pcs .

Step 5 - 
Now start making alternate folds . One mountain and one valley . The picture will explain better . 

Step 6 -
We have to now allign them together and stick to the 6 by 8 inches of cardstock . 
But before sticking attach a ribbon to the 6 by 8 inches centre . 


Step 7 - 
Now take the two 6 by 6 inches of cardstock . Score them at 2 inches . 
Now we will attach a flap to front . 


Step 8 - 
You will have a composition something like this . 


Step 9 - 
Now embellish it to your consent . 


Wednesday, 16 January 2013

Shabby chic Piggy Bank

Hello Friends,
This is Mallika from Aola Handmade Cards , again with a post as part of the DT for Crafters Corner .
Today I will show you a very interesting project which I have been working on .
This month we have a theme of showcasing anything but not a Card or Layout . Keeping that in mind I have created a project .
Recently , my Scrapbooking classes and custom orders have gone to a new level - resulting in me splurging on Crafter Corners . 
My long-time love for papers has actually compelled me to buy Once upon a time paper stack . In case any of you are interested in vintage, go for the same . Many people ask me how do you do vintage. This is the answer to their query. Base paper holds most of the magic . Crafters Corner has so many choices that it will confuse you all.
Do you also know that our cherry lynn dies prices have dropped down permanently !!

Now, as for my project - it won't be termed vintage, but can be termed "Shabby Chic".
I have made a piggy bank / key holder / night lamp- all in one!
The back of the house has a key holder  .
The supplies which have been used:

Please enlarge the pictures by clicking on them to see the minute details . 

For further information please mail at : info@crafterscorner.in     


.


Monday, 24 December 2012

Baby Carriage Tutorial

Hello Friends ,
This is Mallika here from Aola Handmade Cards with a tutorial on how to make these pretty favor Baby Carriages .
I had a tough time deciding what tutorial to make and I actually changed three projects . I was suppose to post this yesterday but was stuck in some emergency so couldn't post .Apologies ..
Now onto my project

How to make a baby Carriage ??


Item You ll Need -
Cardstock -  I am using Nana's Kids from DCWV 
Scoreboard - Martha stewart 
Trimmer - Tonic Trimmer
Nesting Dies - Circle scallop
Big shot 


Step 1: Cut the two pieces of cardstock, pink 4” x 5”, white 3 15/16” x 4 15/16” and one piece of 4 x1/4'' inches of cardstock


Step 2: Score both pieces of large cardstock at 1” on all sides


Step 3: Cut in at four places on both pieces of cardstock .


Step 4: Fold on score lines and adhere together.


Step 5: Insert lining into box to make sure it fits.


Step 6 : Cut either a round circle or oval for the carriage hood.  I used my largest Nestie Scallop Circle.  Cut 1/3 of it away.


Step 7: Using the larger piece of the circle, punch holes on
ends and attach it to the carriage with brads:


Step 8: Insert lining back into carriage box


Step 9: Put adhesive on ends of 4” x ¼” piece of
cardstock and stick in-between lining and box for handle:


Step 10:
Assemble the wheels and adhere to carriage.  Finish off with embellishments
For wheels you can simply take your nesting dies circle of course and assemble with the help pf small button /.