Hi friends,
Dr Sonia with the finale to the Stencils Series. In case you missed the earlier posts here are the links :
Stencils Part 1,
Stencils Part 2
Mixed Media can be scary for a beginner as mistakes are bound to happen...you may not like a portion of the smudged stencilled design or the area where your ink was over - sprayed , the starkness or the dullness of the colors etc etc. But a few tricks can help correct mistakes, transform looks and help you create works of art!
While making the first project shared in this post I experienced disappointment and frustration and nearly threw it in the dustbin but fortunately the extremely knowledgeable Shalini guided me as to what was wrong with it and how to salvage it!
In this post along with the step by steps ,will share some of the tips on preventing and correcting mistakes in Mixed Media projects.
Mixed Media Wall Hanging
Supplies
Collage Clay
Palette knife
Heartfelt creations Delightful Daisies Stamp and die
Heartfelt Creations Botanical Wings stamp and die
My mixed media plaque celebrates life and enchanting nature with a butterfly and an angel encompassed in a semicircle of soft vellum flowers!
Vintage white and
coppery gold balanced the bright raspberry pink in this wallhanging!!
One corner has vintage scroll resin embellishment and crackle texture created with clear rock candy and highlighted with Distress Inks .
The flower was created using Heartfelt Creations Rose stamp , Distress Inks , Art Anthology sprays and Diamond dust.
The lower corner has typical mixed media texturing created using buttons, die cuts, pearls and resin embellishments
And here are some of the steps in the creation of this mixed media art.
I recycled a sturdy cake base to create my mixed media plaque. After a nice coat of gesso painted the base with Folk art
Vintage White paint.
Used a
mask stencil called
Carabelle Studio Papillon Stencil with Distress Ink and got the mask of the stencil design!
Replaced the stencil and applied strawberry collage clay
Collage clay has a thicker texture compared to Ranger Texture paste but you can get a nice coating using a palette knife
Was not happy with the pink look of the collage clay so used Art Anthology sprays and Pink embossing powder in patchy areas.
The butterfly was starting to build up in texture and sparkle!
I was unhappy with the stray smears of ink left by the spray and the dull look of the white so painted over the butterfly with a contrasting Folk art Apple green
Tip : If you are not happy at a point during your mixed media work...add a different type of media like sprays or paints or embossing in same or contrasting colors....it can help totally change the look of your project!
Added more texture with glass Beads gel, chunky glitter and tiny drops of resin!
Mounted the butterfly onto a curved piece of chipboard to make it sturdy as well as to make it more dimensional when adding to the plaque.
Tip : to bring about a cohesive element in your work use something throughout like splatters of white ink,a same shade of distress ink or the same color of embossing powder like I did here.
In this mixed media plaque I have used the same Gold embossing powder on the leaves, flowers, wood grain, stamped sentiment and on the key which forms the body of the butterfly.
My "celebrate " sentiment is also mounted on a curved board before attaching to the base. It has oodles of texture created using embossing powder, glass beads gel and star sequins!
The wood grain was created using the
Carabelle Studio Effet Bois stencil and texture paste . Sprinkled Ranger Gold embossing powder on the wet texture paste and heat embossed to get a beautiful golden wood grain.
Sharing how this project looked like at one stage.....
It was okay but there was something wrong with it!! Fortunately before I dumped it I asked Shalini's opinion and she very clearly told me to get rid of the decoupaged bird however beautiful it looked !
I covered up the bird and the stamped music background with Folk Art vintage white and added a few bits and pieces and could completely transform the look!!
Hope you agree it looks much much better now!!
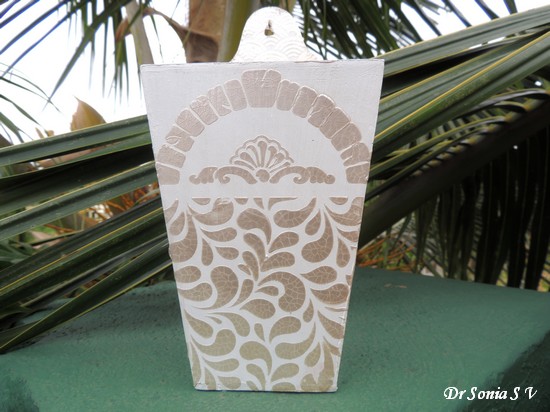
Mixed Media Wooden Vase
Supplies Used
Altering a wooden object is such fun and the most common way crafters opt for is decoupage.But if you want to try something more unique and fun...bring out your mixed media supplies and go for it!!!
Apply a nice coat of gesso on the wooden vase. Gesso is very important here as otherwise your crackle paste can simply fall off at a later!
Once the gesso is dry, choose your stencils and crackle paste and gently and carefully apply a uniform coat over your stencil.
Tip : A fairly flat coat of crackle paste will give a better end result unlike texture paste where you dont really have to bother to get a super flat application.
Tip : The more delicate your stencil is, the more careful you have to be as the paste is not very thick and can easily ooze out of the stencil borders if you are not careful.
Gently lift off your stencil and inspect your stencilling.
A bit of my crackle paste has oozed out into the space between the bricks of the arch.Such a mistake can be corrected by taking a fine paint brush and gently lifting off the excess paste.
I used a beautiful petal stencil on the lower part of the vase and if you are working on stencilling different parts either wait till your first stencilled design is dry or be extra careful you dont smudge the earlier pattern.
When you stencil over an edge you can get tiny overhanging peaks as you can see in this picture...correct this by running your fingers along the edge in one sweeping motion!
Once dry you get a beautiful crackled design
On the upper part of my vase I had used the delicate
Carabelle Studio Geometry but as you can see the stencilling is not very crisp in certain areas and the crackle effect is hardly visible !
Tip : Use special effect pastes such as crackle pastes on larger stencil designs and not on delicate patterns.
I loved the color of the platinum crackle paste and it has a lovely rich and elegant look!
Though the crackle effect is soo beautiful ....the contrast was not there and I wanted a more vibrant look...in retrospect I thought I could have stencilled the crackle paste on a darker background but I could still salvage the project!!
I thought of the new
Art Anthology's Sorbet paints [can be applied on multiple surfaces ]and I smeared some of the gorgeous Red Velvet Sorbet all over my vase using my fingers to move the paint around and into the cracks!
This paint has glitter elements added to it and your project will shimmer!!
The Sorbet did change the color of my crackle design but then it looked yummy!
I used a variety of cream white clay and resin embellishments to enhance the contrast!
How does it look my friends?
I hope you enjoyed both the stencilled creations!!


Wonderful post . So elaborate and comprehensive. Well done .
ReplyDeleteA relief to hear Anita! Thank you!
Deletewow, awesomeness sonia, those vellum flowers - my favourite, a detailed post and thanks for sharing the tips
ReplyDeleteVellum is my favourite for heartfelt flowers!
DeleteAbsolutely stunning, Sonia!!
ReplyDeleteThank you so much for the support
DeleteOh my!! So many awesome creations using Stencils! Thank u for sharing this detailed post on use of stencils in the projects! :)
ReplyDeleteSuchi xx
Thank you so much for such encouraging words!
DeleteJust love both of your amazing creations Sonia! Beautiful combo of stenciling and MM elements! Love the clean look of cracks and how beautifully you embellished your butterfly! FABULOUS work!!!!
ReplyDeleteThank you so much!
DeleteGorgeous Mixed MEdia Project with beautiful textures ! Loved the mix of rough n delicate textures on the plaque and the wooden vase is Fantastic ,yummy !
ReplyDeleteWOW! Both creations are stunning!! I love the pretty pink!
ReplyDeleteHave a wonderful day,
Migdalia
Crafting With Creative M
Thank you so much for your support Migdalia
DeleteEnjoyed the entire post! Wonderful creations! Love the textures and your handmade flowers are very pretty!
ReplyDeleteThank you Priyanka
Deletelovely mixed media stencilling.. loved the textures on canvas and wood.. :)
ReplyDeleteThank you so much for the support and encouragement Radhika
Delete