Hello everyone! How are you all doing? Hope you all are enjoying the fab posts my fellow Team mates are posting :)
Well today I'm back with a new post on Collage clay!
This post was originally a video tutorial but sadly I haven't been able to upload the video due to some technical glitch soo I decided to turn it into a pictorial please ignore the not soo high picture quality and bear with me :*
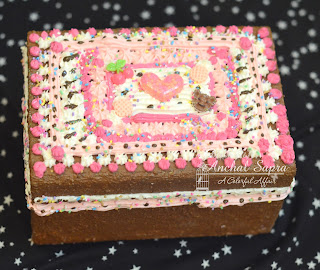
This is the box we will be making and here's another version of it in a small size! ISn't it cute? And looks so edible? My nephews wanted to eat it haha :p
So lets get started!
Lets see if anyone can guess how did I create the texture of the cake? Any ideas?
Welll I used sand :p You require few basic supplies for this project I've linked them all for you :)
Start by adding an even layer of the matte gel all over the box n sprinkling sand over it. Tap off the extra
Well today I'm back with a new post on Collage clay!
This post was originally a video tutorial but sadly I haven't been able to upload the video due to some technical glitch soo I decided to turn it into a pictorial please ignore the not soo high picture quality and bear with me :*
This is the box we will be making and here's another version of it in a small size! ISn't it cute? And looks so edible? My nephews wanted to eat it haha :p
So lets get started!
Lets see if anyone can guess how did I create the texture of the cake? Any ideas?
Welll I used sand :p You require few basic supplies for this project I've linked them all for you :)
Lets get started!
I started with a plain wooden box removing the locks so that I have a smooth surface.
I added washi tape to it so that it stays close as I work on it and it makes a nice border for me.
I am using the 3d matte gel by Prima for this you can also use mod podge, decoupage glue for the same
Start by adding an even layer of the matte gel all over the box n sprinkling sand over it. Tap off the extra
The more grainy the sand the better would be the texture
Next coat it again with the matte gel sealing all the sand together n let it dry.
Remove the tape once its dry n begin painting
Im using a chocolate coloured acrylic paint for the box.
Next comes in the fun technique of making coloured clay Just pour some clay in a bowl add your fav colour of acrylic paint n mix well.
Next take a piping bag and add the clay to it. You can use any nozzle with it n then just begin piping :)
I've used 3 colours of clay for this box you can decorate it however you wish! Hope you all enjoyed the tutorial!
Have a great day
Hugs
Anchal Sapra
PRODUCTS USED


Oo wow..a very yummy project...loved it..xx
ReplyDeleteIts gorgeous and yummy!
ReplyDeleteCheers
Dr Sonia
Yummm project... :)
ReplyDeleteSuchi xx
scrumptious :D <3
ReplyDeletesuperb post!
ReplyDeleteThis comment has been removed by the author.
ReplyDeleteLovely project!
ReplyDelete