Followers

Showing posts with label Flower tutorial. Show all posts

Saturday, 22 December 2018

Flowers and Leaves with DMC dies

Foamiran Roses and Leaves
Hi friends Dr Sonia here sharing  a floral bouquet made with the new Dress My Craft Rose die set No.2. I was so excited to see all the beautiful beautiful flower dies Shalini released and even though it is hard to pick a favorite....the Dress My Craft Rose die set No.2 is my favorite There are a total of 14 dies in this set and it is perfect to make roses ranging in size from tiny rose buds to really huge blooms!
Let me jump right into the Tutorial
Foamiran Roses and Leaves Tutorial 
You can use just 2 sizes of petals to make large  foamiran roses. Die cut 5 sheets of foamiran at a time using the petal dies.This not only saves time but helps to thin the foamiran even further!
Foamiran Rose Tutorial 
Die cut at least 2+3+5 [these are the petals in each layer from inside to out] =10 small petals and 5+7 [outer 2 layers of petals]= 12 larger petals. Always cut a few extra petals as foamiran is very thin and it is inevitable to tear a few petals as you work especially if you are impatient like me!
Foamiran Rose Tutorial 
Use a coloring media of your choice to shade petals if you wish. For these roses I lightly shaded the upper part of the petals with Mungyo Artists Soft Oil Pastels. I shaded the small petals slightly darker.
Tip:  Shading the central petals darker helps to give more depth to your flower.
Foamiran Rose Tutorial 
Shape the petals into a cup shape using your fingers or a ball tool. If you want to save time you can heat your petals by touching the petals to an iron and your petals will quickly curl into a cup shape  but this does tend to make your petals thicker !
Tip: Using your fingers is faster but make sure you don't have nails on your fingers as otherwise you will get nail marks on your petals!
Foamiran Rose Tutorial 
Take a forceps and grasp the upper edge of your petal as shown.

Foamiran Rose Tutorial 
Twist the forceps to the back  as shown.

Foamiran Rose Tutorial 
Heat this edge on the iron box for a few seconds

Foamiran Rose Tutorial 
Remove and curl it into place using your fingers again.This is how the back of your petal will look now.

Foamiran Rose Tutorial 
Do the same for the other side of your petal.

Foamiran Rose Tutorial 
Sometimes as your heat the petal the cupping may smoothen out...then use your ball tool/finger again to cup the central part again.

Foamiran Rose Tutorial 
Don't be frustrated if you tear a few petals in this shaping step !! Shape all your petals in this way. You will need around 10 small and 12 large petals to make your rose.
Foamiran Rose Tutorial 
The easiest way to make a rose is by starting with the bud. You can use  a crunched up cotton ball, aluminium foil , clay or even a paper ball  as your center. 
I used the pointed Styrofoam buds from Dress My Craft for my rose center...love that these come in many sizes,have a wire stem to hold and the shape is just perfect!
Foamiran Rose Tutorial 
Glue 2 petals overlapping each other around the central Styrofoam bud. 
Tip: the quickest glue for foamiran is hot glue but be very sparing in the amount of glue you use and only apply at the lower part of the petal...that way you wont see unsightly white blobs of glue when you make your flower!

Foamiran Rose Tutorial 
For the 2nd layer use 2 to 3 petals. The easiest for beginners is to use 2 petals in the 2nd layer as trying to get in 3 petals is a tight fit ...so don't be frustrated if your rose center doesn't look as cool as you wanted it to!

Foamiran Rose Tutorial 
Add 4 to 5 layers in the 3rd layer. Working in 5 petals in easier 
Tip: Once you have made one or 2 flowers you will quickly understand the right amount of overlap to get that perfect petal arrangement!
Foamiran Rose Tutorial 
Add the  outer 2 layers in the same way...overlapping the petals as you glue.
Foamiran Roses and Leaves
If you are making a bouquet or a home decor item the under-surface of the flower will be visible...add a calyx using the calyx die in the set.
Foamiran Rose Tutorial 
 Scrunch up the die cut calyx to make it look more natural. Turn your rose over and apply a blob of glue on the center . Add your calyx, curling it to overlap and cover the center and stem of your rose.
Foamiran Rose Tutorial 
How to make Foamiran Leaves

Foamiran Leaf Tutorial 
Once again die cut 5 sheets at a time  ...this helps to make the leaves thinner.

Foamiran Leaf Tutorial 
You can draw,use mould or even stamp to add veins to the leaves but here is a super easy way to add lovely veins.
Place the leaves on a perforating pad [ used in parchment craft and flower making] or a thick mouse pad and run the pointed tip of the Dress My Craft golf tool on the leaves to make your veins.
Foamiran Leaf Tutorial 
It is so quick to make your leaves using this method!
Tip: Hold your tool in a slanted fashion rather than vertically up...this way you will not tear through the delicate foamiran.
Foamiran Leaf Tutorial 
If you are making a bouquet you need to add leaf stalks...sharing a quick tip to make your job easy and fast: Insert floral wires an inch or so into the glue bottle, twirl and remove it.
Tip : Use a quick drying tacky glue for fast and mess free results. I used Aleene's tacky glue here.

Foamiran Leaf Tutorial 
Stick the wire on the under-surface of your leaf[ the surface with the less prominent vein markings]

Foamiran Leaf Tutorial 
It is faster and more fun if you batch process a bunch of leaves in one go!
Foamiran Leaf Tutorial 
Leave undisturbed to dry . Be patient!!
Foamiran Leaf Tutorial 
And voila...your beautiful leaves are ready to go on your floral arrangement!!
Foamiran Roses and Leaves
I hope you liked this project and found the tips and techniques useful.
I apologise I could not make a video ... I am much better at writing than speaking and I really wanted to share all the tips in a post so that it will be easier for you to reference back to it at leisure!!
Here are the supplies used.
Everything is from Crafters Corner
Supplies : Foamiran Sheets, Dress My Craft dies  : Rose die #2 , Styrofoam Buds, Mungyo Artists Soft Oil Pastels, Floral Tape, Golf Tools, Ball Tools, Flower making wire, Aleene's tacky glue

Tuesday, 27 February 2018

Foamiran Flowers Tutorial and 3 D project tips


Hi friends,Dr Sonia here and  sharing a DIY Shaped Drawer + Easel card decorated with lots of handmade foamiran flowers. Sharing  a video Tutorial on how to easily make  simple foamiran flowers plus a few tips and tricks about how to make a shaped drawer.

 All the flowers you see were made using foamiran . The pink ones were made from really thin foamiran and the white ones from slightly thicker sheets[ even genuine foamiran varies in thickness from sheet to sheet so dont worry if you discover that some sheets are thinner than others!]


The butterfly was made using air drying clay and a clay mold, and made to sparkle using microfine glitter from dress my craft.

I used beautiful Lemoncraft papers to line the card and box and added a lovely background texture using my favorite Scrapberry's Petals Pattern Stencil and Prima White Crackle texture paste.

I used the Cheery Lynn  tea rose die to make a tiny rose from pink foamiran and hung a bottle from the rose. The bottle is filled with tiny dress my craft little hearts and micro mini pearls!

Foamiran Flower Tutorial

Here is the short video Tutorial


More tips while making foamiran flowers
  • If you are diecutting foamiran sheets die cut 3- 5 flowers in one go depending on the thickness of your sheets. This helps to flatten your foamiran sheets even more!
  • Heating your flowers is completely optional but fun and can give a different look- In this project the buds were created using  same Cheery Lynn  sunflower die but after heating with the iron-box to curl the petals.
  • Adhesive- the easiest is hot glue and you can get a nice permanent bond but do remember to tackle those pesky glue strings while you make the flower and as soon as you glue otherwise your project will look like a nest with all those strings!!!

DIY Shaped Drawer - Tips
I love making 3 D projects and here are a few of my favorites: 3D House shaped Organizer,  3 D Garden ShedShabby Chic Dresser.
They are time consuming and not easy to construct from scratch but very gratifying nevertheless!! So I though of sharing tips I have discovered over the years especially for making 3 D projects.
The seasoned crafter will be familiar with the tips I am sharing...this part of the post is more for those starting out in this very rewarding part of our paper-crafting hobby.
  • If you are a hobby crafter or a professional and you want to make something sturdy and long lasting...chipboard is your best friend!! You can buy chipboard in different thickness and choose the thickness you feel will be best suited for your project or recycle sturdy boxes and calendars as a source of your chipboard.I recycled an old desktop calendar to make the sides of the drawer box in this project.

  • Cutting:since only a few dies like the BigZ or the special Spellbinders Contour dies can cut chipboard your best option is a craft knife. You can start off with the local ones  and when you feel you need something better you can explore the branded Craft Knife options
  • Cutting Mat : If you are just starting out and don't have a self healing cutting mat a good alternative is the kitchen chopping board .In case you are thinking of buying a cutting mat you will be surprised to know that there are quite a lot of nice options . I have an A2 mat from Morn Sun and a magnetic one by WRMK . The morn sun one has been with me more than 7 yrs and is a good , sturdy and economic option but after I got the magnetic mat that has been my go to option since the mat is large and easier to use for big projects plus it is magnetic and since the ruler is metal your chipboard will be held more securely without slipping while cutting[ that means less stress on your hands!]
  • Cutting Curves

  • The easiest way to cut a curve is to use a plate or any other flat edged object at home. Mark the center of your chipboard edge and use the grids of the cutting mat to help you get that perfect symmetry which will later help give that neat look.

  • Sandpaper is a good investment for crafters who are interested in making projects with chipboard as it is super useful to smoothen the cutting edges and shave off millimeters off an edge! You can get these from the hardware shops and they come in different grits--- pick up a couple of different ones as they are super super useful not only for chipboard but for decoupage and mixed media as well.

  • Adhesive - If you are making an album then choosing an acid free adhesive is super important so that you dont destroy your beautiful papers and photos several years down the lane. You can use the good old fevicol mr but it's drying time is crazily slow and not my preferred adhesive for quickly making 3 d projects. A fabulous quick drying alternative is  Aleene's tacky glue. Recently I tried Elmer's Craft Bond tacky glue but found it too runny ! The hot glue gun is not a good option for creating durable projects unless you are using it to stick foam as the hot glue undergoes variations based on the temperature and in a country like India where the climate changes drastically you can have projects literally falling apart if you relied on only the glue gun!
  • Supportive Strips. Any kind of glue takes time to dry when making 3 d projects and if you want nice perpendicular walls use strips of carstock to hold the pieces together like int his project : Garden Shed or for a super quick method use carpenter's adhesive tape[masking tape]
The drawer box has lining of foam on the  base and here is the side view showing dangling faux leather tassels[ from dress my craft] and the crystal feet!

The  metal handle was toned down with a bit of gesso to match the rest of the project!

And here is the easel card + drawer box in my garden!

I hope the  flower Tutorial and tips were useful to you!!

Supplies : Foamiran Sheets, Oil Pastels, Pollen- Pointed thread pollen light green, Micro mini thread green pollen
Clay Molds- Plaid Trinkets, Funnel Tray
Dies :  Creative Expressions Sue Wilson Filigree 3 D ittybitty Bow,Spellbinders Labels 47 Decorative Elements,Spellbinders Curved Borders 2,Tonic Studios Birthday Swirl,Heartfelt creations Delightful Daisy Die,Heartfelt creations Classic Leaf Die, Cheery Lynn  Sunflower, Cottage Cutz Spring Basket with Ducks,Dee's Distinctively Berry Sprigs
Papers : Lemoncraft Fresh Summer; Stamps : Heartfelt Creations Open Leaf Stamp
MS Scoring Board
Adhesive : E6000 Spray adhesive
Dress My Craft Little Hearts, Sparkling Dust

Friday, 17 February 2017

Dress My Craft Papers and Tools Rock!!


Hi friends, Thank you so much for all the love showered on my Altered KeyHolder posted earlier showcasing handmade flowers and Tutorials. Here is another altered project..this time a Tea-light holder dressed up in a fairy house style using lots of  handmade flowers , vines and crystals!

I am so in love with the new Dress my Craft Papers...they are superb for die cutting as due to the thickness of the papers, the shapes hold so well.
The roses were made using Dress my Craft Floral Oriental paper and Spellbinders Rose Creations  dies.

The tear drop crystals are gorgeous fillers I picked up from Crafters Corner. Love how they lend a magical touch to a project.

Propped up the dragon fly charm on floral wire to fly  above the flowers!


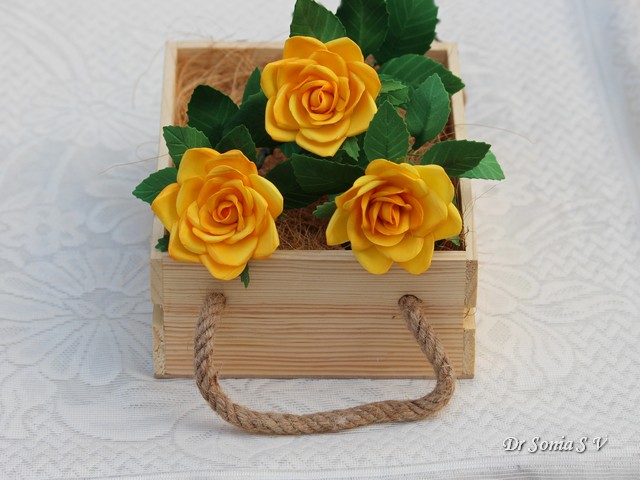
The yellow and pink blooms were also made using the same Spellbinders Rose Creations  die and Dress my Craft papers! Dont you just love it when you can stretch your supplies and make so many different flowers using a single die / punch.
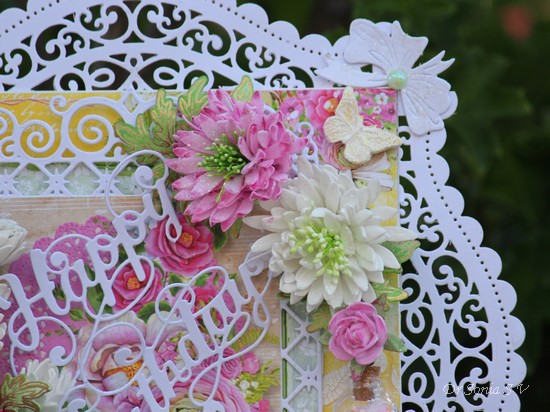
        I had never been able to quite enjoy making the crushed flowers which are so popular...I think the problem was the paper I had been using. This time I used the Dress my Craft papers and tools.I loved how easy it was to crunch up the papers without tearing them and the best thing was the shape held wonderfully!

Here are some of the flowers I made using Dress my Craft papers and tools.

The rose is one of my favorite flowers to make and yes I agree its the toughest one to get right too!! 
I love to find  easier ways to do something and in the last Tutorial I showed you how to use an earbud to help shape the central bud of the rose...in this post I will show you how to use Dress my Craft tools to make your flower making quicker and  easier.
Materials

  • Dress my Craft Oriental Paper
  • Groove Golf Tool Set: used the 2 large ones here
  • Any 5 petal Flower die: Here I used the Spellbinders Rose Creations  die and used the 2nd largest die 
  • Distress Inks /other inks
  • Mister
  • Towel
  • Embossing Pad
  • Adhesive of choice : I prefer the hot glue gun for its fast results.
  • Dress my Craft Sparkling dust
Use any 5 petal flower shape and color whichever way you want.Use one color, ink only the edges or use 2 different shades. Just remember to color both surfaces of your flower as the rose is a 3 dimensional flower and you will see both sides on your final flower.
Mist lightly with water and blot gently with a towel.

To quickly and easily form the central bud , use the largest of the golf tools and roll your flower petal around it

This is so much quicker than embossing with  tools and much easier than simply trying to roll the petal into a cone using your fingers alone!

Do the same with all the petals of your flower.


To form a nice pointed cone, now take the 2nd largest golf tool and wrap one petal around it...sliding it up to the tapering end and rolling into a tight cone.


What I loved about the Dress my Craft paper is that not only is it super easy to shape by this method but also the shape stays nicely...see how the petal doesn't uncoil immediately but gives time to glue!

You need to do this with only one petal which will form the innermost core of your bud. Glue the other petals around this .
You can use hot glue if you are adept with it [meaning not prone to burning yourself and not using too much] or use a clear drying adhesive of your choice.

You can either glue the adjacent petals overlapping the edges or glue petals from opposite sides...it just slightly changes the look of your bud and gives a bit of variety!

Your bud is now ready ! Add a calyx and its ready to go on a project as it is!


For the layer immediately around the bud, again use the large golf tool and rather than emboss, simply wrap the petals around it like you did before.


Optionally,  use the pointed tapered end of your 2nd largest or smaller golf tools and gently curve the edges of the petal outwards.

 Glue around your bud

You can achieve a tight or loose look for your rose by choosing where you apply the glue:
apply glue only on the  base of the bud and you will have a looser rose
apply glue on the base and on the lower half of the sides of the bud...you will get a tighter rose!

For the outer layers [you can add 2-3 depending on how full a flower you want] use the large golf tool to nicely cup and add subtle texture to the petals.

If any area looks stiff ,switch to a smaller golf tool and go over that area. Keep in mind that if you want more embossing anytime switch to the smaller size of the golf tool.

Invert the cup shaped flower and press the center with the round end of the largest golf tool.

Glue this under your rosebud


And so with just 3  die cuts  you have made a cute little rose!

Add more layers if you want a fuller rose .
To jazz up your rose...apply adhesive medium [use spray adhesive, crackle paint, multi-medium matte, glossy accents etc] and sprinkle Dress my Craft sparkling dust or frosted sugar.


Doesn't the rose look beautiful !!!

And the best thing is it was not too hard to make too isnt it!!

The pink one below is the one I used in the tea light holder


And here is the tea light holder hanging from our miniature Orange tree!

I hope you found some of the tricks I have shared useful.Do tell me how it is.

Supplies : all from Crafters Corner
Dies : Spellbinders  :Spellbinders Rose Creations,Heartfelt Creations :Heartfelt creations Classic Leaf, Heartfelt creations Delightful Daisy Die, Cheery Lynn  Dragon fly
Stamps : Heartfelt Creations Open Leaf Stamp,Heartfelt creations Delightful Daisies Stamp
Inks : Ranger Archival Inks , Distress Inks  Embellishments & CharmsHeat Embossing Supplies
Flower making : Pollen, Crystal Fillers
Dress my Craft products: Flower Making Paper : Dress my craft collection exotica and Floral Oriental collection paper

Golf Tools : LARGEMEDIUM,  SMALLMINI and NEW : Golf tool set
Misc Tools:Funnel tray
Sparkling Dust from Dress my Craft