Hey friends!
A very quick post for today. I have a small picture tutorial to share with you. I suck at doing tutorials but wanted to share this cool technique with you.
Shalini sent me a Hero Arts Unicorn pigment ink pad to work with. I didn't have time to do much research or watch videos about how to use it. The technique I used here has not been invented by me for sure! Many of you might have already tried. So this post is for those who haven't. :)
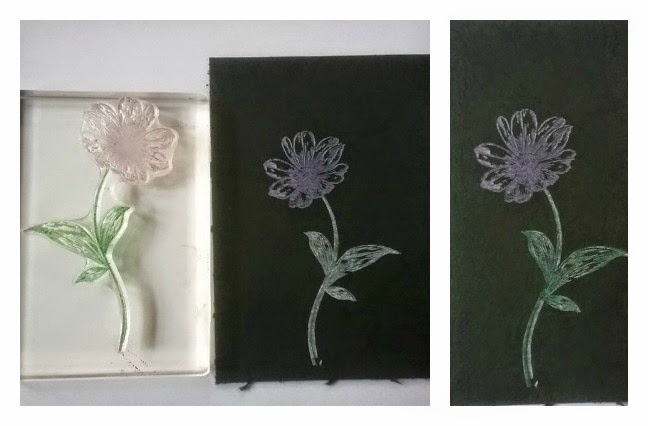
I love colors on black card stock but I never made a card that way. I knew that stamping with white pigment ink and then using colors on it gives great results... So I though I'd stamp with the pigment ink first and then again stamp with dye ink...all this on a black CS.
He's is a peek into my little experiment... Extremely sorry for my bad photography. I had to take pictures in the evening, so no natural light.
There is another tute that I did. This time I followed a video where Jennifer McGuire Stamped with pigment ink on Kraft colored CS and colored over it with copics. I followed the same but didn't use the super expensive copics. Instead I used the awesome Faber Castell bi-color pencils that Tee had sent me long ago and black CS to stamp on! <3 (I'm extremely sorry I couldn't find the link to the video... I'm sure you'll ind it somewhere on her blog.. )
A very quick post for today. I have a small picture tutorial to share with you. I suck at doing tutorials but wanted to share this cool technique with you.
Shalini sent me a Hero Arts Unicorn pigment ink pad to work with. I didn't have time to do much research or watch videos about how to use it. The technique I used here has not been invented by me for sure! Many of you might have already tried. So this post is for those who haven't. :)
I love colors on black card stock but I never made a card that way. I knew that stamping with white pigment ink and then using colors on it gives great results... So I though I'd stamp with the pigment ink first and then again stamp with dye ink...all this on a black CS.
He's is a peek into my little experiment... Extremely sorry for my bad photography. I had to take pictures in the evening, so no natural light.
 |
Step 1. Gather your supplier! :p
Step 2. Stamp the flower in HA Unicorn ink. I stamped it in pastel pink
|
 |
| This is how your image looks after stamping with the dye ink.
Step 5. I wanted a deeper tone. So I stamped with the same color ink again.
|
 |
| Step 6. Now ink the stem part and stamp on the image. I stamped over and over again to get that color! :p |
There is another tute that I did. This time I followed a video where Jennifer McGuire Stamped with pigment ink on Kraft colored CS and colored over it with copics. I followed the same but didn't use the super expensive copics. Instead I used the awesome Faber Castell bi-color pencils that Tee had sent me long ago and black CS to stamp on! <3 (I'm extremely sorry I couldn't find the link to the video... I'm sure you'll ind it somewhere on her blog.. )
 |
| I added Wink of Stella for some interest (read since I LOVE wink of stella! :)) I outlined the sentiment in white gel pen. I also outlined the inner colored circles with the same gel pen. |
OK...I'm done for today! See you again with a small tute on reverse stamping! :)
Supplies used
Faber castell colored pencils
White gel pen


Great ideas and absolutely new to me.Thanks for the tute!
ReplyDeleteThanks for sharing your ideas!!
ReplyDeleteHugs
Archana
Lovely Post Sindhu !
ReplyDeleteI have been trying to leave a comment on this post so many times but it seems the blogger doesn't want it :( ..Anyways Just wanted to tell you I loved each of the techniques you have shared here they are so fab :) I will definitely give this a try !Thank you so much for sharing them !!
ReplyDelete