Followers

Showing posts with label DMC stencils. Show all posts

Thursday, 13 September 2018

Cadence Textile Sprays

Hellloo...

Rupa here this THURSDAY, with a video tutorial.

Today I am going to be showing you lot of things that can done with the Cadence Textile sprays.


Firstly, these sprays come in a range of colors.
They can be used easily along with stencils or free hand.
They are permanent and are washable.
Iron on reverse of fabric when dry to seal the colors.
Mild hand wash is only recommended.

Here is what all I have created with the sprays.


Enjoy the tutorial here and as always would love to hear your feedback.


But remember to grab your sprays from Crafters Corner and show your creativity.
This festive season should give you a lot of reason to work with these for some unique gifting! Think about it.

Products from the store...
Cadence textile sprays
Cadence stencil adhesive spray
Cadence Trendy shadow alphabet stencils
DMC stencils
Cadence fabric glitter gold relief paste

Until my next creative journey,
Happy crafting and recycling.
Cheers.
Wishing all the viewers a very HAPPY GANESH CHATHURTHI.


Thursday, 2 August 2018

chippy paint effect with Cadence

Hellloooo and a very warm welcome from Rupa here!

 I was on a break and so happy to be back here and share my projects and tutorials with you.

I am going to working with CADENCE products and show you lots of DIY's on home decor and textile...isn't that exciting...I am loving the DT kit that came my way with all the yummy products.

So for today I have a home decor project, a quick and easy one with just a few products from Cadence, some recycled stuff, ofcourse and here we go....

Sit aback and relax and watch the pictorial as I describe this CHIIPPY PAINT home decor project!


How do you like it???

This is what I started with... I had this lovely vintage tin gifted empty by a friend, lol! I wanted to showcase it as a planter with a difference and so this project was born! I also made a stand for this with wood scraps and as you can see the products I have used are the BETON EFFECT relief paste, DORA PERLA GOLD RELIEF paste and the ARTIST CANVAS stencil from DMC and some paints from my stash...that's it!


Step1- I painted the frame with a teracotta color chalk paint from my stash and let it dry.


Step2- I used the DMC stencil and the Beton paste and did stenciling in random places.. The beauty of the paste is its full of fibre and gives a nice texture and dimension.


 Step3- I added some green acrylic colors to the paste to get some moss and applied that too randomly! The paste took to colors with ease and no time I had moss growing in my stand, lol!


 Step 4- I did some dry brushing with black paint to tone down the colors and to give the stand a weathered look. I emphasized the nooks and corners with black brushing and also ran over the died moss and stenciling.

Step 5-Then came the beautiful GOLD relief paste...this is like butter with granules!
 What a lovely gold it is, immediately lifted the look and enhanced the project and took it to the range of an antique piece!

Look at the gold butter...yummm!


 I allowed the relief pastes to dry naturally...yes it did test my patience but it was worth the wait! I further aged the stand with more black dry brushing and on the gold paste too, so that it looked old!


Have a look at some the pics...the final result is that of an antique, vintage, weathered, chippy painted stand!!! I AM LOVIN the look...it looks even more natural in real!


The combination of the Beton paste and the Gold relief paste is the main reason for this look!


And this how this whole project looks...I am happy I could give the vintage planter its due home with these Cadence products.


I couldn't stop clicking pictures, it was actually difficult to get the best angle and side!


That brings us to the end of this simple DIY home decor project and I hope you will give it a try. These products are a  definite buy buy if you love the vintage, grungy weathered kind of looks.
I appreciate your being on this page today and would love to hear your feedback and comments!
Until my next creative journey,
Happy crafting and recycling.
Cheers.


Saturday, 24 February 2018

Mixed Media Canvas & Layouts: Guest Design Post by Preeti Datta

Hi folks!

Preeti Datta (aka Dutt Preety) here. Good Morning :) 
I am thrilled & honored to be back on the Crafter’s Corner Blog as a Guest Designer. 
Very grateful for this opportunity. Thanks a ton to Shalini di & the whole team at Crafters Corner.

I will be sharing 3 projects today; a Vintage Themed Mixed Media Canvas & 2 Mixed Media Layouts. 

I’ve used Dress My Craft's gorgeous products: Stencils, Glitters, Beads, Papers, Flowers & other craft supplies from the Crafter's Corner store

Let's get started. 

1. Vintage Mixed Media Canvas- "Dream"


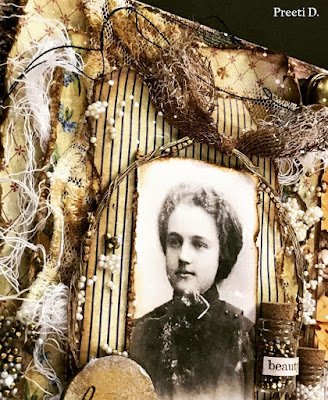
Here are some close-up photos to reveal the intricate details :- 


Collage of the Process Photos: 


Synopsis of the Process: Prepared the canvas (10 by 8 inches) with Prima's Heavy White Gesso and added texture through DMC's Swirls & Couture Fashion stencils & Prima's modelling paste. Created the composition in the background with laces, then added color with Lindy's sprays. For more texture & details, did background stamping with a Prima stamp & Potting Soil Archival Ink, added DMC's pearl micro beads, golden antique beads, DMC rainbow glitter using Prima's 3d Matte Gel, made a wire embellishment with DMC's golden antique beads & prepared the Dusty Attic chipboards by heat embossing them & adding some DMC rainbow glitter chunks to them. Also, added tiny glass bottles with DMC's pearl micro beads, golden antique beads, stickers, thread, antique brads & rolled up book paper cigars. For creating the layers, used papers from DMC's Teenie Weenie Paper pack, fussy cut elements from DMC's motif sheets, added gauze & lace. In the end, created ink splatter, distressed the edges of the canvas with Vintage Photo Distress Ink & added a little shine using Inka Gold & Prima waxes.

2. Mixed Media Layout- Celebrate


Here are some close-up photos of the layout:


Collage of the Process Photos:

Synopsis of the Process: Prepared the base with Prima's Heavy White Gesso & then applied Prima's Modelling Paste through DMC's Alphas Stencil. Added color using ink sprays & distress inks/oxides. Added more interest to the background by stamping with archival inks & sponging on distress oxides through DMC's Thumb Print & Couture Fashion Stencils. Then prepared the elements for layering & embellishments by using DMC's Dots N Stripes Paper Pack & Motif Sheets. Further, gathered all the elements for layering like flowers, die cuts, laces, twine, gauze, DMC's 3D Fairy flowers (altered the color by applying gesso and then coloring with sprays) pollens etc and created a composition. In the end, added texture & shine to the flowers and in places around the layout, using DMC's Pearl Micro Beads, DMC sequins, Little Hearts, Rainbow Glitter, Microfine Glitter Powder & Rainbow Glitter Chunks using Prima's 3D Matte Gel. 

3. Mixed Media Layout- Dream Big


Here are some close-up photos of the layout:


Synopsis of the Process: Prepped one of the Pattern Papers from DMC's Hydrangea Lawns Paper Pack with Prima's Clear Gesso and applied Prima's Modelling Paste through DMC's Thumbprint Stencil. Then added  DMC's Rainbow Glitter & Microfine Glitter Powder to add sparkle to the background. Sprayed on a spray sealer (to bind the glitter to the layout better) then deckled the edges of the paper & adhered it to other deckled & distress edged papers to create a layered 3-D look.  For the main composition, used DMC's 3D Fairy Flowers, twine, gauze & die cuts. Fussy cut the butterflies & titles from DMC's  Motif Sheets. Did background stamping & added color to the background with ink sprays. Added texture & shine to the flowers and in places around the layout, using DMC's Pearl Micro Beads, Golden Antique Beads, DMC sequinsRainbow GlitterMicrofine Glitter Powder & Rainbow Glitter Chunks using Prima's 3D Matte Gel. In the end, created white ink splatter. 

That's all for today :) 

In case, you'd like to check out my first GD post where I shared 8 Simple Mixed Media Cards (using DMC stencils & glitters), please click HERE.

I'm very grateful to Crafter's Corner for this experience. I had so much fun playing with the supplies. I highly recommend that you check out their website, HERE and also, their brand- Dress My Craft for it’s Stencils, Glitters, Sequins, Flowers, Pattern Papers, charms, miniatures etc They have a plethora of cool options to choose from. Buy a few to try them out, experiment and see the quality for yourself. I'm sure you'll love them :) 

Please don't forget, there is a great deal on DMC stencils via a Grab Bag Offer,wherein you can pick up all 12, A4 sized DMC stencils at a discounted price, please click HERE to check it out. 

Have a great weekend!
Thanks a lot for your precious time :)
Stay Blessed
Preeti Datta
Blog
Instagram