Followers

Friday, 18 March 2016

MOMENTS OF LOVE WITH ANITA KEJRIWAL

Hello friends !!!!

It's Anita here and I hope you all are have some good moments.....those little moments that bring joy and happiness...a little smile..a little compassion in your heart .
Today's post is inspired by those little moments. And to realize those moments, I have created this easel card with the new Heartfelt Creations Winking Frog collection.

FROGS !!!!!! and passion ... You mean Romantic and Love !!!!! I must be crazy !!!!!

OHHH YESSS !!!! Just flip through the Winking Frog papers and you will fall in love with these CUTE tiny creatures showing nothing but gestures of love and how beautiful they look together.
And the flowers ----The water lily ...compliments these so well.

Heartfelt Creations is so wonderful that with such unusual colllections, it challenges the creator in me to step a little out of my comfort Zone. This is the main reason that I want to be a part of the design team .. so that I can show the world that with HC products , the creative vision is so much enhanced and here I have done so .... HOW ???? ... You will see here !!!!

Here is this Easel Card, I have combined Two flowers from the HC collection... CASCADING FUSCHIA WITH WATER LILY... isn't that unusual !!!! and see how romantic our cute couple looks beneath the cascading fuschia and beside the water lilies.
Amidst the beautiful flowers.... LOVE GROWS !!!


Now isn't that unsual because normally , I do not combine two flowers but here the cascading Fuschia gave me the perfect backdrop for my scene.
Now to learn how I constructed the base of this step Easel Card... Here is a photo tutorial.
Please sit back and relax and absorb my instructions.

To make the base of the card

1. Cut three pieces of white cardstock measuring
6'' x 5.5 ''
5'' x 5.5 ''
4'' x 5.5 ''

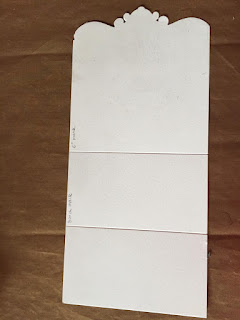
See how I drew a line on one side and  placed my Regal ornate and border die straight . This way , you will have perfectly straight die placed on your paper.

Cut all the three cardstocks in this manner and you will get these.


Next, cut the coordinating pattern paper from the winking frog paper collection and match to the size of cardstock. These , are then cut with the die like this to fit along the cut design of the cardstock.


What we have now are these three pieces.

(Do not follow the measurements written on the paper) 

We will now make the base of the card in the Easel style to hold these three tiers.


For this , take a cardstock measuring 6 '' by 12 '' and cut top side with the coordinating die.
Score at 6'' and 3 '' on the 12'' side. Fold like an Easel card.
Place all the three die cut card pieces on top of each other with foam tape. It should look like this.
Cut three oval layers from the Spellbinders Grand Dies and layer them together as shown here.


This is how the base will look.

Cut  out water lily flowers and leaves using the stamp and die set and colour them with these inks.


So here is the final card. I have water coloured the Fuschia and did fussy cutting and adhered them to the top with foam tapes

Here is a complete list of supplies used from Crafters Corner 

Water colour pencils

Crafters Corner is the best place in India for all your crafty needs. And it also has the largest Collection of Heartfelt Creations Products. So do hop on to the blog for some good shopping.


I hope you liked my post. So do vote for me HERE and you can see all my Hearfelt Creation Projects here and please please do leave your comments. Its very very important for me. 

Have a good day.


Monday, 14 March 2016

Easy Painting with Folk Art Multi Surface

Handpainted Wooden Articles for the home
        Hi friends, Dr Sonia here donning my Designer cap for  Crafters Corner once again and reviewing a product I have fallen thoroughly in love with and going gaga all over!! Yes I have a tendency to do that for all my product reviews don't I.......but do you know why that is.........its because for my DT posts Shalini actually lets me choose what I find the most attractive from all the amazing range of products in her shop! 
             I am sure all of you at one point or the other have wielded a brush , dipped it into some yummy paint and let the inborn artist in you have fun!
            Painting  must have given you the most enjoyment in childhood as at that point we didn't have to worry about which paint, what surface , will it work and what not!!
            Now there are so many different paints for different surfaces that for an average person it gets soooo confusing and the down side is that if you get it wrong all your hard work just literally flakes off !
             I was so excited about FolkArt Multi-Surface Acrylic Paints ,brought to us from PLAID [the manufacturers of amazing products such as Modpodge] because as the name suggests it is just that....a wonderful one stop solution...you can use it to paint on multiple surfaces such as:-
  • Glass
  • Ceramic
  • Terracotta
  • Plaster
  • Thermocol[styrofoam]
  • Clay
  • Tiles
  • WallS
  • Wood
  • Silk
  • Fabric
  • Canvas
  • Plastic
  • Concrete 
Yes that is a huuuge list!

And have a look at the amazing comparison chart from the PLAID website. All those little black dots above a paint's name show what the paint can be used for .
Folk Art Multi Surface Paint  

Key Features of Folk Art Multi Surface Paints 


Folk Art Multi Surface Paint  
  1. We all love to use paints that come in ready to use colors thus avoiding the trouble of mixing colors to get shades! These paints  are available in an amazing 40 colors ...in different variations such as bright ,soothing pastel and even chalky colors
  2. They are absolutely non toxic hence ideal for use by crafters
  3. They come in lightweight plastic bottles ---yes no cases of broken bottles if you knock over your paint!
  4. The lid design of the bottle is a clever flip open type and yes that means easy replacing the lid and no hunting for lids ...makes it so much easier if you are a "in rush" and messy crafter like me! And as you know acrylic paints dry out fast and this type of lid design is a distinct advantage! 
  5. The lid has a nozzle which is just the right size to allow you to squeeze out drops  of paint onto your palette. I found this a distinct advantage over the wide mouth usual paint bottles .
  6. Since these paints can be used for multiple surfaces if you want to make matching items for your home eg if you want to paint a matching ceramic vase, wooden tray , paper mache box....you don't have to shop for different types of paints but just pick up the versatile Folk Art Multi Surface Paint   !

How to Prepare your surface for painting

Though we all like to jump right into painting here are a few tips to prepare your surface to get the best results [ From Plaid Website]
  • Wood: Sand smooth with fine grit sandpaper, wipe away sawdust.
  • Tin: Wash with soap and water; wipe with white vinegar dampened cloth, then rinse with water and let dry completely.
  • Glass/Ceramic: Wash with soap and water; wipe with rubbing alcohol dampened cloth.
  • Terra Cotta: Wipe clean; seal pot interior with paint or two coats of FolkArt Waterbase Sealer. If terra cotta will not be used as a planter, simply paint.
  • Canvas: Wipe primed canvas clean; if unprimed, apply a couple coats of FolkArt Gesso Primer.
  • Rigid Plastic: Wipe clean with damp cloth.
  • Paper Mache: Wipe clean with damp cloth.
  • Plaster: Wipe clean with damp cloth.
  • Concrete: Coat with white vinegar, let dry, rinse, and dry thoroughly.
  • Fabric: pre-wash in soap and water, dry thoroughly without fabric softener or dryer sheet.

Painting on Wood 

Wooden Hanger
        For some time I wanted  an extra  cloth hanger for my bedroom but wanted something unique and not the run of the mill store bought stuff. I had this wooden cloth hanger I had bought thinking I would decoupage it but felt lazy on thinking of decoupaging all those curved parts! When Shalini discussed  Folk Art Multi Surface Paints...I jumped at the chance to use it on my wooden cloth hanger!
Folk Art Multi Surface Paint  
Beginner's Painting Tip : If like me you plan to use white and other colors on a project ...finish off the other colors first as unless you are an especially clean and meticulous painter you will splatter colors on your white!
Folk Art Multi Surface Paint  
Once I painted to wood and metal parts in white and the most gorgeous chalky pink I used a sanding tool to gently sand and smoothen the blotchy less than perfect areas
Buying Tip : There is a really cute and handy Mod-podge Tool Kit available at Crafter's Corner with a useful Distressing and Sanding tool[awesome for card making and scrapbooking too], Squeegee[ super useful in decoupage], 3/4 inch flat brush [ perfect for painting large surfaces]apart from 2 handy scissors and a scale all neatly packed in a plastic see through pouch!
Sanding
Now let me confess I am not an artist in any sense of the word but I am sharing a few steps of how a total novice like myself  could achieve a lovely painted article!
Folk Art Multi Surface Paint  
       I thought flowers were a good project for a beginner ! Love how cleverly the  bottle is designed and its easy to squeeze out just a drop or two of paint. The Folk Art Multi Surface Paints have a creamy consistency and are not running or too thick....just perfect for a beginner!
Folk Art Multi Surface Paint  
Many of you may be familiar with the famous One stroke Painting technique by Donna Dewberry if not do google and you will find amazing works and tutorials!
Folk Art Multi Surface Paint  
I will not say my flowers and leaves are exactly the one stroke technique as mine are too amateur and simple. Double loaded an angular brush with 2 shades of paint and blended them by brushing on paper. You can use a flat brush you have.
Folk Art Multi Surface Paint  
Since I was quite new to this type of thing I practised a few flowers on paper first and you can see how funny some of my trials look!
Folk Art Multi Surface Paint  Practise
Well in the end I managed to paint passable flowers!
Folk Art Multi Surface Paint  
And it didnt look too bad against the white background !
Hand painting
Added a few leaves and it even started to look beautiful !
Handpainted wooden Hanger
         My husband usually is rather meagre with appreciative words on my creations but this simple handpainted project elicited a "wow" from him and yeah that made by day!
Folk Art Multi Surface Paint

I painted a few "buds" on the edges of the hanger and added simple leaves.
Folk Art Multi Surface Paint  
The whole project was so simple and gratifying to do!!
Painted wooden Hanger
I was so happy at the success of my first handpainted project I ventured to make a matching accessory for my wooden hanger!
Wooden Basket
Decided to alter the wooden basket shown above in the same way
Modpodge kit
I used the brush from the Modpodge kit to paint my wooden basket white
Folk Art Multi Surface Paint  
Now I was faster so my florals took less time
Handpainted Basket
          Shalini knows my obsession with adhesives so she sent me this wonderful glue from Modpodge called "wonder glue" in my DT kit !
Wonder Glue
It was perfect to add some heavy bling to my wooden basket!
wooden basket
Lined the sides of my basket with a pearl mat and also wound a string of pearls around the  top arch!
Wooden Basket
It was tricky to paint 5 petal flowers on the arch so I just swirled my brush and made "buds"
Wooden Basket
I also added swirled buds on the edges of the basket!
Handpainted Basket

Painting on Plastic

Folk Art Multi Surface Paint  
I am sure everyone will have some or the other plastic item at home just begging to be altered! Well I went to work with some plain takeaway containers
Folk Art Multi Surface Paint  
Doesnt it look sweet!!
Folk Art Multi Surface Paint  
         When trying Folk Art Multi Surface Paint  on plastic I found that it took on the colors well but if you really wanted an opaque covering you needed to use more paint if you are using the pastel shades.
Folk Art Multi Surface Paint  

Painting on Metal

Metal Tin
I had this gorgeous heart shaped metal tin just waiting to be altered!
Stencil
Since Folk Art Multi Surface Paint work beautifully with stencils I tried using it with a Memory Box stencil I had
Folk Art Multi Surface Paint  
I used a stencil brush and Folk Art Multi Surface Paints to create a lacy design on the metal tin
stencil art
Though there was something charming about the lacy design I got I didnt quite like it !
Stencil Art
           Now here is what I really loved about the Folk Art Multi Surface Paint  .....they are easily washable! If you are not happy with what you painted...you can easily wipe it away or wash it off while it is still wet!
Folk Art Multi Surface Paint  
So after I washed the whole thing off I thought I would go the floral way again!
Double loaded my paint brush with vintage white and baby pink to paint simple daisies on the lid of the tin.
Simple daisies
        I didn't use brush strokes but rather just dabbed on the paint using the edge of the brush and I love the slightly textured look that left on the metal surface!
Handpainted Daisies
For an amateur handpainted project I feel rather happy about it!
Handpainted Tin
What do you think my friends?
Handpainted Tin
The Folk Art Multi Surface Paints are so popular in crafting circuits and they come in such beautiful color shades that they are fast selling out ! 
Here are the links to the list of supplies used :
Supplies Used