Followers

Showing posts with label versamark. Show all posts

Friday, 21 June 2013

Make your pattern papers with Tim Holtz distress paints

Hi All,

It's Priya here to show you some cool effects using distress paints.. These are thick opaque colors water based color which are highly reactive with water.. However, once they are dry, they set like any other paint.. so you have both the properties of distress inks and paints.. You can achieve various effects like marbeling, ombre, gradient, etc using these paints..
I will show you how you can use these in paper crafting and card making.. I tried to make pattern papers using these paints.. .

Supplies Needed:


1. Distress Paints of various colors
2. Stamps
3. Crafter's Workshop Templates
4. Embossing Powders
5. Versamark ink
6. Paper Towels

Now lets have a look at the PPs I created using these supplies..

1. Ombre effect with heat embossing using template:
For this I am using 3 distress paints of same color family, Vintage Photo, wild honey and mustered seeds.. I have also used Herlequin stencil from Crafter's Workshop and Ranger super fine gold embossing powder..

1. Stick the template firmly to the paper and surface..

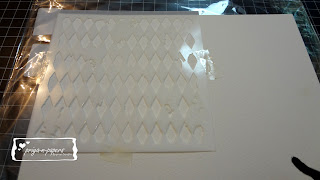
2. Tap the embossing ink directly on to template.. Make sure the exposed paper is fully covered by the ink..

3. Sprinkle the embossing powder and heat it..

 4. Paint through the paper using inbuilt dauber..

5. Sprinkle some water to make colors more liquidy.. User your fingers to spread and mix the colors till you get the desired ombre effect..

I made a card using this PP..

2. Vibrant Pattern paper:

1. Draw straight lines of different paint colors.. using the inbuilt dauber..

 2. Let the colors air dry for 15-20 mins..

3. Using Picket Fence color, just dab the color out and make impressions at various places.. don't move the daubber around.. it will give around 1/2 inch nice, solid white circles.. Use it the way you like..


3. Stamping and embossing with paints on Kraft paper:
Unlike distress inks and stains, distress paints give nice solid colors on darker surfaces because they are opaque and thick..
1. Use a lighter shade of distress paint as ink and stamp onto the paper.. The color will just pops out.. I have used Spun Sugar Distress paint here..


2. While the paint is still wet, sprinkle some clear glitter embossing powder..

3. The embossing powder will stick to the wet paint and we can then just heat the powder to melt it..


Here is the complete card.. it's looks so b'ful in real..

4. Layered Stamping with Distress Paints:
You need 2 distress paints, one dark color and one light color of same or different families.. I have used Spun sugar and picked Raspberry..

1. Stamp the image with dark color (picked Raspberry)..

2. Let it dry for some time. Make sure to remove the paint from the stamp after stamping. Otherwise the paint will not come out once it's dry..


3. Stamp with lighter shade of color.. (Spun Sugar here..)

 4. Stamp it little further, around 2-3 mm.. this will give a nice effect.. the dark color will look like a shadow..

There are many more techniques to use distress paints... the list is endless.. keep trying as the possibilities with are endless..
You can buy distress paints from Crafter's corner..If you have any queries regarding any of the products used please leave me a comment here or write to us at info@crafterscorner.in
Have a Good Day Everyone and Don't forget to play along our current challenge Gift's Galore to win some Exciting Prizes :)

cya!
Priya 

Saturday, 15 June 2013

Create magic with embossing folders!!

Hi friends!

I know I had disappeared from the blog world  for a while, all thanks to my sprained wrist and fluctuating energy levels.I haven't touched my craft supplies for a long, long time, which is not common. Anyway I hope all of you are doing well. :)

I'm here to share some information on embossing folders that might be useful to you.

I am sure all of you are aware of embossing folders and the way they work.

I have browsed a lot and selected few techniques that are easy (for me :p).

Shall we get started now? :)

1. The first technique is just embossing... The card here will give you an idea of what an embossed paper/ CS will look like..


2. Have you ever tried inking up your embossing folders? Well... you must if you haven't . Ink your folder with distress inks, spray some water and you will be amazed with the result...

Note- You must ink the smoother side of the folder. You will know what I mean if you own an embossing folder. Also, spraying water is very necessary for the ink to spread.


Here is the outcome. Doesn't look pretty? I have used mustard seed, tumbled glass and shabby shutters for this one.

For this card, I have used only worn lipstick distress ink.


3. Stamping the 'smooth side' of your embossing folder is another fun thing to do. I came across this technique by the name 'kissing technique' on IBS blog. Gave it a try now... 

This is what you have got to do....

Stamp the smooth side of your folder with a BG stamp (or any stamp if you want to try) and emboss your CS as usual. You will see that you have a nice BG all around your embossed design.

Check out the tutorial on IBS blog here.

It's so easy. Here is the outcome.

What do you think?

4. Here is something crazy that I tried. Haven't seen anywhere but I'm sure I'm not the first one to try this.

Just like in the above kissing technique, I have stamped the smooth side of my embossing folder with a BG stamp, but with versamark water mark ink this time. Run throught your CB or Big shot pr any other die cutting or embossing machine. After embossing, immediately cover the entire design with embossing powder and heat emboss. 

It hasn't come out perfect but with practice, guess I will get better.


5. This is easy. emboss and highlight the desired part of your embossed image with a white gel pen. I have outlined the whole image for fun! :) You can do whatever you want. There is no right and wrong when it comes to creativity, don't you agree? :)


6. Next is partial embossing. It's really very easy and I love the result.  

Run the embossing folder only part way (not all the way through your machine) and then rotate the handle of your machine in anti clock wise direction to get out your folder. Oh no! I'm not good at explaining! :(

 you will understand when you see the pictures...


I left space for sentiment and embossed the rest...

7. You can emboss various kinds of paper in with embossing folders, also fabric. I tried embossing vellum and WOW! embossed vellum is sooo pretty. See it for yourself.


8. Next is water coloring the embossed design. For this I inked up the folder (smooth side) with worn lipstick distress ink and later after it dried, colored the flowers and everything else with water color pencils.

It's pretty, isn't it? :)

Well... that's it for now.

Here is the LINK you might want to check out. It's from here that I got my inspiration. There are also many videos that will help you use your folders in a better way.

If I find time, I'll definitely make another post on embossing folders.

Supplies used-
Cuttle bug embossing folders.
Versamark water mark ink pad
Distress inks- worn lipstick, mustard seed, shabby shutters, tumbled glass
Hero Arts year round sentiments. (If you want this set, contact Shalini, she will surely be able to help you get it.). There is a huge stock of HA stamps in our store. You must chem them out.
Silver embossing powder. You can get embossing powders in colours... click here for info.
Mulberry flowers- Keep your eyes open for a whole new range of flowers...:)

If you have any questions regarding techniques shown above, leave me a comment and I'll be happy to answer.

You want to know about any product? Then send a mail to Shalini at info@crafterscorner.in

Have you participated in the gifts galore challenge yet? Click HERE for details.

Hope to see you soon! Bye! Take care...

Sindhu...


Thursday, 25 April 2013

Introducing "The Crafter's workshop" stencils


Hello Everybody,
Today I want to share some information about a product that is one of my favourite things to use, and that is the Crafter’s Workshop Stencils.I would not be exaggerating if I say that I am in love with these.I have been collecting these for some time and I am so glad that these are now available locally and so easy to purchase.

The Crafter’s workshop is a company based in the US which specializes in templates and stencils.They are quite a rage with artjournalers, scrapbookers and mixed media lovers all around the world.These stencils come in two sizes i.e. 6 by 6 and 12 by 12 and are made of good quality plastic.They are easy to clean and maintain and incredibly versatile.There are a lot of different designs available and they keep coming up with newer templates very frequently.
Here are some ways that I have been using these awesome stencils.
1.To create backgrounds
There are multiple ways you can make backgrounds for your cards,tags,scrapbooking layouts etc,using these stencils.There are a lot of options and I am going to cover a few of them and also show you some samples that I created for this post and some projects that I have already done using these.(Please excuse the not so nice pictures.Almost everything is in low light.)

Here are some of the things that I have tried so far :

Use with Distress inks : You can use these stencils with distress inks and create cool backgrounds.You can combine multiple colours of inks with the same stencil too.Here's how I did it and the results


I used the Flutterby Stencil with worn lipstick distress ink and some White opal liquid pearls on the butterflies

For my next sample I tried two different inks ( Peacock Feathers and Worn Lipstick) with the Circle Grid stencil and also sprayed some gold spray through the stencil.


Spray away : Another popular technique is of course spraying.You can use shimmer sprays,flat colored sprays ,homemade sprays and make beautiful backgrounds for your cards,tags etc.I have to admit that I struggle with spraying.My images are more blotchy than crisp.You will see this in my sample.
Here's my attempt in my art journal .Not a very good result but that is more my clumsiness than anything else.:-)


Here are some tips that I gathered on getting a good sprayed image
 Tip 1 : Whenever you are using sprays,always make sure to use a repositionable/low tack glue or tape to attach the stencil to the paper.This ensures that the stencil does not move and also since the stencil is stuck down to the paper properly,there are less chances of the liquid seeping through the cutouts.
Tip 2 : Don't spray too close to the stencil.Keep some distance to get a finer spray.This will help in avoiding blotchiness and unclear images.Also note that if you are looking for very crisp images,especially you cardmakers,you may or may not like spraying.The effect that the sprays create is more artsy than crisp,so if you like that,go for it.
Heat Embossing : Yes,you heard me right!You can use these to do heat embossing too and then try the embossing resist technique.How you do it depends on the stencil you choose.For very intricate stencils,it might not be a great idea to go for heat embossing, but stencils with larger designs totally work for this.Some examples of stencils which will work great for heat embossing are Bricks Stencil , ,Mini Flower Frame, Mariposas, Circle Grid,to name a few.


Here I have used the Harlequin stencil with silver Zing Embossing powder and various shades of distress inks ( Broken China , Peacock Feathers and Faded Jeans ).Picture taken in lowlight.:-(

If you have a large stencil design,you can just use your embossing ink directly on the stencil.Make sure that your embossing inkpad is juicy and just squish it between the cutouts.You can then just emboss as usual with any embossing powders.
If you have more detailed/intricate stencils,you can make use of embossing pens like Versamarker Watermark Pen and fill in the areas that you want to emboss.

Note : You can use the same principle for using Perfect Pearls Pigment Powders  too.

Use with Modelling paste/Texture paste/Gesso : This is my favourite way of using the templates since I am fascinated with mixed media.You will need some kind of textured medium for this.Shalini will have liquitex modelling paste in her store very soon and I am very excited about that.
For this, all you need is the stencils,your modelling paste and a spatula.If you don't have that,a popsicle/ice cream stick,old credit card or even a hard brush should work.I haven't tried it with a brush, but have seen some people do it.So give it a try.
The trick is to take a moderate amount of paste on your spatula and then place it over the stencil and then spread it just like you would do when icing a cake.It will be a good idea to use some sort of respositionable adhesive to stick down the stencil Let the modelling paste airdry or use your heat tool.It doesn't take too long.
Tip : The modelling paste is generally white in colour,but that does not mean that you have to rely on that only.Modelling pastes are paint friendly,so if you want a specific colour,mix some paint with the modelling paste and then apply.
I have mixed black acryclic paint with the modelling paste here
You can also use distress inks over the modelling paste after it has dried.You can even stamp on it..
The stencilled design is coloured with Vintage Photo and then stamped with a script stamp in Colorbox Frost White Pigment ink

Here, I altered a frame by using the stencil and modelling paste and then coloured the whole thing with Worn Lipstick Distress Ink

I have used the Art is Stencil , Harlequin Template and the Flutterby Stencil respectively in these projects 
2.For dry embossing : Okay,a disclaimer here first.I have not personally tried this,so I am not sure how well this works.During my research on this product,I found that these stencils can be used for dry embossing using a Cuttlebug.I have a Bigshot Machine and I have yet to try and see if it works with it.Here's a video showing you how to dry emboss using these stencils.
3..Outline and colour to add random accents to your projects : Some people also use the stencils to just outline the design and then go back in and colour in the image.This might be tedious but I think can be useful if there's a specific design you want and you don't have a stamp of that particular design.

4.Resist with Mod Podge : This is a last minute thing I tried in my art journal.,you can sponge Mod Podge through the stencils.Once it dries,spray with the colours of your choice.Mod Podge will resist the sprays.This works best with gloss finish Mod Podge as per the internet,but I tried with Mod Podge Matt Finish and the results were not all bad.Ignore the bad spraying and uneven stencilling please.Focus on the resist.:-)The top portion has a thicker coat of mod podge and the bottom has a very thin layer.

4..Use with different kinds of paints: The most traditional method of using stencils is to use it with paints.Acrylic,water colour,poster paint,whatever you have.Remember,these stencils can be used to paint any surface,be it tags,boxes,canvases and if you have tons of patience and determination,even walls and wooden furniture.:-)

Phew,this post is really long,but I really could not help it,There are so many ways to use this product.One post is not nearly enough!
Whatever is mentioned in the post today is what I have learnt from various sources and have personally tried till now.I am sure there are many many more ways you can use these.There's no rule stopping you from combining multiple techniques with these templates.I think the possibilities are endless and you just need a tiny bit of creativity to make full use of this awesome product.
Here is a pic of some of the products that I have used for this post.All these are available at the shop.
Hope that I have shared enough information to highlight the versatility of this product.If you have any questions,please leave a comment or write to us at info@crafterscorner.in .
 Have a lovely crafty day.

Cheers,
Pallavi

Sunday, 24 March 2013

Heat embossed cards..

Hello everyone!!!
 Its kavitha here to share some inspiration on this months theme-Stamping and distress inks.This is my last official post for crafters corner,my 6 months  DT  term is over and i am stepping down from my DT position .Hope you have enjoyed my inspirations so far.
So i have not one but two cards for you today.I am really hooked on heat embossing since we had embossing theme here in crafters corner blog. So here is my super inky cards..with lots of embossing and inking.

I love love the new distress colors-my most favorite is peacock feathers.For my first card i have heat embossed the background design and distressed it with more of peacock feather and a little of shaded lilac inks.The flower is also inked up with same shades as background and so is the butterfly.


I had some left over pieces of the embossed design after trimming it for my card,so i made a matching tag and bookmark.
For the book mark i have punched out some flowers out of the embossed paper.
Here is the other card with same color combo-peacock feathers and shaded lilac,i have also added some mowed lawn inks.For the edge of the card i just dabbed the versa mark ink pad directly and sprinkled some silver embossed powder and embossed it.For the veins of the flower i have used embossing pen and added some silver embossing powder.
Hope you liked both of my cards,the new colors in distress inks is so beautiful and vibrant..almost all the colors are must have.Check out crafters corner for the full range of new colors in affordable prices.
Supplies used:
VersaMark Watermark Stamp Pad
Hero art stamps
Tattered floral dies
Distress inks-Mowed Lawn, Shaded Lilac, Peacock Feathers 
Clear embossing powder 

If you have any doubt about the product or technique used,feel free to leave a comment.We are happy to help you.

  And if you have not linked up your creation for this time's challenge yet then please do so soon as there are some awesome prizes to be won!..Do check it out HERE


Thanks for looking.
Lots of love and happy crafting,
Kavi

www.crafterscorner.in (All craft supplies under one Roof)
For further queries do mail us at : info@crafterscorner.in


Tuesday, 5 March 2013

A Colorful Hello! :)

Hi Everyone,
This is Hussena here to share with you a card I have made as an inspiration for our current theme which is 'Stamping'.....For my card first I have stamped my card base with Hero Arts Flourishes stamp using Versamark embossing ink ...And heat embossed it using Ranger Super fine clear embossing powder...After I heat set it I went a little crazy with Distress inks...And colored the background using them....Distress inks are water- based /dye inks and they have very vibrant colors and they retain the vibrancy even after they dry unlike other dye inks.....So when I distressed my card base using Mustard Seed,Tumbled glass ,Shabby Shutters ,Scattered Straw  the colors not only blended into each other but helped to make this very colorful background...I have then stamped some flowers & leaves & colored the flowers using Fired brick & the centre using Mustard Seed & Ripe Persimmon distress inks and the leaves with Shabby Shutters & Mustard seed.....I have used the Ranger Ink blending tool & foams to color in the flowers & leaves & then fussy -cut them & popped them on dimension...You will find all these supplies in our very own Crafter's Corner' shop :)...


Supplies Used :-
Base CS -Campap
Dies :-
Spellbinders Label 8
For the embossed background :-
Versamark Embossing ink pad
Ranger Super fine Clear Embossing Powder
Inks used :-
Distress inks used : Mustard seed ,Shabby Shutters ,Ripe Persimmon ,Tumbled Glass ,Scattered Straw and Fired Brick .
Versafine onyx black ink pad
Stamps :-
Hero arts Flourishes stamp
Inkadinkadoo Flowers stamp set
Sentiment -TPC Studio
Pearls -Stash

Hope you all like my card...If you have any questions or queries regarding any of the supplies used...Please leave me a comment below or mail us at : info@crafterscorner.in

Do join us for our current challenge "Stamping "...We have some great prizes  in store for you...!!

www.crafterscorner.in (All craft supplies under one roof)
Have  a nice day everyone!

Thursday, 28 February 2013

CAS Card By Mallika

Hello Folks ,
Today I have prepared a CAS Card .
I have always been the heavy embellished one . Making this one was a real challenge . Recently I have been in love with the CAS cards  .
This card has been made using Spellbinders Rose Creation dies .
I have used following distress inks -
Gathered twigs
Walnut Stain
Festive Berries
Vintage photos .
Sometimes I really wonder "kya cheez banayi hai TIM ne ?? "Distress inks totally transform the project .
I have been very nervous about heat embossing , But this month all my fears have gone .
The sentiment has been heat embossed using Ranger Heat Tool and Ranger black embossing powder .
The flower have been doodled using some flourish stamp and Versa mark pen and versa mark ink pad .  The are embossed using large embossing tool on perforating pad  .
For any queries regarding this mail to info@crafterscorner.in

Regards
Mallika