Followers

Showing posts with label Kavitha. Show all posts

Sunday, 24 March 2013

Heat embossed cards..

Hello everyone!!!
 Its kavitha here to share some inspiration on this months theme-Stamping and distress inks.This is my last official post for crafters corner,my 6 months  DT  term is over and i am stepping down from my DT position .Hope you have enjoyed my inspirations so far.
So i have not one but two cards for you today.I am really hooked on heat embossing since we had embossing theme here in crafters corner blog. So here is my super inky cards..with lots of embossing and inking.

I love love the new distress colors-my most favorite is peacock feathers.For my first card i have heat embossed the background design and distressed it with more of peacock feather and a little of shaded lilac inks.The flower is also inked up with same shades as background and so is the butterfly.


I had some left over pieces of the embossed design after trimming it for my card,so i made a matching tag and bookmark.
For the book mark i have punched out some flowers out of the embossed paper.
Here is the other card with same color combo-peacock feathers and shaded lilac,i have also added some mowed lawn inks.For the edge of the card i just dabbed the versa mark ink pad directly and sprinkled some silver embossed powder and embossed it.For the veins of the flower i have used embossing pen and added some silver embossing powder.
Hope you liked both of my cards,the new colors in distress inks is so beautiful and vibrant..almost all the colors are must have.Check out crafters corner for the full range of new colors in affordable prices.
Supplies used:
VersaMark Watermark Stamp Pad
Hero art stamps
Tattered floral dies
Distress inks-Mowed Lawn, Shaded Lilac, Peacock Feathers 
Clear embossing powder 

If you have any doubt about the product or technique used,feel free to leave a comment.We are happy to help you.

  And if you have not linked up your creation for this time's challenge yet then please do so soon as there are some awesome prizes to be won!..Do check it out HERE


Thanks for looking.
Lots of love and happy crafting,
Kavi

www.crafterscorner.in (All craft supplies under one Roof)
For further queries do mail us at : info@crafterscorner.in


Monday, 11 March 2013

Distress markers review

Hello all,
its  kavitha to share some reviews on distress markers today.There is so much you can do with them,not just coloring alone.It can used for almost all the techniques that we use for distress inks.But before we go on to that,here is the basic things about Distress markers.

Distress markers are acid free and non-toxic.They come in a  color palette of 37 colors -36 colors from distress inks palette and one opaque color-picket fence..It comes with dual tip-brush tip and fine tip.Brush tip can be used for coloring and shading where as fine  tip can be used for writing,outlining,stenciling etc.

The brush tip of the marker is very flexible that you can make thin lines to thick lines,so you  can easily use it for coloring in very minute parts at the same time can easily cover a large  area as well.The markers are water based and blends very well with water,if you are a beginner you can use water brush ,others can use just a regular brush.Its almost like water coloring,if you know how to use water colors,then using distress markers  is just a piece of cake.

Distress markers comes in family of colors,so you can use different shades of same color and get a good depth in your coloring.you can even use same color to get different shades(if you don't have all the shades),the more water you add,the more lighter the color becomes,and less water gives you darker colors.The colors may look patchy while doing,but once it dries it really blends with paper seamlessly and gives a super smooth finish.
P.S:If you are a beginner ,while shading allow some time in between each coats,once the first layers dries give the second coat,other wise the colors will blot.

So as i said earlier distress markers are not only meant for coloring,you can almost do all the techniques you do with distress inks and much more.

You  can create different effects with stamping,one of them is shaded effect.I have used a solid stamp here,and colored the stamp with 3  different shades and sprayed some water with mini mister before stamping,tada..here is a beautiful shaded water color effect with stamping.
Want to have colorful sentiments for your projects?no worries you can create  nice effects with distress markes.For the first one,i generally colored the stamp and stamped it.
For the second one i kept small small dots on the stamp and stamped on the paper,it gives a different effect.
Want to have different colors for same sentiment?for third one i have taken a big sentiment stamp with 5 lines,colored each one with difernt markers.
Want to have two colors in a single sentiment?i have taken a bold sentiment stamp and used two different colors.
These things are possible only with markers,and the possibilities  are endless,you just have to experiment.

You can create wonderful effects for your backgrounds.For the first one i .have kept some random dots on the acrylic block in differnet sizes,sprayed some water and applied it to the paper.
For second one i just scribbled some random lines on the acrylic block and sprayed some water and applied it to the paper.
For this you have to repeat the steps 3 times,first with more water,second with less water and third time without water.Great isn't it?you can different much more effect in this way..again you have to experiment a lot:)
So hope my review is quiet useful.Feel free to ask if you have any doubts.Distress markers is available in full set and individual colors in crafters corner at affordable price.

Happy crafting,
kavi

  http://www.crafterscorner.in (All craft supplies under one roof)
For any further information regarding any of the products please contact :- info@crafterscorner.in

Sunday, 24 February 2013

Tile pattern card

Hello everyone!!
its kavitha here to share another inspiration for this months theme "Expression of love" and heat embossing.I had a totally different thing in my mind while starting,it dint work well and then i tried another idea and again it dint end up as i thought and finally i tried a regular embossing resist technique and  realized nothing new in it.Finally i combined all 3 ideas and made this card,its one of rare moment where you start with something in mind and end up with totally something different..but who cares,crafting is always fun when experimenting and yeah the result will be totally surprising.

 I have cut the embossed-inked background paper into 1 inch squares,placed them  on a white background paper  and made a tile pattern.The heart is made with crackle technique where first you have to stamp the design and then apply embossing ink all over apply embossing powder and heat it.Repeat this 3-4 times and keep it in the freezer for 5 mins and take it out and just fold it in different different direction,it gives a beautiful crackled effect.The butterfly is heat embossed on vellum.So hope you like this happy card,for any doubt or queries leave a comment below,i will be happy to help you.


Supplies used:
 VersaMark Watermark Stamp Pad
American crafts zing embossing powder-white
Distress inks-Mowed lawn,picked raspberry and mustard seed.


Hope you all liked my inspiration.Do join us for this month Challenge # 5-Expressions Of Love.

Happy crafting,
kavi

  http://www.crafterscorner.in (All craft supplies under one roof)
For any further information regarding any of the products please contact :- info@crafterscorner.in

Thursday, 7 February 2013

Chalk board technique tutorial

Hello all!!!
its kavitha here to share another inspiration and tutorial on this month theme “Expressions of Love” and   "HEAT EMBOSSING"
 Chalk board technique is in  hot trend now in paper crafting world.When i saw this technique first, i remembered how we use to draw(or scribble in black board)in school days when teacher was not in class:). May be that should be one of the first step for many people in art world:)

You need some good sentiment stamps and few designs like flourishes or anything related to the theme you are taking(i have taken a LOVE theme here).First stamp the main sentiment in the center of the black card stock with versamark ink and then sprinlke opaque white embossing powder.Tap the excess powder and emboss it with heat gun.

Build on your design with various sentiment and design stamps.Its not necessary to have so much of sentiments and designs..this is my first time doing this,so i went a little over board..hehe.Once finishing the heat embossing part,stamp the same sentiment with opaque white ink a little away,so that it will give a reflection effect(this step is not compulsory)

I have also done some doodles with versamark embossing pen.The side line,scrolls in the top are made with them.versamarker pen is very versatile,you can create your own handwritten sentiments,doodles etc.Just draw with them,pour the embossing powder,tap of the excess powder and heat it.

Once you finish everything take a soft cloth and blend some frost white ink here n there to give a realistic look.Thats it..your chalk board is ready and you can use it on your card and decorate it.
Here is my card with it..

Supplies used:
 VersaMark Watermark Stamp Pad
 VersaMarker Watermark Pen
 Ranger Heat It Tool - European Version
American crafts zing embossing powder-white
Color box frost white ink pad
 FIskars-Lasting love stamp set

Hope you all liked my inspiration.Do join us for this month Challenge # 5-Expressions Of Love.

Happy crafting,
kavi

  http://www.crafterscorner.in (All craft supplies under one roof)
For any further information regarding any of the products please contact :- info@crafterscorner.in

Monday, 28 January 2013

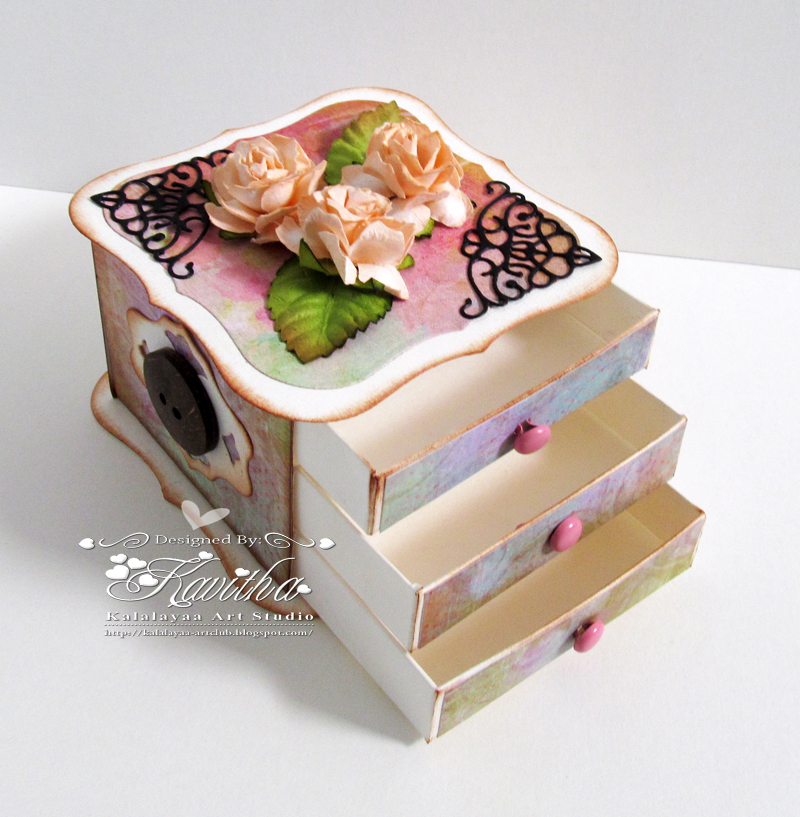
Drawer box..

Hello crafters!!
its kavitha here again to share another inspiration for this months theme-Anything but a card or layout. I made this mini drawer box which measures 3 by 3 inches.Isnt it so cute?You can fill some small gifts or chocolates inside or can use it as trinket box.It definitely makes a perfect gift.Now have a look..i have posted more pictures to show its dimension.Hoped you liked it.


Supplies used:
Pattern paper:Prima
Martha stewart score board
Spellbinders Label one and  pendant die
Lace Corner die from cherry lynn
Mulberry roses n leaves
Brads
Vintage photo distress ink


Hope you all will play along our current Challenge # 4- Anything but a Card or Layout ..!!Just few days left/There is a Magnolia magazines up for grabs...


  http://www.crafterscorner.in (All craft supplies under one roof)
For any further information regarding any of the products please contact :- info@crafterscorner.in

Sunday, 20 January 2013

Heart shaped treat bag tutorial

Hello everyone!!
its kavitha here to share a  tutorial for making a heart shape treat bag(perfect for valentines day:))This is very easy to make with dies,you dont need any template at all.


I have taken the largest scallop heart die.Mark a 'V' shape like this upto 3/4th of the die cut(you can use any shape dies). Measure the length on both the sides.This is coming to 61/2 inches on both the sides.


Take a card stock measuring  61/2 inches by 2/1 inches.Score at 1/2 an inch on the both the sides lengthwise.Also score at 31/4 inches to make it into  'V' shape.Make a 'V' shape slit in the center.
Then apply a little bit of glue on the joining area and stick it together.Now stick this panel to the die cut.once it dires stcik the other die cut to the other side.
For the handle take 11/2 inches by 12 inches card stock and punch it on both the sides and stick it to the bag.
Hope i explained it clearly,i found it difficult in explaining this a bit,so if you have any doubt please leave a comment:))

Supplies used:
Spellbinder dies-Scallop heart ,classic heart and ribbon banner dies.
Cuttle bug embossing folder.
Martha stewart doily lace  punch
Cherry lynn small exotic butterflies.
Martha stewart leaf punch
Martha stewart score board


Hope you liked my tutorial and treat bag..
 http://www.crafterscorner.in (All craft supplies under one roof)
For any further information regarding any of the products please contact :- info@crafterscorner.in

Saturday, 12 January 2013

Tilda gift box set

Hello everyone!!
Its kavitha here to share another inspiration for this months challenge  Challenge # 4  "Anything but Card or Layout ".
I have decorated a little wooden box in shabby chic style and made some mini cards and tags to put inside inside.This month we are focusing on Magnolia,so you can see more of tildas this month:)
I have colored the tolda with ink-tense water color pencil.Have added loads od yummy shabby chic goodies,hope you all liked it.Scroll down for the list of supplies i have used.


Supplies used:
Tilda sending love letter
Cherry lynn butterfly die
Mulberry rose and Long fillers 
Mulberry leaves
Spellbinders scalloped oval n classic oval dies
Magnolia heart swirl die

 Hope you all will play along our current Challenge # 4- Anything but a Card or Layout ..!!There is a  Magnolia magazines up for grabs...These magazines are full of ideas & designs for all kinds of crafters..!

www.crafterscorner.in (All craft supplies under one roof)
For further information please mail at : info@crafterscorner.in


Monday, 31 December 2012

Faux wood background tutorial

Hello all!!
 hope you all kick started your new year celebrations.This is the last post of the year in crafters corner.We all wish you a very HAPPY N PROSPEROUS NEW YEAR.Have a crafty 2013 ahead:))

   Its kavitha here to share a tutorial today on how to make a faux wood background for your cards.Of-course you get lots of embossing folders for wood backgrounds,but i am going to show you a easy method which can be done within few minutes with your scoreboard.
Keep you card stock on the martha stewart scoreboard and randomly score the lines using bone folder.Make small lines instead of scoring from top to bottom at a stretch.Keep moving the card while scoring so that you don't get even lines.

Hope you can see how the lines have come out in this picture.Then using vintage photo distress inks first distress the whole card stock.

Then make it darker from the outside,so that you get dark n light shades.If you want more darker add a little bit of black only on the edges.Now your wood background is ready to use in your card.


I have decorated the card with stamped and colored butterflies from hero arts.For the sentiment panel i used spellbinders floral oval and classic oval dies.Sentiment is from fiskars Make a wish stamp set.Some ribbon n button to finish the card.
Hope you liked my tutorial and card.
 http://www.crafterscorner.in (All craft supplies under one roof)
For any further information regarding any of the products please contact :- info@crafterscorner.in

Wednesday, 21 November 2012

Wall hanging tutorial

Helloall,
 its kavitha here to share a tutorial today.First of all i am so sorry for the poor pictures,my camera phone is already dying and top of it my computer is corrupted and all software's has been deleted,so not able to edit the pictures:(.
The tutorial is to make a mobile hanger with paper scraps.All you need is circle punch-from EK success,Martha stewart doily lace border punch,fevicol,stitching thread,pattern paper scraps and ribbon.

Take a 18" strip of card stock(2 inches width) and punch the border.Stick both the ends together,you will get a base like this.

Take the punches circle,apply glue and fix the thread in the middle and stick another punches circle over it.In this way the thread gets covered and both the sides will have patterns.In case you can stitch you don't need to stick the other sides,instead you can use double sided pattern papers.

I made 8 strands of punched circle and attached it to the base.For hanging it punch 4  holes on four sides in the base,take one meter of ribbon,put a knot on one side and attach it to  the base.Finally join all the four ribbons together and tie a bow.

Hope you liked it,you can try this with different shapes like heart,stars,butterflies etc.Best way to use your scrap too.This looks lovely in real.
 http://www.crafterscorner.in (All craft supplies under one roof)
For any further information regarding any of the products please contact :- info@crafterscorner.in


Happy crafting,
kavi

Wednesday, 14 November 2012

Punches and stamping

Hello crafters,
 hope you all had a great time celebrating diwali with lots of sweets n crackers:).Its kavitha here to share a card today,based on this moths theme.I have used punches and stamping in this card.Its a pretty simple card,but love how it turned out.I have paper pieced the flowers with pattern papers,colored the stems with Distress markers.The brush tip is super fine and very easy to color even the tiniest parts.The punch is from ek success-abstract flower.Distressed the edge with vintage photo distress inks.
I applied a coat of Crackle accents on the flower,i guess is not visible much in the photograph.Please click on the picture to enlarge so that you can see the details.It really gives a glossy finish with crackled effect.


Hope you liked my card.Do join us with the Punches/dies challenge with stamping this month.If you ahve any queries reagrding the products used drop in a mail to mshalini79@yahoo.com

Happy crafting,
kavi


Friday, 12 October 2012

SUPER EASY FLOWER TUTORIAL

Hello all,
hope you all are enjoy our inspirations ans tutorials,please feel free to let us know what you want to see in future as we are here to help you out in some creative way:) Its me kavitha here to share a super easy flower tutorial with you all today.We all love to make handmade flowers and use it in our projects,but always flower making takes lots of time and needs loads of patience too,so we probably end up in using ready made flowers.What if you can make a handmade flower in less than 10 mins?here is it..

All you need is spellbinders scallop circle die,punch craft paper(for this flower you need a bit thicker paper than usual,say 110-120 gsm),mini mister and fevicol.

I have left the first and last size of the die and have taken the middle 5 sizes.it totally depends on what size flowers you are going to make.The first two sizes you need 2 pcs each and rest one piece of each

With the help of your mini mister  spray water generously,crumple them and make it into a ball.If you don't have mini mister keep a bowl of water,dip the petal and take it out immediately

And then slowly open them and get it back into shape.Do each petal individually like this

Allow them to dry a little  for 5-10mins and when they are still damp stick all pieces together with the help of fevicol.Give a little shape with hands and fill the center with glitter balls,brad,or rhinestones.Super easy isn't it?you needn't  to punch,emboss,shape or anything,as easy as that,and the result?so effective.Doesn't it looks like a cabbage rose?


I have made Autumn wreath using these flowers.I don't have a picture tutorial for making the wreath,but i just explain how i have made it. I have cut 2 circles in a thick card stock with Martha stewart circle cutter.THe outer circle is 61/2 inches and inner circle is 4 inches.Sticked them together and wrapped with raffia ropes.
The flowers and leaves are arranged using silicone glue,the filler flowers are done with mini punched flower and wire pollens available in crafters corner.You can get all varieties of punch bunch punches at crafters corner.


Hope you like them:)
Happy crafting,

http://kalalayaa-artclub.blogspot.in/