
Greetings everyone
How have you been :) I hope great.
Did you see the last post by my fellow team mate which was all about mixed media. She has explained so beautifully and in precisely in a very simple way what mixed media is all about. So I decided to carry on the theme and try my hands on mixed media again.
Surprisingly my DT kit for the month was super amazing, take a look

Isn't it awesome, I just love impasto paint and art alchemy brilliance wax.
And this is my first set of super intricate chipzeb by Mudra, let me tell you these are beyond amazing super think and such fine cutting details totally blown away by the quality of the same.
So finally I decided to make set of mixed tags using these crazy supplies.
{All supplies used will be mentioned down below along with the links, so don't worry sit back and enjoy post}

Tda ... Here is my take on mixed media tags. I have simple tutorial and lets get started....
STEP BY STEP : TUTORIAL
Step 1:

To make my tags I used Sizzix Alterations tag die and white card textured card stock from my stash.
Step 2:
Select your choice of metal embellishments scraps resins etc etc whatever you want to you use, Just to let you know there is no LIMITATIONS.

 Once I have selected my embellishments, I like to place them randomly and play around till the time I find perfect places for each one of them.
Step 3:
Now I have pasted all the embellishments using art basics 3D Gloss gel.


Step 5:
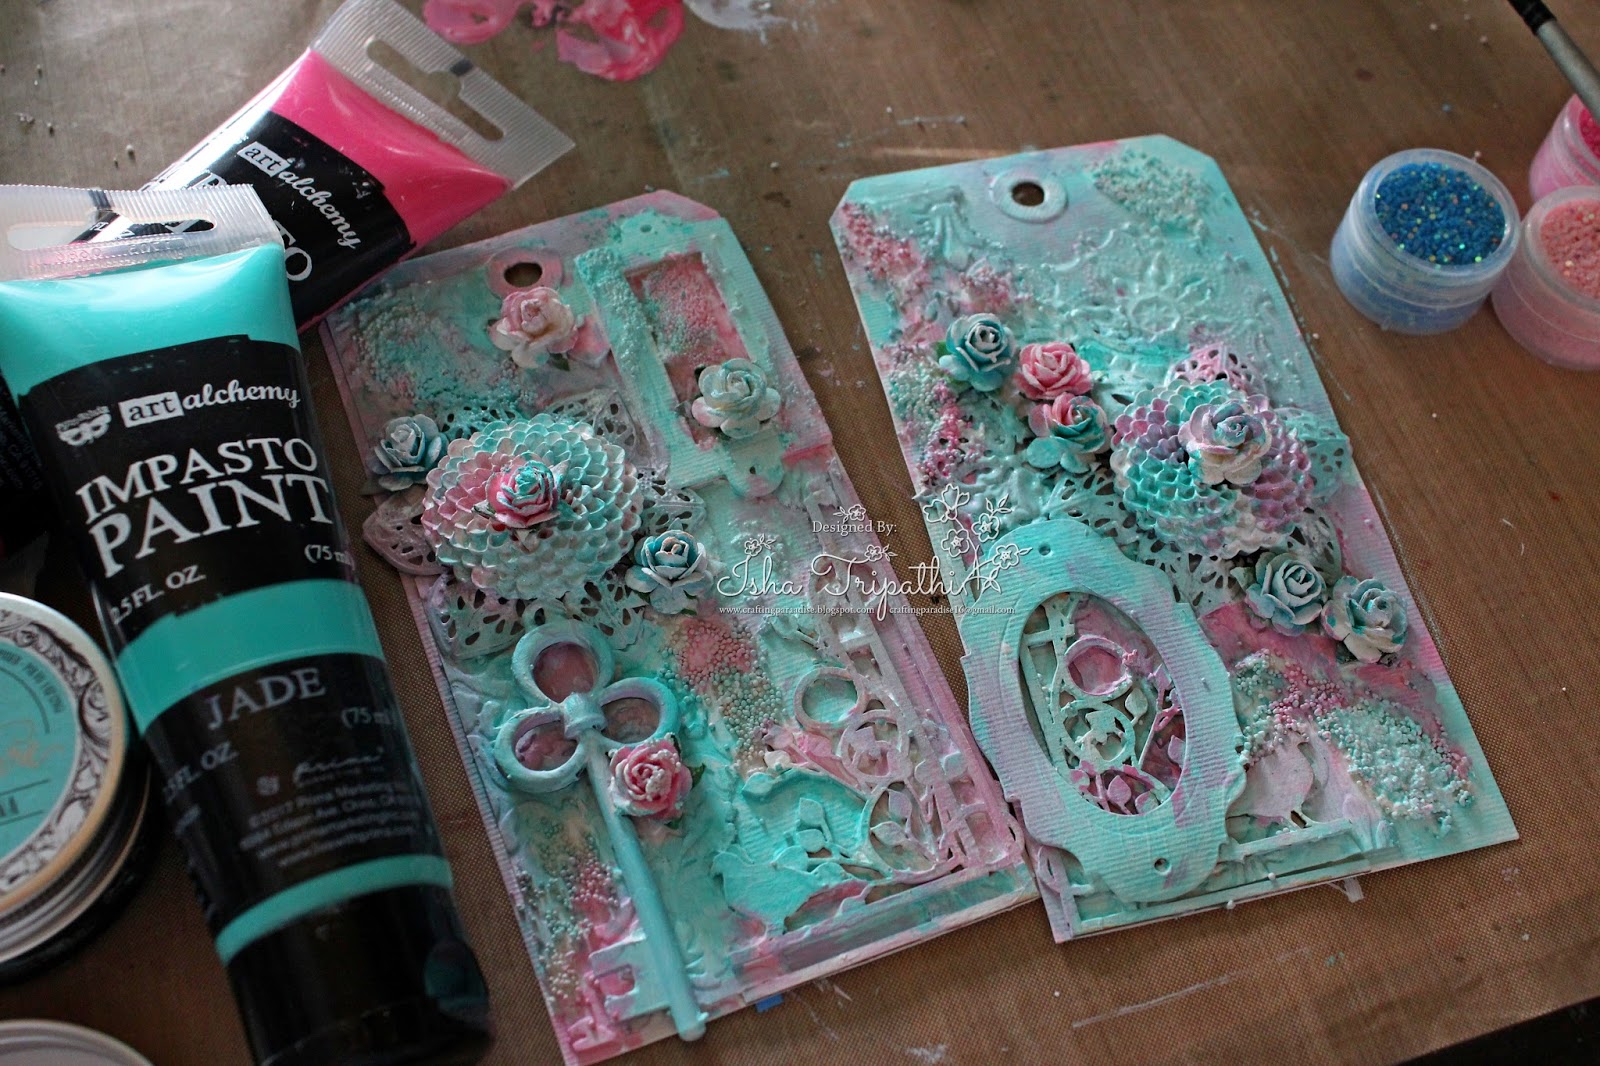
Now once the gesso dries up, apply impasto paints till your heart drop. I just love these two gorgeous colors from art alchemy and in fact store has the one of the awesome collection of impasto paints.

Step 6:
 This is really one of the awesome products I have used, Memory Hardware by Frank Gracia. Love the muted tones. I have used Blue and pink color here.
In the above image the tag on the left I have dusted the artisian powder and I don't know whether you can spot the difference between the two tags but the one on the left looks more vintage and has a matte effect.
What is the product all about-
Prima Marketing Frank Garcia Memory Hardware Artisian Powder. Use this fine and delicate colorized powders on resins, wood, paper, clay and more to create a vintage look! Great for revealing texture, detail and cracks. Mix with gesso or modeling paste or mix with water to create a custom spray. ( source: https://www.crafterscorner.in)
Step 7:
Lastly to add some glamour to my tags I have brushed whole loads of art alchemy White gold wax on the chipzeb and all over my tag.


I hope you liked my tags and I was able to inspire you all.
Happy Crafting
And do keep checking the space for more exciting inspirations.
Supplies used:-
TAG DIE SIZZIX
Marquise Blue - Artisan Powder
jade impasto paint
Raspberry pink impasto paint
Mono Multi Liquid Glue
Mudra Chipzeb
Metal Embellishments
Art stones - Finnabair
How have you been :) I hope great.
Did you see the last post by my fellow team mate which was all about mixed media. She has explained so beautifully and in precisely in a very simple way what mixed media is all about. So I decided to carry on the theme and try my hands on mixed media again.
Surprisingly my DT kit for the month was super amazing, take a look

And this is my first set of super intricate chipzeb by Mudra, let me tell you these are beyond amazing super think and such fine cutting details totally blown away by the quality of the same.
So finally I decided to make set of mixed tags using these crazy supplies.
{All supplies used will be mentioned down below along with the links, so don't worry sit back and enjoy post}

Tda ... Here is my take on mixed media tags. I have simple tutorial and lets get started....
STEP BY STEP : TUTORIAL
Step 1:

To make my tags I used Sizzix Alterations tag die and white card textured card stock from my stash.
Step 2:
Select your choice of metal embellishments scraps resins etc etc whatever you want to you use, Just to let you know there is no LIMITATIONS.


Step 3:
Now I have pasted all the embellishments using art basics 3D Gloss gel.

Step 4:
Once the gloss gel dries up, cover the entire tag with gesso. I have used single layer of liquitex white gesso.

Now once the gesso dries up, apply impasto paints till your heart drop. I just love these two gorgeous colors from art alchemy and in fact store has the one of the awesome collection of impasto paints.
Step 6:

In the above image the tag on the left I have dusted the artisian powder and I don't know whether you can spot the difference between the two tags but the one on the left looks more vintage and has a matte effect.
What is the product all about-
Prima Marketing Frank Garcia Memory Hardware Artisian Powder. Use this fine and delicate colorized powders on resins, wood, paper, clay and more to create a vintage look! Great for revealing texture, detail and cracks. Mix with gesso or modeling paste or mix with water to create a custom spray. ( source: https://www.crafterscorner.in)
Step 7:
Lastly to add some glamour to my tags I have brushed whole loads of art alchemy White gold wax on the chipzeb and all over my tag.


I hope you liked my tags and I was able to inspire you all.
Happy Crafting
And do keep checking the space for more exciting inspirations.
Supplies used:-
TAG DIE SIZZIX
Marquise Blue - Artisan Powder
jade impasto paint
Raspberry pink impasto paint
Mono Multi Liquid Glue
Mudra Chipzeb
Metal Embellishments
Art stones - Finnabair


