Hi friends, Dr Sonia here with an easy to make yet fabulous looking Mini Album and a matching handmade gift.
Good quality card-stock is such a wonderful staple to have handy especially to make handmade albums.
I was especially thrilled when Shalini introduced some fabulous quality papers under her brand Dress My Craft and here are my top picks-
the metallic gold, the full range of black card-stocks, the mirror papers and the gorgeous fabric papers!
If you have ever folded an accordion you will know that you need a really good quality paper .This special accordion album with multiple folds and flaps was made using the 400g black card stock from Dress My Craft
This is how one side of the accordion looks .Alternating pages have flaps which fold down and look interesting and unique when displayed !
The other side of the accordion album has flaps which unfold up
I used Graphic 45 papers throughout this particular album.
I used some handmade clay embellishments and gorgeous Dress My Craft hearts and rosebuds on the cover page!
This mini album has 7 pages and 6 flaps and can hold 25 photos. It is a versatile design and using good quality card stock you can add more pages and flaps and even pop up elements!
Here is the video showing the album in action and though I have made this mini using dies from Crealies[ details on my blog] in the video I have shown a simplified version you can make using just scissors, card-stock and glue!
Mini albums are fabulous personalised gifts and sharing a simple matching gift idea!
The cute dome is from Dress My Craft and you can use it to create all kinds of themed mini dioramas!
In keeping with the romantic theme of my album I created tiny foamiran rosebuds using foamiran sheets, Artists oil pastels and Cheery Lynn Large rose dies!
Made a base using some wooden discs left over from some carpentry work at my home.
I have always loved using corrugated paper and was thrilled to see it as a new addition to Crafters Corner. Corrugated paper is such a versatile medium and especially perfect for covering curved surfaces.
Took a strip of corrugated paper to cover the rough edges of the wooden disc and wrapped the pretty lace[ also from Dress My Craft ] around it and finished it off with a cute ready made satin bow!
I hope you liked this mini album design and the dome idea.
Hello,
Tejal here today with another Product demo. Today I'm showcasing two products in one Video and hope that you like them!
One is the Ranger's Crackle Paint...I'm using the Clear Rock Candy...you can see all the colors we have in the store here! You get them in all the colors of the distress ink plus a few more...like the metallic colors in Brass, Pewter and Bronze. Then there's Clear and the White picket fence.
So on to the next product that I'm talking about..
The Frantage Shabby White Embossing enamel...this is one of the coolest embossing powders ever...Check out the Video to know more...
Here are some of the close ups of the projects and crackle effect I show in the Video..
This is the flower with small crackles because of the thin layer of paint
This is the flower with the larger cracks because of the thick layer of crackle paint on it!
Hope you enjoyed the Video and please leave any comments or queries below..
Tejal here with another product demo...Today I bring you the very versatile Embossing paste....I had been itching to try my hands on this product and when Shalini got these into the store, I had to try them out and bring a demo for you guys!!
Its a bit long (any surprise there??? ) I'm covering the following points in the video,
Basics of how to use the paste
Adding color or tinting your paste
Adding glitter over your paste
(Open the picture in a new tab for seeing the sparkly glitter!)
Adding embossing powder and heat embossing for added dimension.
Take your time to watch it, and as always leave me a comment with questions if you have any....Compliments are also accepted!! :D
Tejal here with another video. Today I'm playing with Gelatos. In my last Mixed Media Canvas Video, I used these Faber Castell Gelatos and I got a few questions as to what they are and how they work....so I thought of reviewing it for you and showing you how to use them...
I love Gelatos....now that I know how smooth and creamy and buttery they are (and no calories at all!!) its just fun to use them..
You can use these on Canvas, Paper, Fabric, Veneers, MDF, watercolor papers etc..and it will give a beautiful result everytime!!
So hop on the Video and join me in exploring this wonderful art Medium.
Here are the close up's of the techniques I showed in the Video.
As always, if you have any questions or queries, please feel free to get in touch with us...or leave us a comment!
Its Tejal here...and today I'm reviewing the Prima Color Bloom Sprays. Absolutely gorgeous colors and oh the ease of spraying!! Nothing like it!!
Image Source - Prima Blog
Join me as I show you how to use these sprays, the whats and hows of these new sprays!
And if that wasn't all, I have my very first Mixed Media Canvas to share with you.Please be kind in your comments.
I made a very CAS Canvas, because I wanted to show that Mixed Media need not be tough or complicated, It can be very easy too!!
So having said that...I would love to see you try a simple canvas and share with us at Crafters Corner.
And have you checked out the awesome awesome new charms in the store? Check them here
I've kept the quote as my main focus and the rest is just to enhance the quote. So what do you think of my first effort??
And here's a small video showing how I made this. Its is in fast forward mode so its only music for today!!!
Leave your valuable comments and questions for me....Will surely get back to you.
This being a month of flowers at Crafter's Corner...we are show-casing different types of dies and flowers that can be made with them..Sindhu,Anchal and Arjita have already shared beautiful posts with you...Do check them out if you haven't..
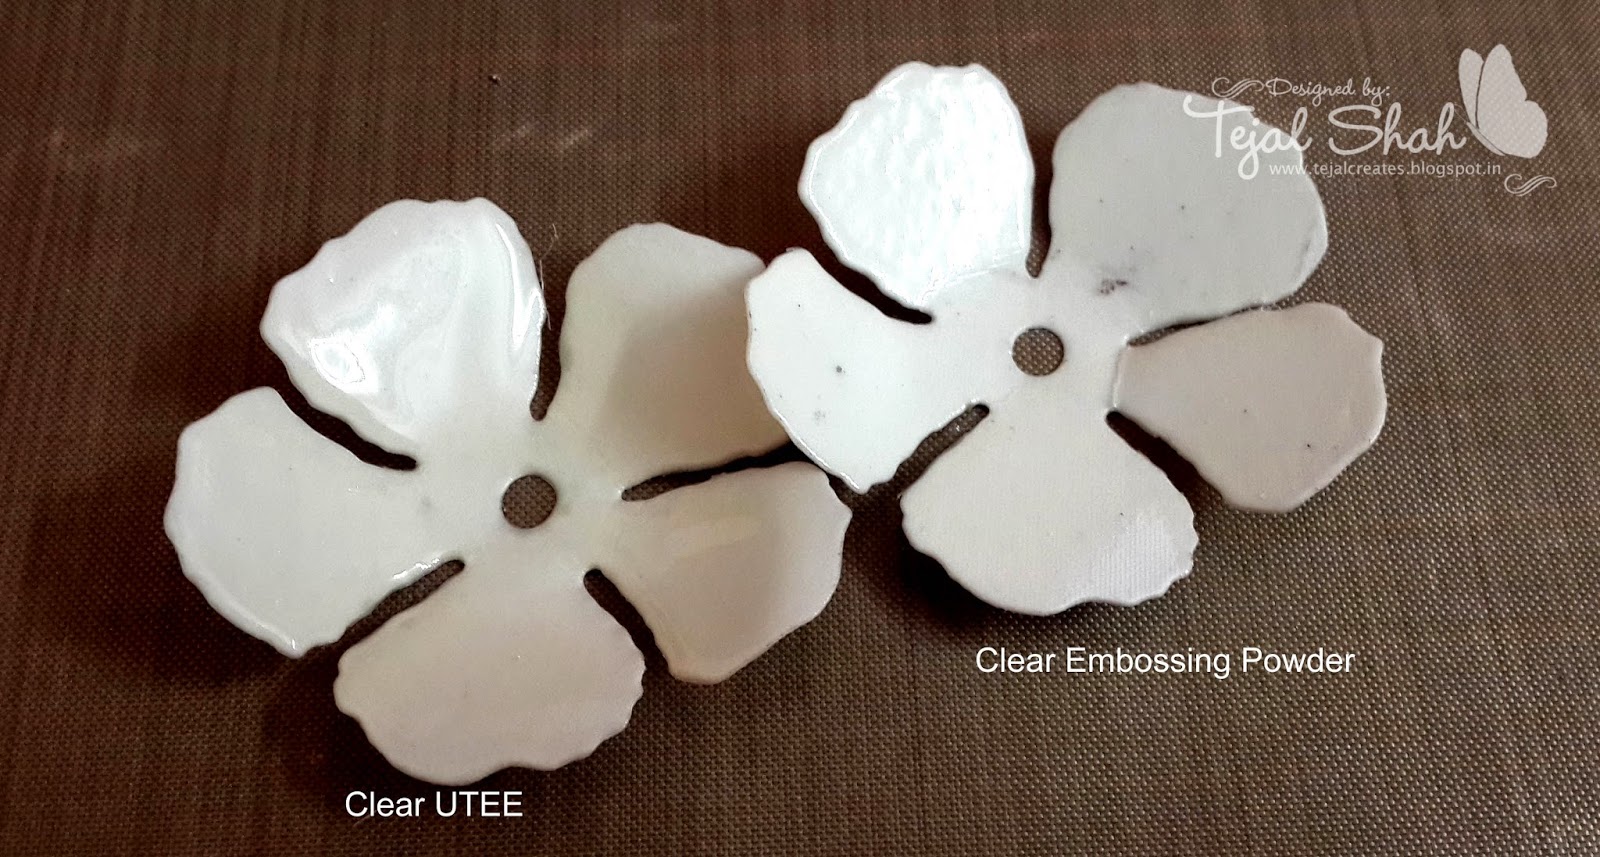
So today I'm sharing how to make a flower embellishment using UTEE or the Ultra Thick Embossing Enamel. As I mention in the Video...the UTEE comes in Clear, White, Black , Gold, Platinum
I've used Clear and Platinum in my Video.
These are what I show in the video...so go ahead, click the play button and enjoy!!
And as always feel free to leave me any questions, comments or suggestions!!
The Chatterbox queen is back with another Back to Basics Video for you. Sometimes when we learn a lot of advanced techniques we sometimes forget the basics. So Here's a refresher course for those who wish to learn, and this is especially for the New beginners to the huge and unending world of Stamping.
Since I talk so much, the Video is in two parts.
Part one Covers the Stamps and the Inks.
Part Two Covers Four simple yet essential Stamping Techniques.
Part one
Correction
In this Video I keep saying Hero Arts inks are Hero Hues..They are in fact Shadow Inks. Sorry for that confusion.
If there are any doubts, any questions or even any particular Techniques that you would like me to show on Video...Please leave a comment and I'll surely do a video for you.
Tejal here with a repeat of my two previous posts....I had spoken about the Perfect Layers Ruler and the Goodbye Static Pad in my previous two posts....But I could not do a video.
Hence, I'm bag with a Video Review of the same two products. I feel a video gives you a better idea and perception than any picture can. So there isn't much to post...since I've covered everything in my previous posts.....
So enjoy the two Videos and do leave your comments and feed back below. It means a lot when you appreciate all the research that goes into each of my Videos.
Hello Everyone...the Video Queen is back...with another looong video...(short videos don't seem to be my style!! )
Today I'm talking about using the WRMK Envelope Punch board .. which is our product of the month...All our Dt's are using the various Punch boards to show how they can be used. Keep a watch on the beautiful projects they make and tutorials to follow!!
In this Video, I'm showing you how to use a punch board, Making Envelope boxes to hold your cards and envelopes . Also I'm comparing the MS Score board Envelope Tool with the WRMK Envelope Punch Board.
So hope you Enjoy the video as much as I had fun making it.
Here are the measurements for making an Envelope Box for any size ( from the 66 sizes that are on the Envelope Punch board)
Your paper size will go up by 1 1/4th inch from the size mentioned on the board...all around.
Your score line moves 1/8th inch from the one mentioned on the board.
Your second score line will be 1inch ahead of the previous score line.
These measurements will make no sense, until you watch how I make the box Envelope. So take some time out...watch the video...tell me how awesome I am.... (lol) and go right ahead and buy this Punch board...it will make your life easier. I can bet on it!!
Hi Friends,
I am Riti Poddar here & I'm back again today with a Video. All those who have doubts or are looking for ideas to use up their Pattern Paper creatively need not wait or look anywhere else. Check out our new Video on Crafters Corner Screen Channel on Youtube.
Please Feel free to leave your comments, suggestions & queries below the video & I will be happy to answer them !
Here are the pics of projects I made for the video:
It's going to be a Pic Heavy Post, so sit back grab a Mug of Coffee & Enjoy !!
A scrapbook Layout with a Pattern Paper Base. If you look carefully the Clown's outfit is also paper pieced using my Pattern Paper !!
Our Next Project is a Door Sign for my Niece's Room. Here again I have used my PP for the Prima Doll's Dress !!
Take a closer look at her dress. I love those Black Buttons on it !! Cute..
Here's a Sweet treat baggie I made using my scrap Pattern Paper. I always make these cute little bags & fill them up with treats. Simple & Fast to make.
Step 1. Take a 4" long strip of PP, the width will depend on your Bag. Fold in half horizontally.
Step 2. Fill your bag with the some treats and place the folded piece of PP and staple them along with the bag on top to seal it !
Step 3. Decorate as desired !
Everyone Loves Chocolates...don't we? And It's the PERFECT gift to Give away on any occasion.
To make your Chocolates look even more special add your personal touch by removing the original Outer wrapper & Wrapping it with some PP, Ribbon, Punched Paper Borders etc and embellish as you want ! It's surely going to brighten up your loved one's Day !
Some More Yummy Chocolate Bars have been dolled up... A little tag included to add a message for the recipient !
Like Reading? Are you a Bookworm OR do you know anyone who is ??
School Going Kids at home ?? Then this is the Perfect Solution to keep them hooked on to their books.
Make these Cute little Corner Bookmarks using your pattern paper and add a die cut of their fav character. Or use some flowers, Quotes etc for Adults when gifting Books..This will surely be cherished !
I remember having them on all my Text Books when I was in School !! Learning was so much Fun !!
Bored of using the Wrapping Papers which are available in the local shops ??
Here's an easy solution with awesome results. Just grab some Pretty PP of your choice from our store & start wrapping your Gifts with them. They're available in many many many awesome designs for all occasions. Be it Birthdays, Anniversaries, Weddings, Baby/Bridal Shower, New Home, New Arrivals, Holidays, etc. Add Some love to your Gift Wrapping, attach a matching Card/Tag to make your Loved One's Day even more special !
Rushing for a Party?? Need Tags?? Create them In a Jiffy...Don't worry when these pretty Designer Papers are there. Just take a strip of PP and fold in half. Cut the ends to make it look like a banner. Add some flowers & your message & you're done !!
Enough of Gift Packing ??... Here's an Origami Flower I made as an embellishment to keep at hand for those days when I have to rush out for a party !! I have a whole bunch of these in a jar in many colors. All I need to do is just stick them on Gifts, Tags, Books, Frames, Gift Bags, Cards, Envelopes etc & I'm Happy !
I use up all the scrap pieces of paper to make these !!
Used this on an Envelope I made out of PP with the help of my We R Memory Keepers Envelope Punch Board. Envelope making was never this easy....Go GET YOUR'S !! YES....we have them in Stock !
With the Envelope Punch Board & Pattern Papers, Envelope making is like a piece of cake. Take a look at some of the envies I made !!
These Rosettes also make an awesome decoration/embellishment piece. love making them for a lot of my projects !!
Making the Study Time Fun for your Kids... Just doll up their stationery & see them jump for joy !!
I wrapped these pencils & erasers with my pattern paper & added ribbons, flowers & rosettes to them. You'll wonder how & why your child sits for longer hours at his/her study desk !! ROFL
This is a cool idea for Party Favors too...
Guests coming home tonight for dinner??? Sudden Plans?? Or are you bored with your Table setting stuff ?
Wanna do something different this Diwali ?? Here's I am with this awesome idea to dress up your dinner tables. From Placemats, to Coasters, to Napkin Rings...Pattern Paper will make that difference you are looking for.... I have dressed up some napkins using my PP, Ribbon, Flowers,Stickers, Die cuts etc
For the Placemats u can get your choice of papers laminated !! JFYI !!
A Shabby Chic Banner using Pattern Paper Doilies which have been embellished with flowers, charms, pearls, die cuts from Kaisercraft, Tickets, etc.
All these charms & many more designs are available with us. Contact Shalini for more deets at info@crafterscorner.in
Take a closer Look at all the doilies !! I loved & Enjoyed Making it !!
The doily is a Cheery Lynn Die - French Pastry.
Papers are all by Prima Marketing - Lyrics, Divine & Life Time Stack A4
Some of the Products Used for making the above projects :
All these Products and More are available at our store.
Visit us at
www.crafterscorner.in
Hope you all enjoyed these few ideas to use your Pattern Paper creatively !!
Please Leave Your Comments & Questions (if any)
I'll be happy to answer them.
I love reading your comments & advice girls..so please don't forget to Drop some Love !!