
Helloooo...
It's Thursday and Rupa here with my PLAID PLAY for this week.
Are you ready???
I have up cycled an empty coconut oil glass jar today and yes...this one has travelled all the way from London cos I just loved the it! Here it is...

It's been with me for over a year now and I was wondering what to do with it! Having played with Chalk paints on wood and other mediums I thought why not try MIXED MEDIA with it???
Sounds interesting... and so was born this project!
A long pictorial post...sit back and enjoy!
THE PROCESS...
This the entire PLAID family that helped me in this project!

STEP 1- Once the jar was cleaned, I took the lid and layered it with lots of found objects lying at home...old bobbins, gauze, nails, buttons, flowers and old butterfly pendant.

STEP 2-I also made a texture paste with gesso and DMC frosted sugar and applied it randomly over the lid.

STEP 3- I covered the entire thing with black gesso. Now my little canvas is ready to take on the paints!!!!

STEP 4- I started with the first color Vintage mustard chalk paint. I was liking it!

STEP 5- The next colo to hit was yellow crochet! I was likiiiing it!

Next was Grotto...LOVE it!

Next comes a combo of vintage mustard and Imperial...I am loving it now!
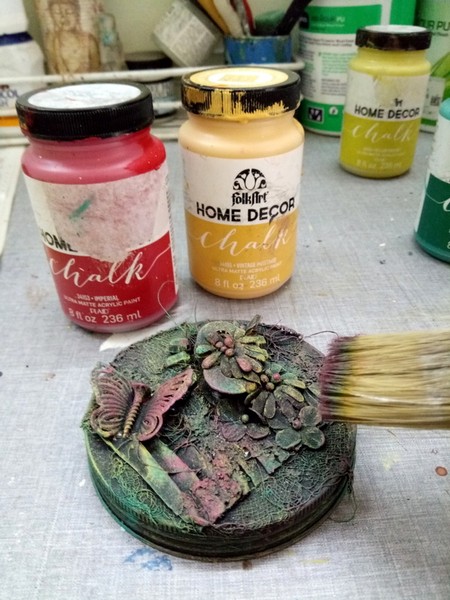
Finally...some color splats with sheep skin and few highlights too with it...
I was LOOOOVING what I was seeing!!! What say???

So you see, MIXED MEDIA is possible with chalk paints too and with PLAID you have an awesome range to choose from!

Here is how the lid looks after a coat of Satin finish varnish.

So what next???
I was left with the base...
STEP 6_ I gave the glass jar a DIRECT coat of Imperial chalk paint. The red was really vibrant!

STEP 7- I then applied some Folk art crackle medium liberally all over the jar and just left it to DRY ON IT's OWN...yes I did not use the heat gun! I kept myself busy in another project, so happy me.

STEP 8- Next comes my fav, sheep skin...

magically the cracks begin to appear when the paint comes in contact with the dried crackle medium! Have a look!.

STEP 9- Once this coat was dry, i mod podged a lovely tissue using ANTIQUE MATTE MODPODGE...my current favorite!

Yes after my previous video tutorial here...I am just not able to get over the antique look of this modpodge gives!
STEP 10- The tissue just takes on the light back ground, yet reveals the red cracks thru the print. I have intentionally scrapped off some cracks to give a distressed look to the jar.

Some more shots of the decoupaged tissue thru the crackle!

STEP 11- I gave another coat of the antique matte modpodge to give more depth and color o the project and finally sealed the entire project with a coat of SATIN VARNISH from Home decor, Plaid.
Here is the final project...

I am so in love with the entire look of this little coconut oil jar...so glad I could do justice to the long travel that it had taken, lol!
Wait, it's not over...I wanted more to this jar than just a deco piece and so I drilled some holes on the lid...if you see closely, you can see it...
....and I lit a candle inside!!!! HAVE A LOOK...

I couldn't stop clicking...as the look was so surreal and I was just pinching myself...the birds were glowing and the light passing thru the holes on the top...should I say more????

The antique feel and warmth of the birds on the base along with a mixed media fusion on the top was an experiment, first of its kind from me!

Hope you liked is and I would love to hear your comments...
CAN WE CALL THIS CHRISTMAS IN JULY...with that, I take leave and will see you next eek.
So go ahead play with your chalk paints and not to forget that antique matte mod podge, GRAB it!
Until my next creative journey.
Happy crafting and recycling,
Cheers,
Rupa.
It's Thursday and Rupa here with my PLAID PLAY for this week.
Are you ready???
I have up cycled an empty coconut oil glass jar today and yes...this one has travelled all the way from London cos I just loved the it! Here it is...
It's been with me for over a year now and I was wondering what to do with it! Having played with Chalk paints on wood and other mediums I thought why not try MIXED MEDIA with it???
Sounds interesting... and so was born this project!
A long pictorial post...sit back and enjoy!
THE PROCESS...
This the entire PLAID family that helped me in this project!
STEP 1- Once the jar was cleaned, I took the lid and layered it with lots of found objects lying at home...old bobbins, gauze, nails, buttons, flowers and old butterfly pendant.
STEP 2-I also made a texture paste with gesso and DMC frosted sugar and applied it randomly over the lid.
STEP 3- I covered the entire thing with black gesso. Now my little canvas is ready to take on the paints!!!!
STEP 4- I started with the first color Vintage mustard chalk paint. I was liking it!
STEP 5- The next colo to hit was yellow crochet! I was likiiiing it!
Next was Grotto...LOVE it!
Next comes a combo of vintage mustard and Imperial...I am loving it now!
Finally...some color splats with sheep skin and few highlights too with it...
I was LOOOOVING what I was seeing!!! What say???
So you see, MIXED MEDIA is possible with chalk paints too and with PLAID you have an awesome range to choose from!
Here is how the lid looks after a coat of Satin finish varnish.
So what next???
I was left with the base...
STEP 6_ I gave the glass jar a DIRECT coat of Imperial chalk paint. The red was really vibrant!
STEP 7- I then applied some Folk art crackle medium liberally all over the jar and just left it to DRY ON IT's OWN...yes I did not use the heat gun! I kept myself busy in another project, so happy me.
STEP 8- Next comes my fav, sheep skin...
magically the cracks begin to appear when the paint comes in contact with the dried crackle medium! Have a look!.
STEP 9- Once this coat was dry, i mod podged a lovely tissue using ANTIQUE MATTE MODPODGE...my current favorite!
Yes after my previous video tutorial here...I am just not able to get over the antique look of this modpodge gives!
STEP 10- The tissue just takes on the light back ground, yet reveals the red cracks thru the print. I have intentionally scrapped off some cracks to give a distressed look to the jar.
Some more shots of the decoupaged tissue thru the crackle!
STEP 11- I gave another coat of the antique matte modpodge to give more depth and color o the project and finally sealed the entire project with a coat of SATIN VARNISH from Home decor, Plaid.
Here is the final project...
I am so in love with the entire look of this little coconut oil jar...so glad I could do justice to the long travel that it had taken, lol!
Wait, it's not over...I wanted more to this jar than just a deco piece and so I drilled some holes on the lid...if you see closely, you can see it...
....and I lit a candle inside!!!! HAVE A LOOK...
I couldn't stop clicking...as the look was so surreal and I was just pinching myself...the birds were glowing and the light passing thru the holes on the top...should I say more????
The antique feel and warmth of the birds on the base along with a mixed media fusion on the top was an experiment, first of its kind from me!
Hope you liked is and I would love to hear your comments...
CAN WE CALL THIS CHRISTMAS IN JULY...with that, I take leave and will see you next eek.
So go ahead play with your chalk paints and not to forget that antique matte mod podge, GRAB it!
Until my next creative journey.
Happy crafting and recycling,
Cheers,
Rupa.
Products from PLAID
absolutely gorgeous Rupa ....as usual !!
ReplyDeleteThanks Suman
DeleteJust awesome..loved it totally
ReplyDeleteThanks Sonali
DeleteLovely Rupa 😍
ReplyDeleteThanks Sneha
Delete