 |
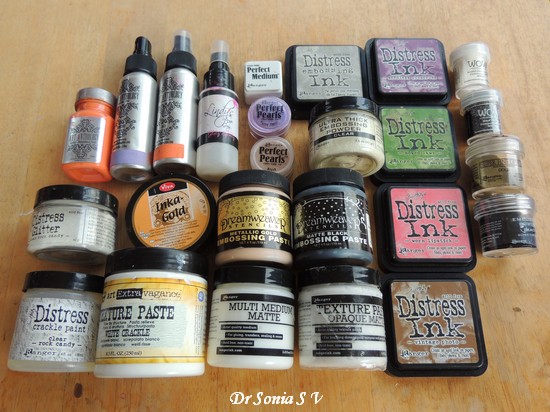
| Media Used in this post |
Though like most crafters I do have a few stencils , I 've not really used stencils extensively so I spent a good 3 weeks researching and preparing for this DT series on Stencils and I am sooo thankful to Shalini for giving me hours of her time guiding me on sooo many products and techniques...A BIG "THANK YOU Shalini"!!
I had only a meagre supply of mixed media materials till now and there were some extremely tempting products you just have to try while you play with stencils so I confess I went shopping big time at Crafters Corner!
And apart from all the fancy pastes, sprays ,powders and paints you can buy here are the 3 things which can literally change your crafting with Stencils and mixed media from an "I occasionally use " to "I love using "!
These are rather inexpensive items and you may already be using them but I am sharing it since these are real life changers in my opinion and boy am I so glad I bought them recently!
The super useful
funnel tray is so helpful when working with glitter, micro beads and embossing powder...no more hunting for a clean paper and being super careful while folding the paper and putting things back into tiny bottles!
The plastic
palette knife is awesome to apply pastes on stencils. I have tried all kinds of crazy stuff to apply texture media earlier and believe me this is one item you should have in your arsenal!
The white tape is
micropore [from my clinic]..why I love it so much compared to other adhesive tapes is that it has an optimum adhesiveness...which is not too sticky and is easily tearable by hand...fabulous to use to hold your stencil in place and also to mask off areas while using fairly fluid media too. You can buy micropore in various sizes from a medical shop or hospital.
Mixed Media Altered Book
Using
This diary I altered in mixed media style is a rather special one as its where I jot down ideas for my DT blog posts and crafty experiments .
After a coating of Gesso,I used
Ranger Multimedium Matt Gel to glue down a layer of tissue paper , purposely making it bumpy in certain areas.
Stencil +
White Crackle Paste
Used a gorgeous product called
White crackle Texture paste on
Scrapberry's Petals Pattern Stencil . Since my base was all bumpy...I didnt get a nice crisp stencilling but then it didnt matter for this particular project
After a few hours you get a lovely crackle effect...nice and easy!
Stencil + White Crackle Paste + Art Anthology Sprays + Inka Gold
Since my background was white, to highlight the stencilled area I sprayed
Art Anthology Sprays Juicy and Concord and also rubbed in some
Inka Gold into the cracks!
Stuck down myriad gessoed embellishments[ pearls, buttons, clay embellishments, broken jewelry] using
Multi Medium matte and gave a light brushing with
Art Anthology's Sorbet Peach paint...this new paint is like a gel and is shimmery and beautiful
Inka Gold and Sorbet Peach paint together looked awesome in the white background .
The humble tissue paper is such an easy way to add texture to a project and its texture can be highlighted so beautifully by rubbing on a little Inka Gold using your fingers.[Be sure to check out my friend Arjita's posts on Inka Gold here at Crafters Corner blog]
I added the sentiment " Enjoy" on my diary cover as after all crafting is to be enjoyed and life too!!
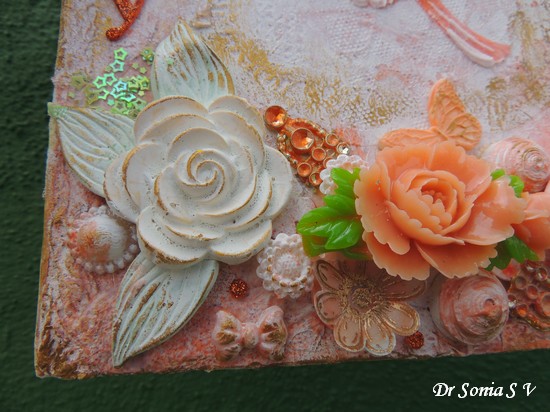
The roses and leaves were made with air drying clay and
Plaid Craft Molds , given a coat of gesso and a light brushing of Peach Sorbet paint.
The lovely
resin flower was part of my very first DT package from Crafters Corner [glad I saved it for such a special project]
Love how the rose made with air drying clay[ was made with yellow clay and gessoed] was glammed up with just a rubbing of the magical Inka Gold!
Stencil + Distress Ink
The design on the center of my book was made using the gorgeous Prima's Jamie Dougherty Stencil Anemone. This stencil is simply fascinating to use as it has 2 parts...a broad outline and a detailing element. Sponge on 1 or even several ombre shades of Distress Inks on the flower outline
You can add a nice script or musical note stamp on it or try some texture media techniques!
Layered Stencil + Distress Ink + Black Embossing Paste
Place the detailing design part of the stencil and apply a nice coat of Black Embossing paste.
A Tip : Dont scrape off the black embossing paste while the stencil is on your project as you can easily mess up things...let it be...after you lift your stencil off your surface...scrape the stencil clean using your palette knife and return excess paste to your jar and dont forget to quickly wash your stencil and knife
Isn't the gorgeous black creamy texture fabulous on the flat Distress Ink background !
Layered Stencil + Art Anthology Sorbet Paint
Now using the same stencil with a very very special luxury paint called
Sorbet[ from Art Anthology]. Sorbet paints are light and fluffy and almost like a smooth gel...quite unlike any paint I have ever seen and it shimmers brilliantly in the light !
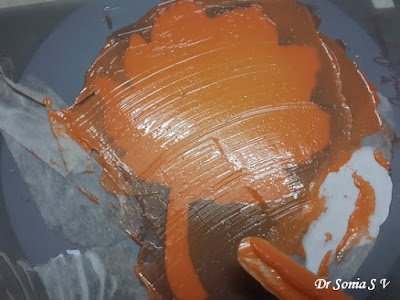
Sorbet paints maintain their peaks brilliantly so you will get entirely different looks with a stencil depending on how you apply the paint.
 |
|
You can smooth it on with a palette knife and on drying you get an amazing shimmery design!
Looks good enough to eat doesnt it!!
Layered Stencil + Art Anthology Sorbet + Black Embossing Paste
You can leave the sorbet painted design as it is or add more by layering on the detailing part of the stencil [ only after the sorbet layer is absolutely dry] and adding a texture paste. I went with Dreamweaver's black embossing paste again.
Isnt this simply gorgeous !!
Love how the matt black contrasts soo beautifully against the shimmering peach sorbet.
And here is one more view to show the shimmer and texture
Here is one more cool technique using the same stencil and Sorbet Peach paint.
Layered Stencil + Art Anthology Sorbet Paint+ Pouncing with Stencil Brush/Finger
For this technique its wonderful to have a stencil brush but if not you can just use your fingers too.Scoop up some Peach Sorbet with your palette knife and apply a nice coating and then pounce on it with a stencil brush or your fingers
Layered Stencil + Art Anthology Sorbet Paint
Since sorbet is a dimensional paint you will get a super cool lacy effect !
And here is how it looks on my book cover
Layered Stencil + Art Anthology Sorbet Paint + Texture Paste + Distress Glitter
And if you want to have more fun...stencil on the detailing with white texture paste and while the texture paste is still wet sprinkle on some distress glitter.
The combination of the shimmering Sorbet Paint , the texture paste and the glistening distress glitter is amazing!
and so that is how my Craft Diary got a mixed media alteration!
And now some Stencil techniques using simple products
Rainbow Mosaic Effect
Using
Stencilling can be simple as it goes too and I especially love the
Carabelle Studio Stencils which are one of the new brands of Stencils available at Crafters Corner .Their "Vitrail" glass effect stencil can be used to create such cool mosaic effects!
Stencil + Distress Inks
Sponging Inks using Distress Ink Pads onto stencils is such an easy and gratifying technique you can do to whip up a quick card or two!
You can stop there or go a step further and add some embossing powder.
Stencil + Distress Inks + Embossit Dabber/ Versamark + Embossing Powder
Replace the stencil and either swipe your
Versamark Ink pad onto your stencilled card or dab with an
Emboss-it dabber [ so convenient to use ], sprinkle embossing powder and heat!
In this card I used WOW clear sparkle embossing powder
Clear Embossing Powders are especially cool to use over inked stencilled areas!
The effect over the
Seedless Preserves Distress Inked area reminds me of grape jelly!!
Stencil + Distress Inks + Versamark + UTEE
The 2nd rainbow mosaic card uses the same stencil, more Distress Ink colors and UTEE...it has such a lovely look like water on a mosaic of colors but try as I might I couldn't quite capture it on photo!
Perfect Pearls Butterfly Tag
Tags are such cool projects to experiment on various techniques and perfect for stencilling!
Sponge any brown shade of ink over the
Effet Bois stencil
Admire your handiwork....then replace the stencil over the design and swipe the p
erfect medium over it in random areas....you dont want to cover the whole design as it can become overwhelming! Brush on perfect pearls and set with a mist of Lindy's pearlescent or water. I used 2 colors and loved the effect!
Stamp , Heat Emboss and use Distress Inks to quickly color a
Butterfly and add it to your Wood grain tag! Add a few flowers and pearls in matching colors
Perfect Pearls is such an easy way to add a lovely shine to your project!
I heat embossed the "FLY" alphas in the same gold embossing powder as the butterfly and layered it on a butterfly patterned ribbon.
Mixed Media Horror House
Using
Gesso,Embossing Powder
Plaid Woodgrainer Tool
When I get new craft supplies my daughter always likes to try them out.She is quite fascinated with the horror genre and chipped in to make this rather ghastly looking project which though not exactly to my taste does have some cool mixed media techniques!
Black goes so well with the horror genre doesnt it but I didnt have any black gesso with me[ its on my next shopping list] so gave a coating of white gesso on a box lid .
Then added gauze pieces around the margins and gave a generous painting of a mixture of olive green
acrylic paint + gel medium[ to increase its fluidity and retard its drying time].
We used a cool
Woodgrainer Tool from Plaid to create a ripple of textures on the surface .
Used the TCW Mini Tuscan Wall Stencil with black Embossing paste to add an arch . Before the embossing paste dries ,sprinkle embossing powder .
When you are aiming for a messy look let the embossing powder remain in stray areas. Heat the embossing powder before the texture paste dries as then the texture paste bubbles up to create a cool bumpy uneven look!
If you are wondering what all the green stuff is...well its puffy paint which we heat embossed and puffed out to glory!
Though I used some old puffy painthe, Crafters Corner has a huge yummy range of
Puffy Paints
And here is the end result!
Though not the most beautiful of projects it sure was fun going crazy with media while making it!
After that stage I dont have any step by step as we went a bit crazy with paints and sprays and my hands were too messy to take photographs!
Sharing a few tips
To highlight parts of a raised stencilled area : rub acrylic paint or Inka Gold using your fingers .
To give a crackle effect:There are several ways of doing this but one of the most fun technique is brushing on
Ranger's Clear Rock Candy Crackle Paint.
- Paint on the crackle paint and leave to dry...dont be impatient and touch to see if its dry!!
- If you add a thick layer you get larger cracks as in the picture below
- Large cracks can flake off and you can prevent that by sealing with Ranger's multi medium matt/ gloss.
The bleeding chained heart is a bronze charm which was really put to the works using layers of paint!
What I find especially fascinating about mixed media techniques using lots of layers is that it is fun to see what layers get masked and what elements show through in the end! The gauze we added right at the beginning gave such a nice textured backdrop to the gold and red!
Though a horror genre we added a few sparkling rhinestones for a subtle evil green sparkle!Hehe!
Stencilling with Gesso
Though for most projects you would want a nice crisp stencilling if you are not really bothered about the crispness and are okay with a bit of a mess you can use the humble gesso to stencil through your stencil.Using Gesso you can easily loose the lovely detailing of intricate stencils but if you are aiming for a loose kind of look its great!
Stencil + Gesso + Embossing Powder
When the Gesso is wet , you can sprinkle embossing powder on it and heat it...it bubbles up nicely and in the picture below you can see the cohesive look rather than the crisp clean look you can get with texture paste.
Altered Mixed Media Box with Masking Technique
Texture Media : Dreamweaver's Metallic Gold Embossing Paste
Paints : Folk Art Multi Surface Paints, Inka Gold
Decoupage Glue : Mod Podge,
Decoupage Material : Napkins,
Metal Charms
Dies : Cheery Lynn Love die
I didnt want to end the post with a "horror" post so here is an altered packaging box [ yeah for those of you who dont know...I am an ENT Surgeon and that is a cough syrup brand !!]
My kiddo helped me to paint the box with the versatile creamy
Folk Art Multi Surface Paints [ did you check out Rupa's posts and my
Intro post]
Decoupaged a tissue on to it and let it dry
I wanted only parts of the leafy stencil design to be stencilled. You can mask off parts of a stencil by using tape or take the easier , less accurate way out and add paper strips under your stencil to cordon off areas you dont want!
I used Dreamweaver's Metallic Gold embossing paste.
Again dont scrape off the paste while the stencil is on your project but lift it off and then scrape off the excess paste
It dries to a beautiful sheer gold effect...smooth and shiny!
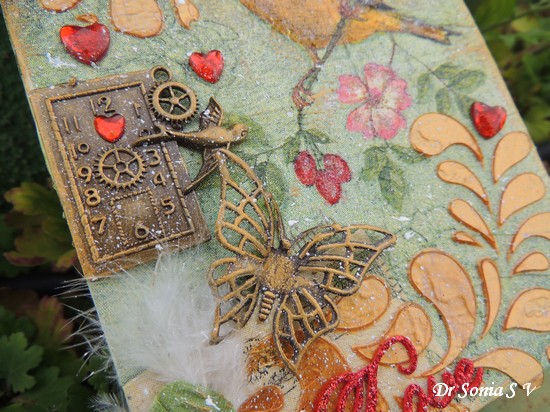
Gold and Red are such a nice romantic color combination so that is the color scheme I went with
Both the Butterfly and the Time flies charms got a good rubbing with Inka Gold to make them look more vibrant and rich.
 |
|
I toned down the overall colors of the box slightly by splattering with white acrylic paint!
Love how smoothly the Gold embossing paste dries!
Phew......If you stayed with me till now....Thank you so much !!!
Hope I have inspired you to get out your stencils and start playing!!






Fantastic projects Sonia. Love that flower with stencil. Gorgeous array of projects and as always great patience to explain things.
ReplyDeleteThank you so much for the support Rupa...oh yes this one post literally took hours to photograph , edit and writeup!!
DeleteFabulous projects Dr. Sonia with so much detail work! Love the various ways to use stencil on different Mixed Media projects! Enjoyed a lot!!!
ReplyDeleteThank you so much Vinita...so good to hear from you
DeleteWow so many techniques and so many gorgeous creations! Too good!!
ReplyDeleteThank you Karthikha
DeletePhew !!! That's so elaborate !!!! Well done !!!
ReplyDeleteThank you Anita! Hehe glad I didnt bore you to death!
DeleteAwesome projects ....
ReplyDeleteThank you so much
DeleteSo many beautiful projects! Love the bit by bit description of everything! Will surely try this out! Thank you Dr.Sonia for this amazing tutorial
ReplyDeleteThank you so much !!
Deletewell explained, so many inspirations sonia. organge flower is a eye candy. great projects
ReplyDeleteHehe I agree Shylaa the orange flower looks like candy!
DeleteWhat an amazing,amazing post and so much hard work put into it
ReplyDelete..I loved the projects you have shared here Dr Sonia.Thank you so much for all the effort you have taken to compile such an elaborate post..Its really very informative :)
Thank you so much Hussena...oh yes I toiled a bit for this one but enjoyed every bit of it and Shalini is an amazing teacher even on the phone!!
DeleteAwesome projects. Loved all the details shared for the project.
ReplyDeleteWow ! Such a brilliant post with some great techniques. Hats off to the amount of hard work you have put into coming up with this informative post. Great projects.
ReplyDeleteThank you so much Jasleen for taking time to pen down these words!! I am soo happy!
Deleteawesome projects sonia :) Love them :) thanks for sharing :)
ReplyDeleteThank you so much Neha
DeleteWow, that's a stunning collection :) love how you play with the stencils & all other craft supplies :) just wow... So much inspiration. :)
ReplyDeleteThank you so much Pon Malar...most of it was quite new to me but I had sooo much fun
Deletelovely, thanks for the tutorials :)
ReplyDeleteThank you so much for taking the time to comment and encourage
DeleteOMG !! So many ways to use stencils with so many mixed media products!! Thank you for introducing me to new products ! Loved the textures you have created using the stencils !
ReplyDeletewht a detailed post... A-Z of stenciling!!! hats off doc... Thanks for it.. loved every bit of it...
ReplyDeleteThank you so much !
DeleteWOW WOW WOW..!!! so many ideas...and so many lovely projects..you rock..
ReplyDeleteThank you so much Deepti
DeleteVery elaborate and well researched post. I recently used the Dreamweaver metallic gold paste on one of my card backgrounds using a stencil and it looks lovely!!
ReplyDeleteThank you so much Indira and yes this was my first trial with the Dreamweaver pastes and oooh so in love with them!!
DeleteThank you very much sonia for taking all the efforts and putting this info for us
ReplyDeleteThank you so much for taking the time to leave such encouraging words
DeleteCheers
Dr Sonia
Wow this is a jam packed super informative post and i totally loved the way you put together all information us
ReplyDeleteThank you so much for doing this post hope i am able to do justice to products now
Isha you are so sweet!! In fact I was scared I would put everyone to sleep!! And you always rock your posts!!
DeleteWow thanks for sharing mam amazing work
ReplyDeleteThank you so much for the support Pooja
DeleteWow...that's super informative post loved every bit of it n details..helped to know so many things clearly..thanks for sharing with each detail pictures... Love n hugs daksha
ReplyDeleteWow...that's super informative post loved every bit of it n details..helped to know so many things clearly..thanks for sharing with each detail pictures... Love n hugs daksha
ReplyDeleteWow! I loved the tutorial and all ! Inka Gold is one of my favorite mediums. I pinned this so I can refer back to it. Excellent art!
ReplyDeletethank u sonia mam...
ReplyDeleteits amezing