
“The gladdest moment in human life, me thinks,
is a departure into unknown lands.”
– Sir Richard Burton
To travel is to discover,
Its all about exploring the unknown,
making memories,
capturing the moments
cherishing...
those good old days...

making memories,
capturing the moments
cherishing...
those good old days...
Filled with freshness, lively designs, happy colours and soothing feel
Heidi Swapp - September Skies Paper Pad suited the best to work with.
The theme being travel, I choose the following papers
with graphic elements with blues and greens .
(oh these patterns are amazing!)
Decisions, decisions, decisions!
Which paper goes at the top?
Which paper goes at the bottom?
Which paper dwells in between?
Which paper goes at the bottom?
Which paper dwells in between?
(after a bit of thinking...)
Using the amazing super sturdy Tonic super trimmer
I have trimmed the following papers according to the sizes mentioned below.
(12" x 12" - Base)
no need to trim
(11.5" x 11.5"- Centre)
(11" x11" - Top)

Then I decided to go with the following paper being at the top.
(It is upto you to decide which paper you want to embellish.)
I turned the blue pattered paper over and used the white page instead as I love White.
(There are several times when breathing space is required.Hence White suited the best.)
(There are several times when breathing space is required.Hence White suited the best.)

Viola! After deciding their positions it is time for the icing.
I picked these 2 papers from the Stack with some
amazing quotes, words, patterns, bright and happy snap cards.
Timmed them using the super amazing Martha Stewart Scissors.
Timmed them using the super amazing Martha Stewart Scissors.
(It is always a good idea to use the snap cards to make your projects interesting
and to give that little memory touch.)

and to give that little memory touch.)
Then I chose the following papers and
trimmed them according to the sizes of the snap cards.

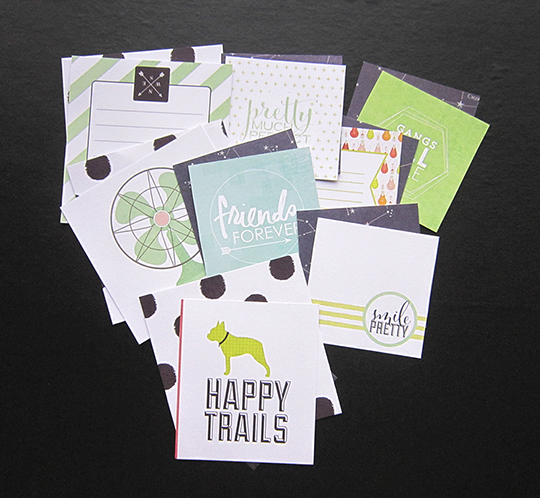
Having looked at all the snap cards I picked few of the co-ordinating ones,
especially the ones with travel icons and memories icons.
I loved the friends forever, happy trails and smile pretty.
(good old memories! These few words took me right back in those times.)
Then aligned each of the following snap cards
to that of the black trimmed paper pieces.
Using the super tacky - red tacky tape I pasted the snap cards
on to the black cards to make the snap cards sturdy.
(I always prefer using the amazing tacky tape
due to its super tacky and transparent clear crisp sticking qualities.)
(I always prefer using the amazing tacky tape
due to its super tacky and transparent clear crisp sticking qualities.)

Lets begin assembling now.
Using the super red tacky tape - especially 24mm is excellent to stick and align the 3 papers
in the centre as shown in the image below.
(There are several ways to arrange these papers)
(The red tacky tape is also a bubble free solution to stick your pages)

Now its time for the snap cards arrangement,
Using the 3D foam tape and the red tacky tape - 4mm and 8mm suits the best
(It is always a good idea to add dimensions to you layout,
it add depth and makes your layout look interesting,
hence a play with both is must.)
(Its a must must have tacky tape.)
(It is always a good idea to add dimensions to you layout,
it add depth and makes your layout look interesting,
hence a play with both is must.)
(Its a must must have tacky tape.)

Once all the snap cards have been placed
its time to add the photo mats.
(There are several way to arrange the snap cards and photo matts.)
Moving it all around and then deciding where it looks good
could be very fun idea to experiment.

could be very fun idea to experiment.
Oooh these eye candies are just too amazing.
Playing around with it all is indeed super fun.
(I just cant get my eyes of these candies, they are so yum..
I love these embellishments.)But at times a question about how to stick them often gets me thinking..
All thanks to the amazing tacky glue,
it dries all clear and indeed a perfect solution for all the sticking problems
(If you haven't tried it yet, its must a try).

Ahaa...now its time to add some cherries on the top, using the amazing and super cool
(These beauties are a must, they are just super cool and can do
wonders in beautifying your projects and add those little emotion touches and boost up your page. )

And here it is...all ready...
- - - - - - - - - - - - - - - - - - - - - - - - - - - - - - -
If you wish to play around with this wonderful collection here are some more Inspirations.


- - - - - - - - - - - - - - - - - - -
The Products List:
- Heidi Swapp- September Skies Paper Paper Pad
- Heidi Swapp - Hello Today -Acrylic Words
- Heidi Swapp - Hello Today Clear Pop Arrows - Helo Today
- Heidi Swapp - Dreamy Ephemera Die-Cuts
- Tonic super trimmer
- Martha Stewart Scissors
- Red Tacky Tape
- 3D foam tape
- Tacky glue
- - - - - - - - - - - - - - - - - - - - - - - - - - - - - - -
I hope I have inspired you to create
Have a crafty weekend
Thanks for Stopping by
...Nupur Patel...
Awesome layouts, Nupur! Your tutorial is a great way to learn how to use papers & snap cards for layering....even a non LO person like me can also understand....;) Your write ups are very poetic....love it!
ReplyDeleteThank you so much Neha. Such words of appreciation from a senior crafter like you truly means a lot to me. Glad you liked them...xx
DeleteU made it look so easy .....the blues and teals are looking so pretty .nupur I m a huge fan of yours...hugs
ReplyDeleteThank you so very much Arjita...So very happy to know you are liking my work..yayaiee...XX
DeleteYour layering skills are awesome...so many pattern papers and elements and you make it look so effortless!!!
ReplyDeleteThank you Purvi, so glad to know that you liked it...xx
DeleteNupur, your layouts are simply fabulous!! I loved the way you layered them. :)
ReplyDeleteSuchi xx
http://suchizcardstock.blogspot.com
Thank you Suchi, so glad to know that you liked it...xx
DeleteSo clean , fresh and pretty!
ReplyDeleteCheers
Dr Sonia
Cards Crafts Kids Projects
Thank you so very much Sonia, yayaieee...xx
Deleteawesome creation soo fresh..., loved every bit of ur tutotial!
ReplyDeleteThank you so very much Sharada, so glad you liked it...xx
DeleteThis is just amazing. Thank you so so much for sharing
ReplyDeleteThank you so very much Ashmita...xx
DeleteThis is just amazing. Thank you so so much for sharing
ReplyDelete