
Hello everyone! I'm so excited for my first individual post here at Crafters Corner Blog! Yayy!
Today i will be sharing a picture tutorial with all of you. Here's what we will be making today.


Its a slider box!! Aren't these Gorgeous!? I soo loved how they turned out!
For the blue box i've used the super pretty paper by Kaisercraft called Blae & Ivy its such an awesome paper pad it comes with die cuts, borders and quotes in it! We have it available at our store do check it out!
Now lets begin!
LIST OF SUPPLIES USED FOR BOTH THE BOXES
1)Martha Stewart All around the page punch- Swirling lace
2)Martha Stewart Score Board
3)Tacky Tape
4)Distress ink - Walnut Stain
5)Distress tool- Ink Blending tool
6)Pattern papers - Kaisercraft Blae & Ivy , DCWV Butterfly Garden
7)Charms- clock, chandelier both from the store.
8)Resin Embellishment - Hydrenga Flower
9)Scissors - Tonic
10)Craft sheet
11)Cutting mat- Self healing cutting mat
12)Archival ink black
13)JustRite vintage label 3 die
14)JustRite stamp- For all you do
Now lets begin!
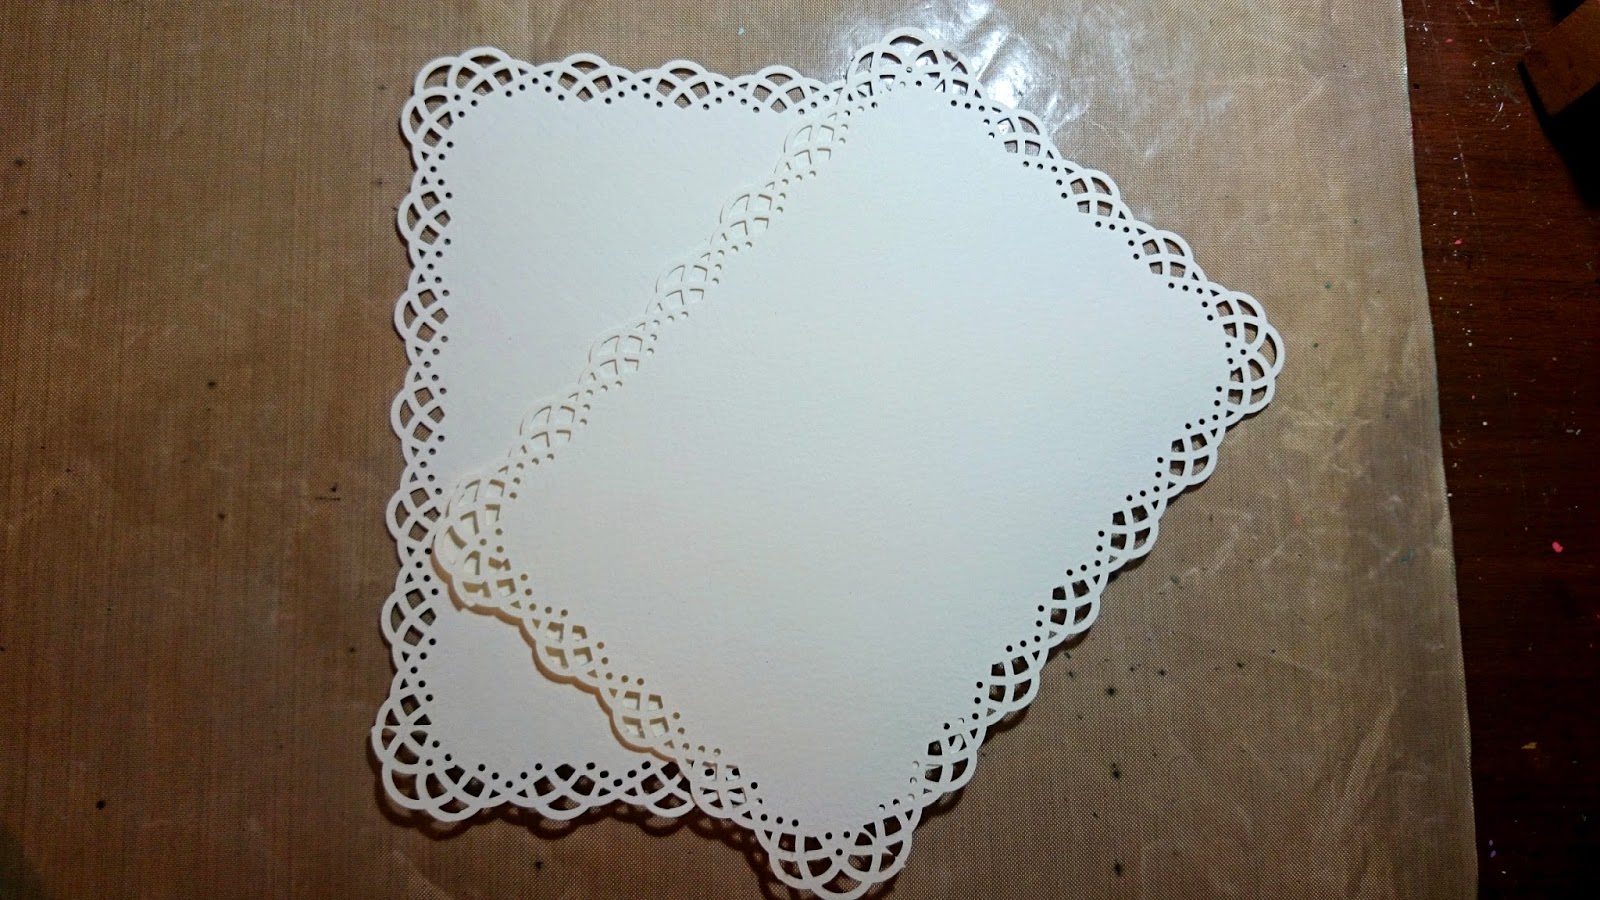
STEP 1
Cut 2 pieces of cardstock measuring 5*6.75
Now using Martha Stewart all around the page punch - Swirling lace punch it.

STEP 2
Take one punched piece and lightly score or draw a line with a pencil measuring 1" from all four sides. Now using a craft knife and craft mat cut a frame. Next cut a frame or strips or pattern paper and adhere around the cut frame.


STEP 3
For the main box cut a piece of cardstock measuring 8.75*9 inches
on the 9 inch line score at 0.5, 2.5, 6.5, 8.5

On the 8.75 side score at 1.5 and 7.25. You will see that two sides of the box are shorter. This is done to get a 3D effect.

STEP 4
Cut tabs vertically on the 8.75 side as shown to assemble the box. I like tapering the ends so has to get a neater look. You can skip it if you want.


STEP 5
Cut pattern paper a lil smaller than the size of the box and adhere, We need to cover all four sides both inside and outside.


STEP 6
Now for the inner box cut a piece of cardstock that measures 6.5*8.25
Score 1.5 inches on all four sides.
Cut the tabs , taper and glue it.
Add pattern paper only to the inside of the box.

 STEP 7
Center the inner box inside the main box and adhere.

STEP 8
Cut a piece that measures 7* 3.875 (7*3 7/8)
Punch the edges and cut it into half. If you want your flaps to be longer and more prominent you can increase the length.


Add pattern paper to it.
STEP 9
Cut 4 pieces of cardstock measuring 1*2 inches and score them at 0.5 inches.
Add these to the flaps as shown in the picture.

STEP 10
After adding knobs and decoration to your flaps insert the small hinges between both the boxes.

STEP 11
Now add tacky tape to the top flap of the main box and adhere the punched frame carefully.
Next add the base punch out. Make sure you allign it properly.
(Sorry! I Forgot to click a picture of this step)
STEP 12
Decorate it as you like :)


Hope you all enjoyed the tutorial and i was clear with my instructions, please feel free to ask questions incase there is a doubt about any step :) Looking forward to beautiful projects by you all. Dont forget to take part in Our Current Challenge #15 Go 3D!!
Hugs!
Anchal Sapra
Today i will be sharing a picture tutorial with all of you. Here's what we will be making today.
Its a slider box!! Aren't these Gorgeous!? I soo loved how they turned out!
For the blue box i've used the super pretty paper by Kaisercraft called Blae & Ivy its such an awesome paper pad it comes with die cuts, borders and quotes in it! We have it available at our store do check it out!
Now lets begin!
LIST OF SUPPLIES USED FOR BOTH THE BOXES
1)Martha Stewart All around the page punch- Swirling lace
2)Martha Stewart Score Board
3)Tacky Tape
4)Distress ink - Walnut Stain
5)Distress tool- Ink Blending tool
6)Pattern papers - Kaisercraft Blae & Ivy , DCWV Butterfly Garden
7)Charms- clock, chandelier both from the store.
8)Resin Embellishment - Hydrenga Flower
9)Scissors - Tonic
10)Craft sheet
11)Cutting mat- Self healing cutting mat
12)Archival ink black
13)JustRite vintage label 3 die
14)JustRite stamp- For all you do
Now lets begin!
STEP 1
Cut 2 pieces of cardstock measuring 5*6.75
Now using Martha Stewart all around the page punch - Swirling lace punch it.
STEP 2
Take one punched piece and lightly score or draw a line with a pencil measuring 1" from all four sides. Now using a craft knife and craft mat cut a frame. Next cut a frame or strips or pattern paper and adhere around the cut frame.
STEP 3
For the main box cut a piece of cardstock measuring 8.75*9 inches
on the 9 inch line score at 0.5, 2.5, 6.5, 8.5
STEP 4
Cut tabs vertically on the 8.75 side as shown to assemble the box. I like tapering the ends so has to get a neater look. You can skip it if you want.
STEP 5
Cut pattern paper a lil smaller than the size of the box and adhere, We need to cover all four sides both inside and outside.
STEP 6
Now for the inner box cut a piece of cardstock that measures 6.5*8.25
Score 1.5 inches on all four sides.
Cut the tabs , taper and glue it.
Add pattern paper only to the inside of the box.
Center the inner box inside the main box and adhere.
STEP 8
Cut a piece that measures 7* 3.875 (7*3 7/8)
Punch the edges and cut it into half. If you want your flaps to be longer and more prominent you can increase the length.
STEP 9
Cut 4 pieces of cardstock measuring 1*2 inches and score them at 0.5 inches.
Add these to the flaps as shown in the picture.
STEP 10
After adding knobs and decoration to your flaps insert the small hinges between both the boxes.
STEP 11
Now add tacky tape to the top flap of the main box and adhere the punched frame carefully.
Next add the base punch out. Make sure you allign it properly.
(Sorry! I Forgot to click a picture of this step)
STEP 12
Decorate it as you like :)
Hope you all enjoyed the tutorial and i was clear with my instructions, please feel free to ask questions incase there is a doubt about any step :) Looking forward to beautiful projects by you all. Dont forget to take part in Our Current Challenge #15 Go 3D!!
Hugs!
Anchal Sapra
Superb tutorial Anchal...that was awesomely explained! The boxes are to die for! I might steal one from you! :) Thanks for sharing!
ReplyDeletevery nicely explained Anchal...love the pp used..TFS
ReplyDeleteVery well explained. Lovely project
ReplyDeleteBeautiful.....super tutorial...love it totally...and love that punch border. ..ooh and those papers..so pretty
ReplyDelete.Great tutorial and the box looks super pretty.Great job,
ReplyDeleteAwesome tute Anchal! The papers and punch look so pretty together.
ReplyDeleteGr8 job 👍👍
Lovely boxes and thanks for the detailed tute, so well explained.
ReplyDeleteAwesome!!!
ReplyDeleteAwesome!!!
ReplyDeleteOmg anchal... u totally took my heart ....I loved the way u have used the papers n made this awesome slider box.....wow.
ReplyDeleteBEAUTIFUL! Loved it anchal!
ReplyDeletebeautiful!!
ReplyDeletemind-blowing tutorial and boxes r looking awesome
ReplyDeleteGorgeous boxes and Thanks for the great tutorial
ReplyDeleteBeautiful slider box and such an amazing and well explained tutorial ..Thank you so much for sharing Anchal :)
ReplyDeletebeautiful box seen after a long time, and so well explained. thanks.
ReplyDeleteSuch cute slider box!!love it..and i love the way you explained the procedure step by step...i have already started to collect the things to make this..so adorable.thank you
ReplyDelete