Hello Crafters,
Thank you for the overwhelming response to my water colored card... Many of you asked for the tutorial to achieve this effect.. so here it is...
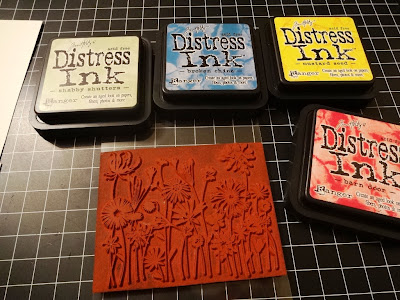
Lets gather the supplies first..
1. Hero Arts Blooming Meadows Stamp
2. Barn Door Distress Ink
3. Shabby Shutter Distress Ink
4. Mustard Seeds DIstress ink
5. Broken China Distress Ink
6. Tooth Brush
7. Kitchen Towel
8. Water color paper
I tried lots of colors but for this tutorial I selected.. Barn Door Distress Ink, Shabby Shutter Distress Ink, Mustard Seeds DIstress ink, Broken China Distress Ink
Ink the stamp's upper part with Barn Door Distress Ink, Mustard Seeds DIstress ink, Broken China Distress Ink... and lower part with Shabby Shutter ink..
Now, sprinkle some water with a tooth brush (I learnt it when I was a kid :D), brush off the extra water first so that the right amount of water is left in the brush..
This is how the stamp will look once it' wet..
Now stamp onto the paper..
This is the stamped image when it's still wet..
and this is when the water gets dried..
and I couldn't stop myself to try various color combinations.. :D
and here is the final results! A set of elegant bookmarks!
You can try any color combination of distress inks.. the outcome will always be amazing..
All the products used in this tutorial are available at crafterscorner.in (except kitchen towel and tooth brush :D ) ...and for any query please mail at info@crafterscorner.in
And don't forget to participate at this month Challenge "Stamping" and the winner will recieve an awesome stamping package.. Hero Arts Mid-tone Stone Wash Ink Pad and Lawn Fawn Be Mine Stamp Set.
Have a craft weekend!!!
Priya,,,


Awesome tutorial.. Love the effect. Will try this one for sure..
ReplyDeletebeautiful...thanks for sharing.
ReplyDeleteAwesome!!1
ReplyDeletewow thanks desperately waiting for this tute.
ReplyDeleteBeautiful...
ReplyDeleteVery Helpful ! Thanks for sharing ! :)
ReplyDeleteIts so beautiful Priya and so easy to do ..will have to try this out for sure :) ....I just loved your bookmarks they look so gorgeous !!
ReplyDeletethats nice and easy too ...tfs
ReplyDeleteWow ! the bookmarks are fabulous ..Thanks for the tut !
ReplyDeleteultimate tutorial....beautiful.....loved it....
ReplyDeletegorgeous bookmarks. easy one, must try it
ReplyDelete