Followers

Showing posts with label 3D foam tape. Show all posts

Wednesday, 9 May 2018

Mixed Media Card Set

Greetings Everyone

How have you been...
Today I have Trio card set to share with you all, and it was more of Mixed media
I had fun creating this Trio set.

For this one I have picked up Impasto Paint yellow and apple green, It's such a beautiful color strikingly soft yet stands out pretty loud.
I wanted to give a summery cool and fresh look to this set.

So lets begin how I created this beautiful Trio cards.


STEP 1-
Take a piece of cardstock ( I have taken textured cardstock) measuring 5"x6" inches.
Now stamp using any script stamp set on the edges of the cardstock.


STEP 2-
In second step I have randomly stamped using versamark ink pad and heat embossed using ranger white embossing powder and yellow embossing powder.

STEP 3-
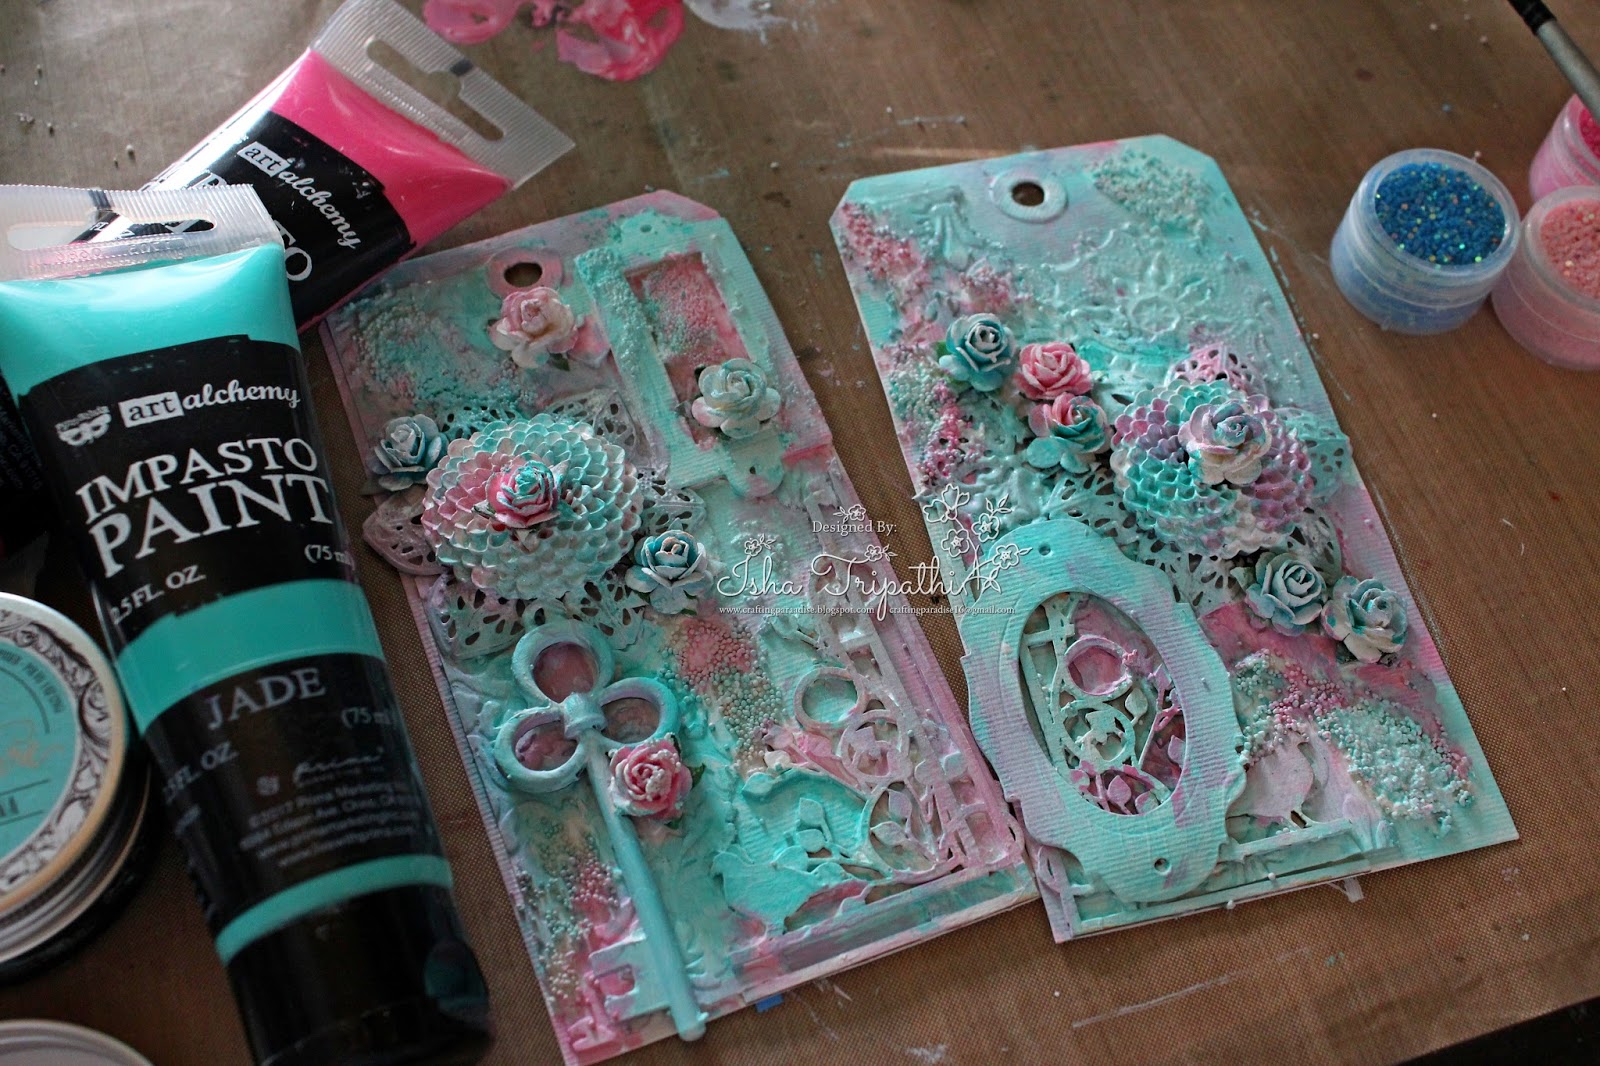
Now I am applying Art basics plaster paste using TCW stencil. In this step once I have applied paste, I have poured Dress My crafts Microfine glitter all over the paste while it was dry and heat set it.

                                Can you see the glitter ?? It looks absolutely pretty in person.

STEP 4-
Now once the paste is all dried up, I have applied Impasto paint with with sponge and spritz lot of water over the top of the paint. Take out excess water with help of tissue paper.
Now heat set the entire base once you have achieved the look you wanted.

 And lastly distress the edges with prima distressing tool. (you may use any )

STEP -5
Now decorate your card with your favorite elements { Mulberry flowers / stamped images/ charms }
I have used penny black stamp and water colored the image using Gansai Tambi water colors.


I have used very minimal elements Mudra chipzeb, stamped images, art stones, punched leave branch and mulberry flowers.
For sentiment I used stampers anonymous Hastags words stamp set from stash.
before pasting the base on final card I have distressed the edges using walnut distress ink from ranger.

I hope you all liked this set and I really hope I was able to inspire you all.
Do keep checking the space for more fun and creative inspirations.


List of supplies -
Gansai Tambi
walnut stain distress ink
Mudra Chipzeb
Impasto Paint
Art ingredients
Mulberry flowers
TCW Stencil

Thursday, 19 April 2018

MIXED MEDIA TAGS : (PICTORIAL)

Greetings everyone

How have you been :) I hope great.
Did  you see the last post by my fellow team mate which was all about mixed media. She has explained so beautifully and in precisely in a very simple way what mixed media is all about. So I decided to carry on the theme and try my hands on mixed media again.

Surprisingly my DT kit for the month was super amazing, take a look


 Isn't it awesome, I just love impasto paint and art alchemy brilliance wax.
And this is my first set of super intricate chipzeb by Mudra, let me tell you these are beyond amazing super think and such fine cutting details totally blown away by the quality of the same.

So finally I decided to make set of mixed tags using these crazy supplies.
{All supplies used will be mentioned down below along with the links, so don't worry sit back and enjoy post}


Tda ... Here is my take on mixed media tags. I have simple tutorial and lets get started....


STEP BY STEP : TUTORIAL 

Step 1: 

To make my tags I used Sizzix Alterations tag die and white card textured card stock from my stash.

Step 2:
Select your choice of metal embellishments scraps resins etc etc whatever you want to you use, Just to let you know there is no LIMITATIONS.

Once I have selected my embellishments, I like to place them randomly and play around till the time I find perfect places for each one of them.

Step 3:
Now I have pasted all the embellishments using art basics 3D Gloss gel.

Step 4:
Once the gloss gel dries up, cover the entire tag with gesso. I have used single layer of liquitex white gesso.


 Step 5:
Now once the gesso dries up, apply impasto paints till your heart drop. I just love these two gorgeous colors from art alchemy and in fact store has the one of the awesome collection of impasto paints.


Step 6:

This is really one of the awesome products I have used, Memory Hardware by Frank Gracia. Love the muted tones. I have used Blue and pink color here.
In the above image the tag on the left I have dusted the artisian powder and I don't know whether you can spot the difference between the two tags but the one on the left looks more vintage and has a matte effect.

What is the product all about- 

Prima Marketing Frank Garcia Memory Hardware Artisian Powder. Use this fine and delicate colorized powders on resins, wood, paper, clay and more to create a vintage look! Great for revealing texture, detail and cracks. Mix with gesso or modeling paste or mix with water to create a custom spray. ( source: https://www.crafterscorner.in)


Step 7: 
Lastly to add some glamour to my tags I have brushed whole loads of art alchemy White gold wax on the chipzeb and all over my tag.


I hope you liked my tags and I was able to inspire you all.
Happy Crafting
And do keep checking the space for more exciting inspirations.

Supplies used:-
TAG DIE SIZZIX
Marquise Blue - Artisan Powder
jade impasto paint
 Raspberry pink impasto paint
Mono Multi Liquid Glue
Mudra Chipzeb
Metal Embellishments
Art stones - Finnabair


Saturday, 31 March 2018

Quick Shabby chic Card Tutorial

Greetings Everyone

How have you been ? {HOPE GREAT :) }
Today I am going showcase super easy and quick card tutorial with you all.
For this you don't be needing any long list of supplies, it is very much available in your stash, go ahead look for them.


Here are the cards that I have made, take a look 

How are they ?


All the supplies used will be listed towards the end of the post and Let's get started

VIDEO TUTORIAL 


Here our some individual pictures for the same.


I hope I was able to inspire you all, and I am sure we all have plenty of stuff in our stash which we may use to create some beauties.

Don't forget to check the space for some amazing jaw dropping DT Post Inspiration by my fellow team members they are amazing totally.

XOXO
Isha 


Supplies Used - 
Pearl beads from stash 
PRIMA dies 


Sunday, 7 May 2017

MFT- Soak up the Fun

Good Morning Lovelies..

Hope you all are doing great, Isha here back again with MFT stamps and dies .
Today I am going to showcase another fun stamp set from My favourite brand My Favourite Things- Soak up the Fun and its coordinating Die set. 


SUPPLIES USED


In my last Mft post I have showcased Tag builder blue print 5 die set, continuing with the same I have created two fun cute little tags. 
I will be showing you How I have created the same. 
Let's get started ....

STEP 1
Firstly I have stamped, water coloured the cute little sea critters from the stamp set and with the help of coordinating die set I have cut them.

Next I have taken 2 One is a solid tag with a stitched perimeter, a second features stitching and a die-cut rectangular window, and a third includes two die-cut windows with stitched perimeters

STEP -2 

Now take any distress ink of your choice, I wanted to created under water scene therefore I have shade of blue - salty ocean distress ink.
Rub the ink pad against the craft sheet- spritz water over the ink- drag the tags in the inks- heat set the tags.


STEP-3

Once the inks dries out, place your critters/images basically I am just doing my positioning how I want my tag to look.
Once through glue down the images. 


STEP-4

Paste the images and cover the window tags with a sheet of acetate


STEP-5 

On the edges of window tag apply 3d dimensional foam tape.
Next add yummy sequins inside the base tag and paste the window above it and seal the tag.


Viola Tags are ready :)


Hope you like these cue little tags.

Moving with this stamp set I have created few more simple fun and cute little projects.


 For the above card I have simply water coloured the background and used some dress my craft sequins and cute little elephant image and sentiment from the Mft stamp set - soak up the fun.


This one is my favourite from the stamp set. I have created this shaker card using loads of dress my craft sequins.


For the above project I have hand drawn the waves using versamark pen and used white embossing powder and heat set it. Background is distressed and water coloured. Critters and sentiment from the stamp set- soak up the fun .


I hope you all like it and was able to inspire you all.

Have nice day
XOXO
Isha.

Wednesday, 26 April 2017

Sequined Superman !!

Good Morning Everyone


Today I am sharing a Book- Box card which I have made on superman theme, and it is to be gifted to someone who is fan of Superman...
Without wasting time, let's get started..
Mind you it’s a picture heavy post and will mention the list of supplies used in the end of the post.

I have used loads of images of superman which I have googled and downloaded.. I am sorry if in case I missed giving any due credit to anyone.. these images were downloaded from free printables.

Let’s move ahead on the project, I have used loads of dress my crafts sequins and Mod podge to make this project.

This is a huge book box card, measures 12x12 inches in size.


That's how the binding looks like...


On the top of the card I mean the cover I have made a big shaker element, which holds loads of sequins, all from Dress my crafts Crafters corner.


 I cannot get enough of the beauties .. some more pictures from different angels..

How to make shaker top- 

-Taken two 1/2 inch strips, measuring 8 inches length 
-Another two pieces 1/2 inch strip of heavy Cardstock 3'7/8 inch 
-double sided foam tape,
-Glitter foam sheets 

Step 1 - make box with double sided tape first 
Step 2 - add card stock strip above the layered foam tape
step 3 -  Add another layer of double sided tape on Black card stock strip 
Step 4 - Add all the elements you want inside the box.

I have added the superman cut out and dress my crafts sequins inside it. And 

Step 5- finally covered the same with acetate sheet.
Step 6- Lastly added the foam glitter strip to cover/ hide the foam tape to complete the look.


I have fussy cut this superman logo and added on the band and have attached Velcro to make this closure band.


Moving inside the box card, tdaaa
here is how it looks when we open the box...


On the base I have done some stamping, heat embossing and decoupage...

This actually reminds me of comic book page and I totally love way how it turned out.


I have used Dimensional Mod podge to make Faux epoxy stickers..


So here we come to an end of my project.
I hope you all liked it :) Don't forget to leave some love.

XOXO


Supplies used -
Black card stock
Mod podge dimensional
Mod podge gloss super thick
Memory box cityscape die
Pattern paper from stash
Tombow glue multi
MS border punch
Dress My crafts sequins
double sided tape - foam/ tacky tape

Tuesday, 21 April 2015

Vintage Accordion Tag Box

Namaste guys

Who doesn't love music. Music is the soul of life . I love to take inspiration from vintage objects and real life around me. I love vintage inspired projects so there for drawing inspiration from a vintage accordion I tried to recreate that look and created this project. 
It has pockets that holds tags and they fan out like an actual accordion .
I have used the wonderfully creative line of papers from Tim Holtz called the Crowded Attic .
I have used beautiful metal hardwares to further enhance the look of the accordion to give it a look of whimsy and old world charm. 
The butterflies you see on the surface I have fussy cut from the paper collection and I distressed them with a few distressing inks.  After embossing them I used foam tape to glue them on. 

Watch the video of this project by following the link below. 


Watch the Video here


Thanks for Visiting.
Don't Forget to Subscribe!!

Ciao


Products Used