Followers

Thursday, 23 August 2018

Exploring Cadence beton relief paste and stencils

Helllooo...
Rupa here and this Thursday I have a video tutorial!

I am going to take you through some basic decoupage and the use of Cadence jumbo stencils and the Beton relief paste to create a HOME DECOR PROJECT with some utility too!
So are you ready..
.
Here are the products that I am working with today...

Cadence Decoupage glue
Cadence Stencil 
Cadence Beton Relief paste
cadence Stencil adhesive spray
Cadence Vintage Gesso
paints of your choice
brushes and palette knife
sponge roller

Here is what I made...


Look at the lovely texture and the concrete/stone effect with the Beton relief paste!


Crisp stenciling and blending of colors with the sponge roller!


Here is the link to the video tutorial.


Do watch and let me know your feedback.
Thanks for stopping by!
Until my next creative journey,
Happy crafting and recycling.
Cheers,
Rupa

Sunday, 12 August 2018

CADENCE BETON RELIEF PASTE & VINTAGE LEGEND GESSO - CANVAS called Beautiful

Greetings Everyone

How are you doing today??
I am back again with my cadence mania, focusing again on the gorgeous Cadence Beton effect relief paste and vintage legend antique gesso.

Today I have a canvas using the cadence products and believe me I am stunned by the outcome, it just look absolutely gorgeous.
Have a look

Cadence beton relief paste and vintage legend 

How is it ?? Did you liked it ....
well let me explain you the steps to create this beauty -

  • First of all choose your size of canvas you would like to work with, I have taken a small circle shaped canvas and randomly applied cadence beton effect using spatula.

  •  Now apply your choice of vinatge legend gesso all over.
  • Take TCW brick wall effect stencil 6x6" and apply beton effect relief paste all over the base.


                                   Isn't the effect amazing ..... I am in love this totally <3 

         Now you are ready to decorate your canvas with your choice of flowers or chipboards :)
I have decorated the canvas with some handmade flowers and mulberry flowers and adorable mudra chipzeb.

               Also I have made these cuties berries using styrofoam bud and DMC Rainbow glitter.
                                                  The big bloom in the center is handmade.


I hope I was able to inspire you all, don't forget to leave some love.
Keep checking the space for more amazing inspirations.

Happy crafting
XOXO
Isha

Product List-
Cadence Beton effect relief paste
Moss effect paint -light green
Moss effect paint - dark green
Vintage legend gesso - green
styrofoam bud
Mulberry leaves pinkish green
poppy rose lilac 
floral chipzeb mudra

Thursday, 9 August 2018

CADENCE VERY CHALKY COLORS ROMANCING DMC FLORAL SYMPHONY

Greetings everyone !!

Hope you all are doing great :)
I am back again with CADENCE, and I am getting addicted to CADENCE.
hahhaha.....

Today I will be talking about CADENCE VERY CHALKY COLORS.
Although I have already explained what does very chalky means, but for those are new to the term Very chalky colors, lemme explain again -

What is very chalky color ?? what does it mean by very chalky ??

Very chalky colors are Water based silky Matte, chalky finish paint with smooth distressing feature for a Vintage and Shabby Chic look. Covers easily the surfaces. Requires no priming or sanding before using. Adheres to even the slickest surfaces. One-coat coverage with most colors on most surfaces. Quick drying.Customize with waxes or varnishes to finish and protect the paint surface. Cleans up easily with soap and water. Non toxic. Certified by EN 71 & CE.

So I hope it is clear and now lets move ahead.....
I have made three beautiful mix media door signs/hanging using the cadence very chalky colors and Dress my craft floral symphony paper collection and this is beyond amazing.
Have a look...


Did you all liked it ?? I think they are cute :P

So let me share with you all how I created this door sign hanging

  • First of all I have painted the wooden/mdf door hanger using cadence very chalky colors.
    I have taken three different shades of very chalky colors wild thyme, french lenin and  palm royal.
  • Now once the very chalky color dries up (PS- It dries really quick), apply randomly brush strokes of white vintage legend gesso.
  • Allow it to dry naturally.
  • Now take your favorite set of pattern paper and stickers, here in my case I picked up floral symphony paper collection from dress my craft and matching motif sheet to decorate the base.Please check the images below, here you can see how beautiful they look just by simply adding papers and motifs.


I hope I was able to inspire you all .

Do keep checking the space for more fun inspiration posts by my fellow design team member.

XOXO
Happy crafting
Isha


Product List-


Tuesday, 7 August 2018

CADENCE VINTAGE GESSO & VERY CHALKY COLOR

Greetings Everyone 

How are you doing today ......
I am back again with Cadence products. Today I will be sharing about Cadence Vintage Legend/ antique gesso and very chalky colors.
In my previous post I have detailed bit about the properties of the product. So here I have a take on them. 

I have painted my mini trinket Chester with the gorgeous cadence vintage legend and chalky colors,

vintage legend cadence

Let me tell you what this Vintage Legend and very chalky color is about - 

1- VERY CHALKY COLORS  { source }
What is very chalky color ?? what does it mean by very chalky ?? all these questions popped up in my head when I first saw the product.

Very chalky colors are Water based silky Matte, chalky finish paint with smooth distressing feature for a Vintage and Shabby Chic look. Covers easily the surfaces. Requires no priming or sanding before using. Adheres to even the slickest surfaces. One-coat coverage with most colors on most surfaces. Quick drying.Customize with waxes or varnishes to finish and protect the paint surface. Cleans up easily with soap and water. Non toxic. Certified by EN 71 & CE.

Image Source
 2- VINTAGE LEGEND { source }
Vintage Legend is Water based, specially formulated gesso paint with different sizes particles inside and colors to create crushed antique vintage surface. All kinds of Cadence acrylic paints can be used as first coat. For metal and glass surfaces, Cadence Hybrid is recommended as first layer. Apply Vintage Legend over the first coat.  For last layer over Vintage Legend, Very Chalky is recommended. Wait minimum 12 hours before scraping strongly. Cadence Home Decor Wax can be used for protection or colored waxes for depth. Non-toxic. Certified by EN 71 & CE.  
These products can absolutely be used on any surface and that is the beauty of CADENCE.


So I hope you understand the basic nature of the product, Now I will detail out the steps how I have painted the Chester... Let's get started 

vintage legend cadence
  • First of all clear the base with dry clean cloth or tissue.
  • Now take your choice of very chalky color and paint the surface all over evenly.
  • You need to allow the base to completely dry before applying vintage legend. Its is best to naturally air dry the base or if you are impatient just like me use your heat gun.
  • Pick your choice of vintage legend shade, for my project I have picked blue, red and white. Now apply randomly blue color and red color and allow it to dry completely 
  • Now I have taken white vintage legend and randomly brushed it on top of the blue and red color. 
  • Finally I have decorated it with resin and mulberry flowers.   
Viola you are done, isn't that amazing. You can do the same on any base.


I hope I was bale to inspire you all to pick up the awesome cadence product from store.

Happy Crafting 
XOXO
Isha 


Product list 
Golden synthetic brush  
 Vintage Legend Antique Gesso - Bordeaux
Vintage Legend Antique Gesso - Fresco 
Vintage Legend Antique Gesso - Ecru 
Very Chalky Home Decor - Ultra Matt Velvety Akrilik Paint - French Linen 
mulberry rose  


Sunday, 5 August 2018

CADENCE BETON EFFECT

Greetings Everyone
How have you been ?? It's been really long I have shared anything with you all.
Sorry for being MIA.

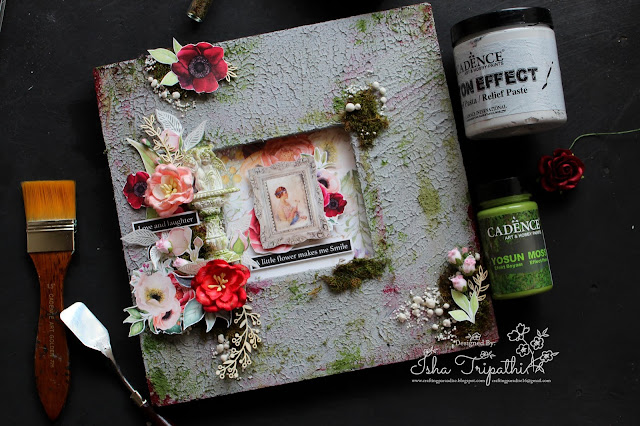
Today I shall be sharing How I altered my old wooden Frame using CADENCE BETON RELIEF PASTE.
In my Last post I have briefly summarized Cadence product properties which was used in CRAFTY FEAST 3, here's the link to my previous post.

So without wasting time presenting to you my altered wooden frame tdaaa .....
take a look 

Cadence Beton Relief Paste altered wooden frame
How is it ?? Did you liked it ??? I loved it :D

Cadence Beton Paste is amazing, it dries quick and is just perfect to give concrete look/effect to your project. The paste has some grains and fiber inside which adds extra texture to your project which is just beautiful.

Cadence Beton Relief Paste altered wooden frame
 How I altered the Wooden Frame ....

  • First of all I have cleaned the wooden frame with dry cloth to remove all dirt or any dust particle.
  • Now with help of spatula apply Cadence Beton effect relief paste all over the surface.
  • Once you have applied the paste, just by lifting the spatula you can messy effect as I have managed to achieve. (picture right after text for close up shot )
  • Next randomly apply green moss effect paint light and dark where ever you want.
  • I have used Dress my craft fresh green moss randomly and highlighted the same with prima art ingredients and candence art stones.
  • Lastly I have decorated the frame with using beautiful Bob n Betty Roseate paper collection Motif sheets, mudra chipzebs and prima shabby resins.
VIOLA you are good to go...
Wasn't that quick ?? yes I was able to Finnish this in 1 hour time.

Cadence beton relief paste effect close up


 I really hope you all liked it and I was able to inspire you all.
Do grab your bottles of Beton effect paste and create your own amazing projects.


Keep checking space for more fun inspiration.

XOXO
Isha

Product List.

Friday, 3 August 2018

Pretty Gifts with DMC products

Hey Everyone, Suzna here......Today i have 2 DMC projects to share with you. Now DMC have wide range of different products. I love love these ...... :-*

So the 1st one is Glass jar decor : Actually this jar i bought from shopping mall, not costly but its cute one, and this jar is actually for storing the spices. But crafters who are interested in altered art :-) ....is it? 
This jar decoration, its very simple. I just fill with some cute DMC stuffs and Prima Marketing flowers. Use glue gun for gluing. Please check the link below of this post, so you can easy to find out 


DMC product 


My second one is a small Scrapbook, This project i uses the simple and beautiful DMC paper pad "Dots n Strips", and Floral symphony motif sheets. Why i choose this paper? Bcoz i need to highlight the textured stencil design. Same time this Motif sheet's fussy cut images help me to decorate more. 


First i made a scrapbook base: Size 5X6 inch : just 4 piece of white chipboard


These are my arrangements: Base sheet, fussy cut pieces and die cut leaves. 


First part: Texturing with stencil


2nd part: Designing, layering the six pages. Its not easy, actually i'm trying many combinations, and once it fix..i start gluing.


Finally Like this :-)


Gluing the pages to the base: I prefer red tacky double side tape. And layering i choose form tape. Check the below links, Crafters corners have very nice and thin form tapes in different width( like 6mm to 2mm)


Cover Design: I have used one pair earrings, Fussy cut image and Butterflies from Dots n Strips motif sheets


I hope you have enjoyed this creation. 
Thank you for stopping by 
Hugs 
Suzna
Supplies Used

Little Hat Purple
Prima Marketing Stencils
TheCraftersWorkshop Stencil
Paletee Knife
Liquitex-light-modeling-paste-acrylic-gel-medium-8-ounces
DMC DotsNStripes 6X6 paper
Floral-symphony-motif-sheet-19443
Craft-toppings Flower pearls
Miniatures-accessories miniature-red-cup
Miniatures-accessories Red roses
Miniatures-accessories/mini-pink-plush-teddy-bear
PrimaMarketing Flowers
Mulberry-flowers-leaves rose-buds-red
Miniatures-accessories miniature-wicker-flower-basket
Miniature-printed-vase--3
Charms-embellishments medium-bottles
Adhesivestapes-tools/3d-foam-tape-18mm
Paper-craft-tools Scissors.
Fashion-accessories
Dots-n-strip-motif-sheet


Thursday, 2 August 2018

chippy paint effect with Cadence

Hellloooo and a very warm welcome from Rupa here!

 I was on a break and so happy to be back here and share my projects and tutorials with you.

I am going to working with CADENCE products and show you lots of DIY's on home decor and textile...isn't that exciting...I am loving the DT kit that came my way with all the yummy products.

So for today I have a home decor project, a quick and easy one with just a few products from Cadence, some recycled stuff, ofcourse and here we go....

Sit aback and relax and watch the pictorial as I describe this CHIIPPY PAINT home decor project!


How do you like it???

This is what I started with... I had this lovely vintage tin gifted empty by a friend, lol! I wanted to showcase it as a planter with a difference and so this project was born! I also made a stand for this with wood scraps and as you can see the products I have used are the BETON EFFECT relief paste, DORA PERLA GOLD RELIEF paste and the ARTIST CANVAS stencil from DMC and some paints from my stash...that's it!


Step1- I painted the frame with a teracotta color chalk paint from my stash and let it dry.


Step2- I used the DMC stencil and the Beton paste and did stenciling in random places.. The beauty of the paste is its full of fibre and gives a nice texture and dimension.


 Step3- I added some green acrylic colors to the paste to get some moss and applied that too randomly! The paste took to colors with ease and no time I had moss growing in my stand, lol!


 Step 4- I did some dry brushing with black paint to tone down the colors and to give the stand a weathered look. I emphasized the nooks and corners with black brushing and also ran over the died moss and stenciling.

Step 5-Then came the beautiful GOLD relief paste...this is like butter with granules!
 What a lovely gold it is, immediately lifted the look and enhanced the project and took it to the range of an antique piece!

Look at the gold butter...yummm!


 I allowed the relief pastes to dry naturally...yes it did test my patience but it was worth the wait! I further aged the stand with more black dry brushing and on the gold paste too, so that it looked old!


Have a look at some the pics...the final result is that of an antique, vintage, weathered, chippy painted stand!!! I AM LOVIN the look...it looks even more natural in real!


The combination of the Beton paste and the Gold relief paste is the main reason for this look!


And this how this whole project looks...I am happy I could give the vintage planter its due home with these Cadence products.


I couldn't stop clicking pictures, it was actually difficult to get the best angle and side!


That brings us to the end of this simple DIY home decor project and I hope you will give it a try. These products are a  definite buy buy if you love the vintage, grungy weathered kind of looks.
I appreciate your being on this page today and would love to hear your feedback and comments!
Until my next creative journey,
Happy crafting and recycling.
Cheers.