Followers

Showing posts with label bo bunny. Show all posts

Wednesday, 3 April 2013

Shadow Box Frame-REFLECTIONS OF LIFE


Hi everyone. As you know the theme of this month is "Bingo" and I, Shalini Pahwa, is here with my creation for the month – REFLECTIONS of your life

A masterpiece for every room, this lovely creation is a potpourri of your small collections, pictures and love notes. Make your memories and priced possessions eternal but placing it in this frame. Whether it is the first love note that you received, or the picture of your convocation or the first step that your child took, the Frame has a place for every milestone in your life. In fact it is your life’s reflection – captured in a unique way.

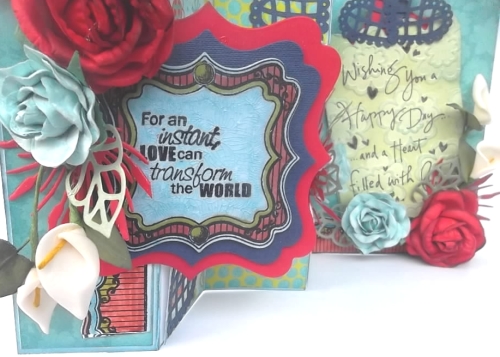
Made from wooden box and having 5 – 6 shelfs, applied the mod podge matte-mat-mate across the frame and then the Frame is covered with “Prima – Romance Novel” ( in love with this stack, amazing collections ) Pattern Paper stack using and pasted the paper using mod-podge. The paper stack can be bought at crafters corner….. The Frame is further decorated with laces, pearls, paper flowers, die cut and small slogans to add to the vintage and classical look of the frame. Stamping and distressing technique is used across the frame for that ultimate look.
Here's the pix


Products used here:
Mulberry flowers, laces ribbon
Stamps:-Bo-Bunny's Enchanted Clear Stamps 6, Hero Arts My Favourite, Kaisercraft Lullaby collection,
Dies: Magnolia Paris Night, Sizzix Corner Flourish, Spellbinders Wrought Iron
Embellishments : assortie brons en zilver,
Distress Ink:  Ranger's Vintage Photo

Pruducts used here are all available at www.crafterscorner.in, for any query contact us at info@crafterscorner.in. 
Check this month's challenge prize package

Hope you all like it and comment on it
Have A Great Day !!!

Wednesday, 19 December 2012

Dies to die for

Hello Friends ,
Today I am up with a very special card made on order .
This one has beautiful use of dies . I have this habit of never buying stuff which I don't require. I really like making the best out of my supplies rather buying and making a collection . The money which I splurge upon my supplies is hard earned and made of sleepless nights .
Let move onto the card -
I have used Layered Elegant Swirl  die to make a fan . There is a special sale going on our site .
Can you see beautiful fanciful flourish on the card ? It is available at our store .  Right beside the Elegant flourish is the most amazing die ever made by my God  ' Tim Holtz '  The sewing room 
I simply love this die .. when I work on the mannequin I remember my childhood days when I use to dress up my doll .
It has the perfect buttons and pegs .
Right behind my favorite die is Labels 8 { offer is going on our spellbinder dies } . This is the most versatile die , perfect for making my frames .
Now I need full attention ... Can you see the word Cherish .. Its heat embossed !! Yes I tried Heat Embossing for the first time . I used Ranger Black Embossing powder and Heat gun by Ranger which works on Indian Voltage .Voila !! I am trying to learn Heat embossing , I am sure it will be a great addition to my vintage world .
The stamp used to make the elegant border is Bo bunny's Gabreille .
The flowers are made by Beautiful Ribbon1  .
Other supplies are Vintage photo Distress inks and Tonic Trimmer .
Hope you all will leave some love .
Hugs
Mallika
Aola Handmade Cards 

For any further information regarding any of the products please contact :-info@crafterscorner.in


Saturday, 15 December 2012

Tutorial---Chocolate Card

Hi
Shalin Pahwa here, Today i'm going to share a tutorial on creating this card with chocolate-yummmy. For this card i've used the gorgeus DCWV Paper-Once Upon a Time Glitter Paper Stack, mulbery flowers, Spellbinders Dies--Parisian Accents, Marianne-Vlinder 3, Spellbinder Die-Romantic rectangles, Tim Holtz Distress Ink, Ribbon, stones, Stamp-Bobunny-Enchanted clear Stamp
Here's the pix


Paper Size 9.75"x7.75" and Corner flaps 1.875"x1.5"
Scoring Measurements are as follows:
3.25", 3.875", 7.125", 7.75", 9.75"
Corner Flaps: paper size: 1.875"x1.5"
Scoring Measurements are as follows:
.625", 1.25",1.875

Fold  Corner flap in and glue them to the card so it becomes a pocket perfect for holding the dairy milk chocolate-Silk
 Inside of the card-u can write some message on the left side


Hers's my finished card


Tip: Attach ribbon front and back panel of the card before gluing the pattern paper.

I hope you enjoyed the tutorial

The supplies used here are all available at  http://www.crafterscorner.in
or u can contact at info@crafterscorner.in and don't forget to participate this Month Challenge#3 make a set

Have Fun

Saturday, 8 December 2012

Enchanted Love

Enchanted Love

Hi,
Shalini Pahwa here, Today i'm going to share the frame layout 12"x12".I'm simply in love with the BoBunny Stamps. I created this background with the stamp-BoBunny Enchanted Clear Stamp using and script stamp with Ranger Archival Ink waterproof Jet Black and then i torn the edges on the top, i torned and added the eyelets with the thick thread. The cupid cut out i did using stamp and colour on it using tim holtz ink -barn door.Again i stamped the word "Cherish" and did the cutout  Then i used Spellbinders die-Labels seventeen for pictures. The mulberry flower, leaves( i love those grey and black leaves), ribbons,laces all available at  http://www.crafterscorner.in/


The products that u see in this layout is all available at http://www.crafterscorner.in/
For any queries contact info@crafterscorner.in
Hope you'll like the layout!!!!!!
Don't forget to participate in this Month Challenge#3 Make a Set
E'njoy UR Day!!!!
Happy Crafting...

Wednesday, 28 November 2012

FANCY FOLDS

Hi Friends,

I,m Anita here with a fancy fold card namely a TRI SHUTTER CARD.
Without much ranting, here is my card in different angles.


 Now, let me give you a detailed description of the supplies used.
The highlight of this card is the crackled effect that I have used on the blue spellbinder label. If you click on the image to enlarge it, you can get to see the beautiful effect created by the Inkssentials Crackle Medium by Rangers. The next thing that is very dear to me is the Just Rite Stamps-Cast Your Cares. Now this is the first time I,ve used the Just Rite clear Stamps, and the lovely crisp image it gives is too good.
I,ve coloured the stamps with my new Distress Markers. The beauty of these markers is that you can give detailed colouring with the 36 shades and are must have for any crafter.
The labels are from Spellbinders.
Patterned paper is from Bo Bunny-Alora
The flowers are from mulberry collection in the store.
Crafters Corner has most amazing collection of mullberry flowers so do check them out.
The dies are from Marianne Anja Leaves-3 and Leaves. The sentiments are from Fiskars and Hero arts.
Crafters Corner strives to bring the best possible craft supplies to you at reasonable rates so even if you cannot see a particular thing in the store site, you can always drop a mail to Shalini at info@crafterscorner.in.
Do check out the new arrival section at the Crafters Corner --which really has all supplies under one roof.
And just a day is left to take part in the Die cuts/Punches  challenge # 2. So get going!!!
Hope you all had a very happy festive season!!!

Friday, 9 November 2012

Treat bag for special occasion! & a Tutorial :)

Hi everyone,
This is Hussena  here to share with you all a treat bag which can be used for all those special occasions like the upcoming Diwali festival or birthdays or just about any occasions...These are tiny bags & can hold small chocolate bars very easily..This can also be used to gift some cards or even money to your near & dear ones!...The list is endless & up to your discretion .. :)...So here's a look at the treat bags first :-

                                                                   
And another one :-          
                                                             

 Supplies used :-

For the Orange  Treat Bag :-
Spellbinders Label 8- Available at Crafter's Corner
Stamp -Fancy Pant Designs- Crafter's Corner
Sentiment & cupcake- TPC Studio -Also available at Crafter's Corner
Faux Stitching & hair coloring of the image done with Tim Holtz Distress marker -Vintage Photo-Crafter's Corner
MS Daisy Punch-  Also available at Crafter's Corner
Balloons highlighted with Glossy Accents- Crafter's Corner

Blue & Yellow treat bag :-
Base- Spellbinders Label 8 -Crafter's Corner
Pattern Paper- Bo Bunny Alora collection- Crafter's Corner
Blue Curly Mulberry flower- Crafter's Corner
Flourish Die -Cheery Lynn Fanciful Flourish -Crafter's Corner
Punch Bunch- 3 in 1 Hydragena -Also available at Crafter's Corner
Faux Stitching- Tim Holtz Distress marker- Vintage Photo

And now for the tutorial on How to make this bag :-

 Step 1- Take a 6 1/2 inches * 61/2 inches CS.

                                                                                                               
Step 2- Mark 1 side of the CS into 1 1/2 inches * 3 1/2 inches * 1 1/2 inches & another side of the CS mark 2 1/2 inches * 1 1/2 inches * 2 1/2 inches...Like I have done in the picture below.

                                                                                           
  Step 3-Now score on the marked lines.Though i have to add please do not use pencil to create the lines the way i have done...I have done it only to make the step clearer to explain...if you draw these lines it will be difficult to remove the marks completely leaving untidy mess behind.

 
Step 4-After,you have scored on all the lines  ,cut the 1 1/2 inch line in the middle on both  sides of the CS as shown in the picture...Do not cut all the way through..Just up to where all the lines intersect.


Step 5-After you have cut on both the sides ,fold them using a bone folder as shown below.

                                                                                                                                                                                           
Step 6-Now fold the rest of the scored lines as shown below.This will give you the basic shape of the treat bag.

Step 7-After all the sides have been folded & scored properly ,glue the sides as shown below by placing the 1 1/2 inch fold inside & overlapping it with the TWO 2 1/2 inch sides.
 

Step 8- After the treat bag has been glued , now place the label dies both in the front & the back side & embellish it as you want for whichever occasion you want to create.

                                           
Hope I have explained the tutorial properly...And you all like my treat bags !...Please do leave me your Comments /Suggestions & if you have any enquiry regarding the products listed here please do drop in a mail to Shalini at  : mshalini79@yahoo.com & She will definitely get back to you 
Thank you so much for dropping by & Have a good day everyone :)