Followers

Showing posts with label altered frame. Show all posts

Sunday, 5 August 2018

CADENCE BETON EFFECT

Greetings Everyone
How have you been ?? It's been really long I have shared anything with you all.
Sorry for being MIA.

Today I shall be sharing How I altered my old wooden Frame using CADENCE BETON RELIEF PASTE.
In my Last post I have briefly summarized Cadence product properties which was used in CRAFTY FEAST 3, here's the link to my previous post.

So without wasting time presenting to you my altered wooden frame tdaaa .....
take a look 
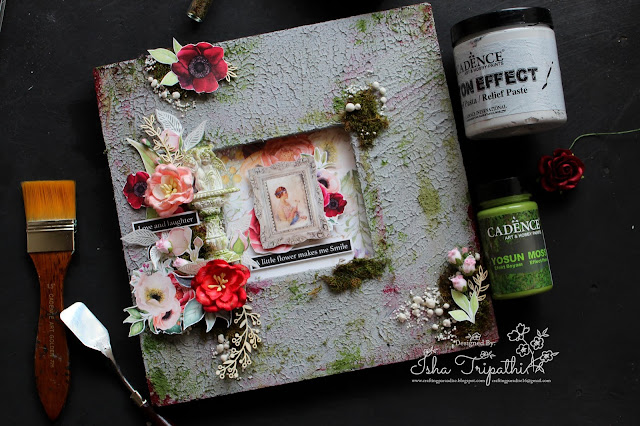
Cadence Beton Relief Paste altered wooden frame
How is it ?? Did you liked it ??? I loved it :D

Cadence Beton Paste is amazing, it dries quick and is just perfect to give concrete look/effect to your project. The paste has some grains and fiber inside which adds extra texture to your project which is just beautiful.

Cadence Beton Relief Paste altered wooden frame
 How I altered the Wooden Frame ....

  • First of all I have cleaned the wooden frame with dry cloth to remove all dirt or any dust particle.
  • Now with help of spatula apply Cadence Beton effect relief paste all over the surface.
  • Once you have applied the paste, just by lifting the spatula you can messy effect as I have managed to achieve. (picture right after text for close up shot )
  • Next randomly apply green moss effect paint light and dark where ever you want.
  • I have used Dress my craft fresh green moss randomly and highlighted the same with prima art ingredients and candence art stones.
  • Lastly I have decorated the frame with using beautiful Bob n Betty Roseate paper collection Motif sheets, mudra chipzebs and prima shabby resins.
VIOLA you are good to go...
Wasn't that quick ?? yes I was able to Finnish this in 1 hour time.

Cadence beton relief paste effect close up


 I really hope you all liked it and I was able to inspire you all.
Do grab your bottles of Beton effect paste and create your own amazing projects.


Keep checking space for more fun inspiration.

XOXO
Isha

Product List.

Wednesday, 4 July 2018

Mixed Media Altered Frame

Hello again, everyone.............. This is Suzna here. 
I'm excited to share with you a mixed media frame, I made using the DMC new product beautiful oval resin frame. I love love this frame. I cant express my feeling here, Its beautiful and low coast, dont miss to buy this beautiful frame.


 All the product details are in end of this post. So keep finding them and make your own creation.

So lets discuss about how i made this ..........Okay


As usual i start with black gesso, before going any metallic paints use black gesso (alteration art). Thats give you awesome effect. Here i did 3 to 4 layer coloring (very thin coloring layers )


These are the first layer metallic paints


You can see green effect on my frame


Purple(Dark velvet) effect on my frame


2nd layer Metallic wax: Just random coloring on my frame


See my frame, how its look like. This is okay, but i want something more.  So i decided to add patina effect paints.
  

In between i am designing inside decoration on frame. So i took canvas sheet, cut it as oval. Glue down on 1mm chipboard. And again cut it as oval. Check the below images.


Adding metal charms : Prima Marketing-Finnabair Mechanicals Metal Embellishments


Theses are the 3rd layer paints.


Inside of frame i use Lindy's Spray. Or instead of canvas coloring use mixed media design papers.


Again and again decorating :-) with DMC mixed size pearl beads. Use glossy gel paste for perfect transparent glue.


Finally adding few words from Tim Holtz word stickers
I am filling empty space or use any fussy cut of your favorite image


And Finally i altered this beautiful frame.


I was inspired Finnabair mixed media projects :-)
I hope you enjoyed my project today
hugs
Suz
 
Supplies Used


Thursday, 17 August 2017

Romantic play with PLAID!

Hellooo...
It's THURSDAY and am here with my plaid play for this week! When it's a mile stone birthday or a wedding anniversary you do want to make something special and if its worth a display at home you want to be doubly sure that it catches every body's attention!
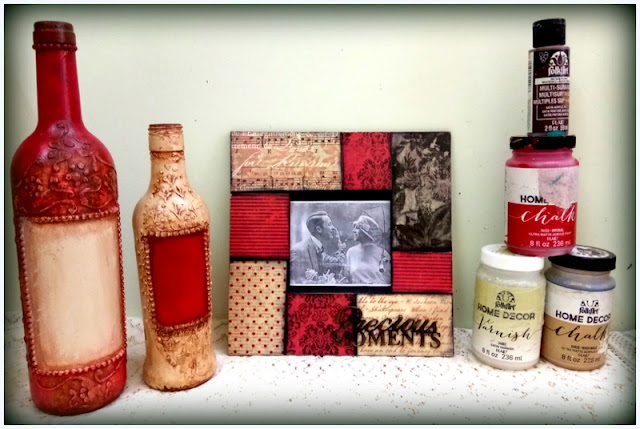
Today I have upcycled 2 bottles with some romantic chalk paints, Imperial and River walk (they do sound romantic, don't they???) teamed it with a collage frame.

Here is a look at the complete family on display...


If you like it...do scroll further to see the entire work in progress! I had a great time making this and I hope you do too !

The process

I started by coating the bottles with gesso and then doing some texture work on it. I have stuck some adhesive pearls and also hand drawn some texture using texture paste through a cone.

Once dry, I gave the bottles a coat of River walk, chalk paint. I love the beige color. it is so vintage already!

As the base color dried, I took some multi surface paint, Bark brown and applied it around the textured area. Immediately spritzed some water and wiped it using a rag cloth. This gave some depth to the textures area and ofcourse made it more vintage!

It was time to take out the red! Look at the vibrancy here...love the IMPERIAL. I coated this in the central patch, allowed it to dry and distressed the inner edges with brown again.

I followed the same technique but reversed the colors in the other bottle.

Here is how both the bottles look after a coat of satin varnish. Not done yet, they wanted company! So decided to make a picture frame to compliment these bottles..

I took out paper scraps in tones of red, black and beige and cut them to small patches to fit the frame. Once I liked the collage, I went about adhering it with mod podge,. The base of the frame was given a coat of black and I gave some spacing between the paper tiles, which gave it the mosaic look.

That's the frame done! I have a chipboard sentiment that I tinted with the wood tint and gave a metallic brass highlight.
The frame and the bottles were given a coat of Home decor satin varnish and now they were ready to pose as a family.


I hope you enjoyed the tutorial today and experiment with the wide range of chalk paints available with Crafters Corner. Whatever be the occasion, there are colors to match.

I will see you next week with another plaid play, meanwhile do let me know your views on this project.
Until my next creative journey,
Happy crafting and recycling.
Cheers,
Rupa

Products from PLAID


Thursday, 1 June 2017

Crackle play with PLAID.

Good morning!
The beginning of a new month and also a Thursday! I am here to share with you a PLAID project using their CRACKLE medium.


I have done a comparison  about Folk art and Home decor crackle medium both of which are from Plaid.

Here is the completed project using Home decor crackle medium.


Here is the you tube link to the same.


Do get back to me with your experiences about using this product and also if you do have any query.

I will see you next week with another Plaid play.

Util my next creative journey,
Happy crafting and recycling.
Cheers,
Rupa

Products from Plaid

  Modpodge matte
Chalkpaints
 satin finish varnish
Multi surface paints
Mini daubers