Followers

Showing posts with label Aletered. Show all posts

Saturday, 6 June 2015

Altered Wooden Plank

Hello everyone? 
How are you all doing? Hope all of you are enjoying the lovely posts shared here by my fellow DT's! 
Well today I am here to share a video tutorial with all of you! Isn't that great? This is the project I have created and down below is the tutorial and the link to all the supplies used! More info is the video. 


And please feel free to ask any project related questions would love to help :) 

Dont forget to leave some love!

Hugs
Anchal Sapra 

PRODUCTS USED
1) Jillibean Soup- Mix the Media Wooden Plank
2)Inka gold
3)Studio- Multi Medium Gloss
4)Rose gold liquid pearl
5)Prima Marketing- Gold Rush
6)Art Glitter- Elements Gold Diggings
7)Elements Earth Textures Adhesive
8)Ranger- Glossy Accents
9)Butterflies
10)Resin Dove Bird
11)Resin Big Roses
12)Resin Mini Blossoms
13)Gears
14)Vintage metal butterfly
15)Tiny Bird Cage charm
16)Epoxy clock charm
17)Chandelier charm
18)Prima metal flowers
19)Prima Marketing Steal deal 3
20)Kaisercraft Ribbon
21)Lindy's- Gossamer Gold
22)Little Lindy's pink
23)Lindy's- Pink ladies pink
24)Little Lindy's- Terquoise
25)Tonic Scissors
26)Gesso
27)Molding Paste
28)TCW Microbial stencil


Friday, 15 May 2015

Idea-ology Flip Frame

Hello everyone! 
How are you all doing? I find altereting things so much fun! So for todays post I decided to alter the brand new Flip Frame by Idea-ology introducted at CHA this year! 

This is how it looks! Its a super solid heavy weight frame! 
p.s- this is a picture heavy post so sit back sip your favourite drink and read on! 

The frame has a blackish silver kind of finish and since I decided to use brown shade papers I inked it up using metallic gold Alcohol ink. As you all know alchol inks work great at metal surface and they are permanent! :)


I dabbed up the ink to create slight texture. I didnt go for a full coverage as I wanted my frame to look two toned and not just plain metallic gold. 


Next I started with the flip album - cut cardstock and pattern papers and arrange the sequence. Adhere the pattern paper using tacky tape. Then mark n punch holes and add eyelets! 


I've used Graphic 45 Botanical Tea paper pad for this project I've distressed all the papers using Gathered Twigs distress ink. 


As you can see I was being a lil stingy lol so I used few sheets which had the branding edge. to cover this up I've used a strip of pattern paper :p I feel it saves paper and the edge looks good! 
I've also added flaps n pockets to few of the pages! more pictures down below! 


Ive embellished my project using the chipboard die cuts from the collection! This is one thing I albolutely love about Graphic45! They always make such good variety of chipboard cutouts and co-ordinating flower die cuts making it so easy to embellish projects made with their collections! 


I fussy cut few roses fro the paper pad and layered them on top of the chipboard cutout to add some dimension!


Created a tag holder here using a chipboard cutout!


This page is one of the brand marker page :p I created a small pocket for the tag! Doesn't it look cool? 


Hope you all liked my frame!
All the products used are linked down below! Please feel free to ask any questions related to this post :)

Have a great day!
Hugs

Anchal Sapra 


PRODUCTS USED


Thursday, 2 April 2015

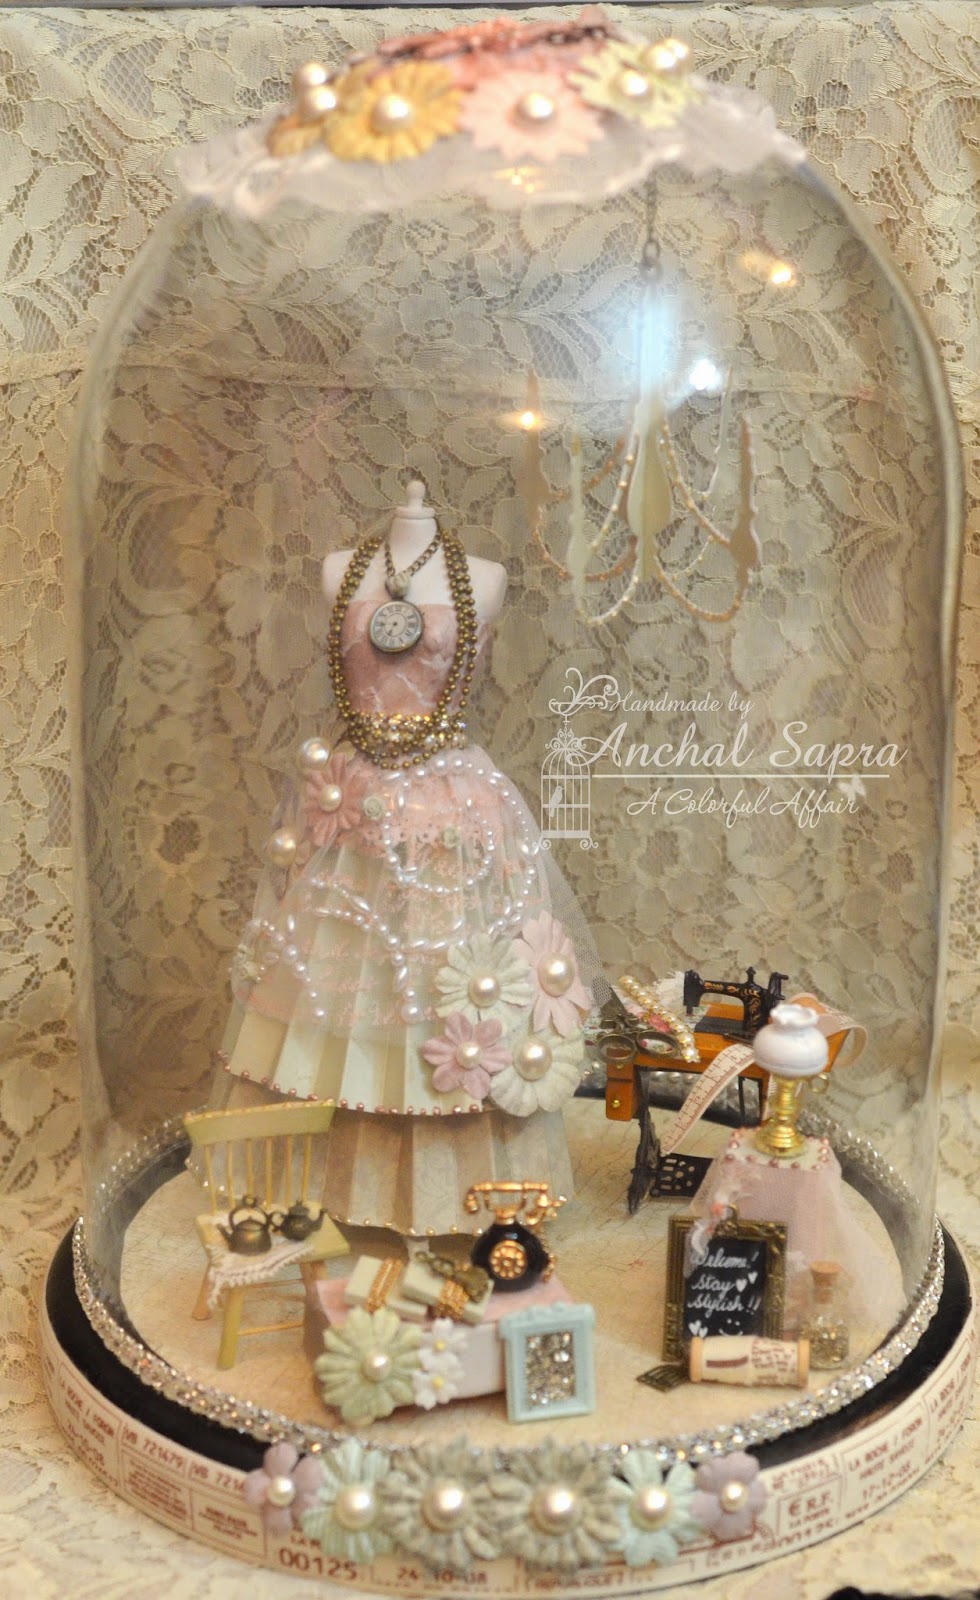
Haute Couture!

Hello everyone!
Anchal Sapra this side first of all I would like to welcome all my new team mates who joined the CC family! I am so happy about my new team! Welcome to the Crafters Corner family Ladies! <3
Gosh I am so excited to share my brand new project with all of you!
This will be a picture heavy post with lots of explaining about the products used so please grab your favourite drink sit back and relax!

First let me share the pictures.


How's it?

As a kid I always wanted to become a Fashion Designer but well Destiny had a different plan for me and I ended up Crafting - creating pretty projects to preserve memories! So if I ever had my own studio this project is how it would have been like hehe! 
I picked this glass dome locally and just loved the way it turned out! 

Our store has recently come up with these super amazing Mannequins and I really wanted to alter one. 
I created the entire dress using the Lovely paper pad called Santoro Mirabelle Premium Backing Design Paper Pad from the store. It has Gorgeous Vintage style prints. This paper pad goes very well with the Santoro Mirabelle Decoupage papers. Do visit our store to see the amazing collection. 

I started by tearing off small pcs of the pink print from the paper and sticking it to the Mannequin using Mod Podge I diluted the mod podge a bit cause I wanted the paper to take the proper shape of the Mannequin .


Next to make the skirt I decided to use 2 prints I made 5*15 inch , 7*15 inch strips from two different prints and scored them half inch apart. I folded them and made slits at the top and layered them on one top of the other to make the skirt. 
I sprayed the top with some water so that the paper was soft for me to flatten it as I wish. I covered the flatter part with a strip I punched using my Martha Stewart Doily punch! This is my favourite punch I just cannot get enough of it!


Now comes the fun part I wanted to add some net or lace to the dress but wasnt sure what to do, 
So I took some Molding paste added this Lindy's stamp Gang Magical to it and gave it a soft pink colour that matched my dress. Next I took the Art Is stencil by Crafters Workshop this too is one of my Favourite product I'm addicted to it , It looks good EVERYWHERE! So I stenciled over some net and dried it using my Ranger heat tool. When you do this step make sure you are using a craft sheet and that you lift the net and wipe off the extra molding paste as you don't want to spoil your work surface and I didnt want my net to get too bulky! I wanted an opaque look to it! 


This net was next added to the dress and I've finished it with some lace from my stash. 
I've embellished my dress using these amazing flowers that match the paper pad - Santoro Mirabelle Paper Blossoms added some pearls to all of them. The Gorgeous pearl swirl that you see on the dress is by Prima Markting. Our store has recently come up with these Amazing Prima Marketing kits which are just perfect for scrapbooking , cardmaking as they have matching a 6*6 paper pad, embellsihments, rhinestones, pearls and what not. The swirl I've used here is from one of these amazing kits. 


Do you see this Pretty sewing machine? Its a new arrival at our store. Isn't it adorable? I've added some embellishments to it to make it look more fun! The measuring tape ribbon is from Kaisercraft its a set of 3 printed ribbons I've used all three of them for my project. One's on the sewing machine, ones's on the cute Maya Road spool next to the frame and one is on the outside of the Glass Dome. These ribbons are of canvas style fabric and they are of very good quality perfect for shadow boxes and 3d projects! Dont forget to check them out. 

I created a corner table using the Miniature lamp from the store. I've added some Chalkboard Paint to the tiny picture frame and written with a white gel pen on it. I just lovee chalboard paint is so versatile and so much can be done with it. Our store is coming up a wide variety of Chalboard paints in various colours! So stay tuned!


I've also used the cute wooden miniature chair from the store. Isn't it cute? Our store has a variety of these miniature Mdf furniture. These are just adorable and so good if you are making a doll house or a house scene inspired project. I've also made this cute table using an old cardboard box. I've covered it using some satin ribbon and pattern paper with red tacky tape. I hope you all have heard about this amazing tacky tape our store stocks? Well let me tell you a bit about it. Its a thin transparent double sided tape used for sticking papers, ribbons,laces ,embellishments and what not. Its of amazing quality and we have a variety of sizes available. Since you all know I made a lot of 3d projects and scrapbooks so I only use red tacky tape as it holds the paper extremely well and no paper would be sticking out or coming off even after years! 


Next I added a Chandelier to my project as a finishing touch. I've cut this using my electronic die cutting machine- Silhouette Cameo. It was 3d file and i decorated it with some liquid pearls. Silhouette Cameo is an amazing machine and the possiblities with it are endless. We can cut in different fonts. make 3d pojects, cut vinyl, fabric and what not! Our store is now the Official Distributor of it! How awesome is that? So if you have any problem with the machine our store is ready to help :) 

I've decorated the Glass dome using some lace from my stash along with the paper flowers by Santoro Mirabelle .


Hope you all liked my project! Please do leave some love! 
If any questions please feel free to ask. 

Lots of Love!
Anchal Sapra 


PRODUCTS USED
1.Santoro Mirabelle Premium Backing Design Paper Pad
2.Santoro Mirabelle Paper Blossoms
3.Lady Mannequin
4.Miniature Sewing Desk
5.Miniature Chair
6.Miniature Hurricane Desk Lamp
7.Retro Telephone
8.Miniature books
9.Mini Glass Bottle
10.Art is Stencil
11.Sterling Glass Glitter
12.Micro Mini Photo frame
13.Scissors Charm
14.Lime Water Jug Charm
15.Mini Dress Charm
16.Tiny birdcage charm
17.Maya Road Wooden Spools
18.Kaisercraft Ribbon
19.Liquid Pearl- Rose Gold
20.Liquid Pearl- Bisque
21.Mod Podge
22.Tonic Scissors
23.Tonic Trimmer
24.Little Lindy's Pink
25.Prima Marketing kit


Friday, 27 February 2015

Altered Butterfly Wall Art

Hello everyone!
Today I am back here with a brand new project! Presenting Butterfly wall art to you!
For this project I was provided with some Deco Mache paper from the store. I was a bit skeptical about how this paper is any different than the decoupage napkins we all have used in the past or how this is easy to use than napkins. So when I got the pack I noticed the paper has a very smooth finish its super thin and extremely easy to use! This is one product that I would definitely recommend to
all the decoupage newbies as its so easy to use. It barely gives any wrinkles and the tiny bit of wrinkles that are formed are so easy to remove with the special decoupage spatula we have in our store!

Next I've used  Kaisercraft Magnolia Groove die cuts one thing I love about these die cut packs is that it saves you from all the fussy cutting and these packs match a lot of papers not just the paper pad of the collection but a lot more. Like this specific die cut pack matched my deco mache paper so perfectly!

I've also done some texturing on my project using the Gold embossing paste and the ranger texture paste. I used the magicals that were in my little lindy's- pink set. I added a little bit of the magicals powder to my texture paste and mixed it well I just loved the bright pink it created!


Hope you all like my project!
Feel free to ask any questions! Do leave some love!
Thanks for stopping by!
Hugs
Anchal Sapra 


PRODUCTS USED
Kaisercraft Mdf 3d Butterfly wall art
Deco Mache paper - Boho chic
Kaisercraft Magnolia Groove die cuts
Little Lindy's Pink
Mod Podge matte finish
Metallic Gold Embossing paste
Ranger Texture Paste
Art is stencil
Time travel stencil
Shabby chic resin embellishment
Rectangle bow frame
Prima bulbs
Pink elephant flowers
Glossy accents
Prima glass glitter - gold rush
Decoupage spatula

Wednesday, 11 February 2015

Make your own resin embellishments

Hello everyone

Are you all ready for some ice resin fun.  I want to share with you all some more projects using ice resin. And to make it more fun i will combine them with various mediums.

Here is a detailed start to finish video of how to make resin embellishments on your own  here.


And here is what i have created with my resin embellishments. A shabby chic altered clock for valentines day.


Materials used


Thanks for visiting 
Don't forget to subscribe

Ciao 
Ashmita Roy

Saturday, 24 January 2015

Messages of Love

Hello Everyone

I am back again with a new project share!! Valentines day is fast approaching and we all need to get ready for the gift giving !! But we crafters all like to make our gifts instaed of buying them right?? So, I want to inspire you with my latest creation!

Then ...


Its perfect for all occasions and you can customize the color schemes and use different papers . It's fast and easy.

I have used a lot of punched flowers and I had so so much fun making these , Its easy peasy!! I just used distress inks to get the shade I wanted.

I used chipboard to create the book and the pages and the frame as well. I cut the pattern paper using the die too.


Thanks for visiting
Don't Forget to Subscribe

Hello