
Hey Friends,


You all must be knowing that Collage Clay by Mod Podge is the latest addition at Crafters Corner. A while back Shalini sent me the same. Honestly, I was baffled initially that how am I going to use it? But once I saw the consistency, I decided to use it differently from what it was meant to be. Its texture is very similar to embossing paste.
For the first card, I used it to make clouds.

I used Koi Water Colours to paint the sky and allowed it to drip to make it look like rain.
I used following supply

Used paper smooches die for rainbow & coloured each band with zig clean markers. Adhere it to the white panel.

I used PTI cloud dies to make stencil & used it to apply clay at the both ends of rainbow.

I embossed sentiment in copper on a stripe of vellum and painted the RAINBOW part with copics from back.
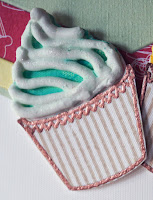
For the next card, I used the thin nozzle to apply icing on my cupcake...;)

Close up

Isn't it yummy? Once it was dry I painted it with distress inks. Added the sentiment to finish it off.
For the next card, I tried two tier cake....:P

I added texture on both tire with thick needle. Let it dry and apply perfect pearl with water to give that gorgeous shimmer. Added some bling and mounted on BG made with distress ink.
Ok, enough of cake...ummm...how about some ice cream?

I die cut three scoops and a cone. Embossed the cone with a folder to give some texture. Added colorbox reinkers to white clay for ice cream scoops. Apply on die cut and pat it with spatula for the texture. The consistency of the clay is so beautiful that it will hold the texture even after drying. I added sentiment and a resin cabochon.

Above card is inspired by the below inspiration picture of Runway Inspired Challanege #90. This is my all time favourite challenge. I just love to translate all the gorgeous dresses into cards.

I decided to use some floral stencil with coloured clay for the upper part of dress.

Clay can be easily coloured with reinkers or acrylic colours and it leaves crisp images while stencilling.

For the skirt of the dress, I used various floral stamps with dye inks and stamped directly on the card base. Mounted the yellow stencilled panel with foam tape. Added a sentiment and heat embossed butterfly.
For the next project, I tried something different.
I took a glass and masked it. I applied blue alcohol ink at the bottom portion.

I mount a sail boat stamp on a piece of acetate so that I can bend it along the curved surface of glass while stamping. (Black StazOn ink for non porous surface)

I applied white clay with narrow nozzle at very bottom of glass. Added blue glitter while wet. Allowed it to dry for 24 hrs. Tie some twine on top and add some charm. Your candle holder is ready.


I know it is sloppy but hey...it is my first time at any such thing. So please don't judge the clay by this thing....clay is great...this is just me... ;)...:P
I really hope that you will enjoy this unusual use of clay and give it a try. I wish I could have used more of those cute resin cabochon. May be next time.
Do share your projects with us. We love to see them. Hugs.
Supply from the store :
Such a lovely projects...
ReplyDeletethanks Swapna
DeleteWow...an amazing post it is...loved the cupcake and the ice cream...Yumminess all around....xx
ReplyDeletethanks dear
DeleteAwesome post Neha! ^__^ Love how you were able to bring together collage clay and cards! My favorites are the ice-cream card and the Runway inspired card. *Big Hugs*
ReplyDeleteThanks halak hugs
DeleteWOW....I was waiting for this post...such brilliant uses of the clay...the icecream one is just awesome...
ReplyDeleteThanks purvi... I am glad you liked it.
DeleteVery innovative ways to use the collage clay ..elegant and very CAS loved all your cards and specially the ice-cream scoops...tempting ;) ! The candy holder is not sloppy at all its cute and thanks for the acetate idea .
ReplyDeleteThanks pooja for all the love.
DeleteThese are all so FABULOUS!
ReplyDeleteThank you julee, I am honored.
DeleteWow Neha !! I was thinking this collage clay is not my thing at all...but you really opened up the possibilities with this post of yours !! amazing work...btw what is the drying time for this clay.
ReplyDeleteThanks suman, drying time is longer than embossing paste...6-8 hrs on safer side. But consistency is excellent.
DeleteWow.. love all the project and that ice cream looks so yummy
ReplyDeleteHehe Neha I think we get to know our fellow crafters so well we end up even guessing how they would use a product. I knew you would use it to make cupcakes and cakes on cards!!
ReplyDeleteCheers
Dr Sonia
Cards Crafts Kids Projects
Ha.. Ha. True but i made ice cream too;) thanks doc.
Deletei have no idea what could be better then this....indeed the bestpost :)
ReplyDeleteThanks dear. I am glad you sent me this.
DeleteVery innovative ideas. You always come out with something unusual. Loved all the cards and the candle holder too.... Waiting to try my hands on it!
ReplyDeleteThanks indira. I love products which are versatile... This is one of them.
Deletesounds like an interesting medium, would love to try it
ReplyDeleteYa.. Divya. I am sure you will whip up something pretty.
DeleteWow lovely projects neha..love the ice cream..stencil and sail boat ones
ReplyDeletethanks
Deleteall the cards are just amazing, u have created wonders....the puffy clouds are adorable
ReplyDeletethanks
Delete