Followers

Showing posts with label tag. Show all posts

Monday, 29 August 2016

Stamping It is !!

Good Morning Everyone

How are you all doing??
I am back again with another post, I hope you are enjoying the super awesome posts by my fellow DT's.
Today, I am going to share some cool ways you can jazz up your projects by stamping.
Let's get started.


I am going to use these stamps for today's post 

STAMPING BASICS: 
Stamps - There are two types of stamps available one is acrylic and other is wood mounted rubber stamps.
Acrylic Blocks sold separately then stamps and comes in different sizes.
Ink Pads - You will need some ink to stamp. Variety of inks are available archival ink ,  momento dye based ink, staz on are to name some.
Paper and colors (distress inks, chalk inks, water colors etc)


You can use any of the two to stamp until and and unless purpose is just plain stamping 
 In the above two pictures you can see the difference how crisp the image is when its is stamped with archival ink, I have used memento and archival ink.

Once you go ahead further beyond stamping like water coloring the stamped images, here you can spot the difference between two of them, Memento Ink reacts with water where as archival inks does not react with water. So a big thumbs up to archival ink if you are fan of water coloring or playing around with some fun techniques with distress inks.

Now coming over to projects that I have made from these stamps - 


For this cheerful bright card I have first done some heat embossing using clear embossing powder, then have used distress inks to water color the background as you can see. 
Voila simple easy peasy card is ready!! 
You can use any sentiment of your choice. 
Here I have used die cut saying HELLO!!

I have gone so carried away with heat embossing, have made some more projects with the same technique of heat embossing 
Take a look 


You will be needing stamp, embossing powder , paper, heat gun and Versa mark ink for stamping.


I have randomly stamped image on white paper and poured some different color embossing powder over the stamped image and heat set it with heat gun. And results are just splendid 


I have made these tags and small card.
They look absolutely gorgeous in person. 

Now moving over to second stamp set "Carte Postale"
When I opened by DT Pack and saw this stamp set, my reaction was nothing but ???? what I am going to do with stamp... 
Well I am a distress ink fan and there was no going away then playing with some basic distress ink techniques.

To begin with I have randomly stamped over piece of paper, doing some generation stamping technique 


Moving from top left corner image I have distressed the paper using vintage photo and rusty hinge distress ink, followed by heat embossing with golden tinsel and black embossing powder.
And lastly covered the entire piece of paper with clear embossing powder and heat set it.
I am so much in love with the vintage effect!!


To finish the card I have decorated it by these gorgeous handmade flowers with heartfelt creation sun kissed stamp and dies.

Last but not the least I have made key chain or embellishment you can say using the stamp set,
You can also use the same as charm in your mini albums ...


I have stamped the image ( 2 pieces), distressed the same with vintage photo
Adhered them with tacky glue
punched hole with crop a dile set eye let and voila your are ready to go..

I hope you find the post interesting and was able to inspire you all...
Do keep watching the space for more awesome  

Supplies used :
Embossing powders: black, clear , butter cup , golden tinsel
Distress Inks- Vintage Photo, mustard seed, picked fence, salty ocean, worn lipstick
Archival inks black, memento black ink, versamark ink


Thursday, 23 April 2015

Mixed Media tags with a Pictorial tutorial

Hello fellow crafters!

This is Jaya here today on the Crafters corner blog and I have a tag to share with you all. 
This is a mixed media tag that I created. Have a look. 
I also have a pictorial tutorial you can see later in the post


Here is a pictorial tutorial  for the same-

Step1:


 I used some scrap cardstock paper that I had randomly misted/sprayed using Lindys stamp gang sprays. I had a big sheet that was spoiled as I spilled a lot of my mist of it.Then it became my testing sheet for mists and finally I decided to make it my base for tags. 
 Isn't that a great way to reuse what you always thought as scrap? I simply loved using this as my base. More so as I could make use of something that was totally a waste. You can use almost any colours of sprays you wish to.

I cut this sheet into 4 rectangular tag shapes using my We R memory Keepers trim and score board. This is a trimmer cum score board in one and is a good buy if you are looking for something affordable and compact as it it is a two in one at the cost of one equipment and is fold-able at the same time thus saving storage space.


Step 2:


 I distressed the edges of the tags using the Prima comfort craft distressing tool. I just love using this tool for giving distressed edges to my paper. This is so versatile you will sure fall in love with this tool. It is by far my most favourite purchase of all times in tools!


 Step 3:


I stacked the smaller tag shape on the lager one and did this with both the sets . One of them I glued down with white glue easily available in the market. You may use the Aleene's tacky glue which have really great reviews.  and the second one I used the double sided foam tape. It is one of the best ways to give dimension.


Step 4:


I did some stamping on the tags using some black archival ink and Kaisercraft dictionary meanings stamp.


Step 5:


 Step 6:


 Heat dry with Rangers heat it tool. You can get this heating tool at the best price in the Crafters corner shop. 


Step 7:


Added some mist on the stencilled area again . I chose Sweet violet purple teal starburst spray from Lindy's stamp gang. Any colour spray can be used here.


Step 8:


I looked at how I wanted my embellishments to go. 


Step 9:


 Finally start adhering the embellishments. I have used quite a few Prima embellishments and flowers you see here.
Mulberry flowers- Poppy flower
                            Micro roses
                         Rose buds
                             Curved roses


 Step 10:


 Fussy cut some gorgeous butterflies from the Pion design paper- Paris flea market- Postcards using my Tonic scissors. Another of my HOT FAVOURITE tools! 
I then adhered them on the tag using white glue.


Step 11:


Once my butterflies where in place I applied some diamond dust and
  Prima art ingredient- Granite Mica flakes randomly to give some interest to the composition. Also added a few rhinestones here and there.


Step 12:


 I punched a hole on the top centre portion of the tag using the We r memory keepers crop a dile punch and misted some seam binding ribbon using the Lindy's sparys using the Yellow Rose of Texas and Hottie patoite Hot pink starburst spray and Mowed lawn distress ink.
Next was just pulling the ribbon through the punched hole and tying the knot. 


A final close up


 Hope you liked the tutorial. All the supplies are available at Crafters corner.
 You can check the links below for the same-

We R memory Keepers trim and score board
Lindys stamp gang sprays
Prima comfort craft distressing tool
Double sided foam tape
Black archival ink
Kaisercraft dictionary meanings stamp.
modelling/texture paste 
Crafters workshop microbial stencil
spatula
Mulberry flowers- Poppy flower
                               Micro roses
                               Rose buds
                              Curved roses
We r memory keepers crop a dile punch
Lindys stamp gang sprays-   Yellow Rose of Texas
                                               Hottie patoite Hot pink starburst
                                               Cotton candy pink
                                               Sweet violet purple teal
                                               Rusty lantern lime
                                               Cathedral Pines Green
                                               Bachelor button blue
Mowed lawn distress ink.


Hope you liked the tutorial. Let me know through your comments.

Have a great crafty week!

Wednesday, 25 February 2015

Decoupage with Ice Resin: Steampunk Tag

Namaste Guys

What is Decoupage?

Decoupage (or découpage) is the art of decorating an object by gluing colored paper cutouts onto it in combination with special painteffects, gold leaf and so on. Commonly an object like a small box or an item of furniture is covered by cutouts from magazines or from purpose-manufactured papers. Each layer is sealed with varnishes (often multiple coats) until the "stuck on" appearance disappears and the result looks like painting or inlay work. The traditional technique used 30 to 40 layers of varnish which were then sanded to a polished finish.

Watch the full video tutorial of the Tag in the making . The Resin was so versatile and easy to use as a decoupage medium and also as a glue!


The best part about using Ice Resin as a decoupage agent you don't need to use any glue or varnish and you get a really awesome finish. 

Materials Used 


  • Ice resin
  • Prima Cartographer paper
  • Prima Cartographer Chipboard
  • Butterfly Charm
  • Ball-chain
  • Tim Holtz film strip
  • Filigree corner
  • Eyelet
  • Lantern die

  • Thanks for visiting.

    Don't forget to subscribe!

    Ciao

    Tuesday, 25 June 2013

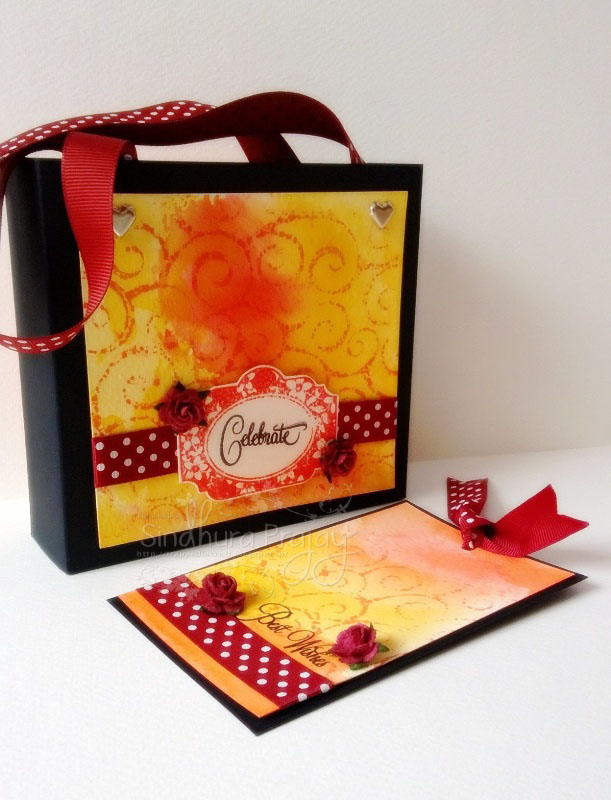
    A bag, a tag and a tutorial!

    Hello everyone!

    I have made a gift bag and a matching tag to share with you. I also have a small tutorial for you. An easy one.

    First let me show you the bag and tag...

    I made that front panel with distress paints. These work amazing for back grounds. Mine isn't perfect but I like it! :p


    This is the rear side of the bag. Kept it very simple...
     Made a similar BG fro the tag also.

    Do you want to know how I made the background and those flourishes on the BG?

    Here is a small tutorial for you..

    Sorry for the bad pictures..

    Supplies required-
    1. Distress paints (Available in Crafters Corner. Not uploaded but contact Shalini in case you want to buy these awesome paints.)- I have used Fired brick and wild honey distress paints.
    2. Water colour paper
    3.Craft mat or a laminated sheet
    4. Mini mister (or just anything to spray some water to blend the paints)
    5. An embossing folder- I have used a cuttle bug embossing folder.
    6. Distress ink - I have used worn lipstick distress ink here


    Step 1. Select distress paints of your choice.
    Step 2. Dab them onto a craft mat
    step 3. Spray lots of water
    step 4. press down a water colour paper onto the paints on the craft mat. Swirl it if you don't mind blending the colours. Mine is a bit messy but I like the final look of it.
    Paints once dry dont blend when you add an extra coating. This lets you achieve brighter colours. So I took some extra wild honey colour onto my paper.
    Step 5. Take an embossing folder. As you all are aware there are two sides to an embossing folder. One thats smooth and another that's not smooth. Apply distress ink to the side of the folder which is NOT SMOOTH.
    Step 6. Just press it down on to the BG you have already made...

    Simple, isn't it? :)

    I want to thank the person who helped me by sending her embossing folders without which I wouldn't have been able to do THIS post.  It wouldn't have been possible without your help girlie! Love you! :)

    So that's it for now. Have you played along our current challenge which is 'gifts galore'? You have five more days to play along.  And the prize is...


    The winner will get to choose TWO distress stains of their choice from a very wide range of colours!  Isn't that great? :-)

    Any queries, send a mail to Shalini at info@crafterscorner.in.
    Any questions about the project or tutorial in this post, I'll be glad to answer. 

    See you.. Take care!

    Love
    Sindhu..

    Wednesday, 19 June 2013

    A gift bag with a Co-ordinating Tag :)

    Hi Friends,
    Its Hussena here to share with you the inspiration for our this time challenge theme #9 which is" Gift's galore"  which is set by our very talented Dt member Anita...I know all my fellow Dt's have been sharing some amazing projects all through this month  and we are really looking forward to seeing some fabulous work from all of you out there based on our challenge theme this time so get creating fellow crafter's only 11 more days to go before our challenge ends :)..Oh before our get off track here's a look at what I have created ...its a matching bag and a tag set perfect for gifting for all occassion here's a quick look at it :


     And a look at them separately :


    Okay here's a little bit about how I have made these  as you can see I have used the very beautiful pattern paper from Prima called the Rondelle as the base for both my bag and tag and believe me half my work was already done as these paper make such a beautiful background that I really didn't have to do much embellishing ..I just added a Cheery lynn daisy and  flourish which I have embossed and distressed using distress inks added a few flowers and pearls and not to forget the beautiful border lace from Cheeery lynn called Anastasia Border and I was all done :).... The handle of my bag are also made using the Anastasia Die which I have distressed using scattered straw distress ink .
                                                 So that's  it from me Hope you like my bag and tag gift set would love to hear your comments regarding it so don't forget to drop me a line :)

    Supplies Used :
    Base CS : Fabriano Elle Erre
    Pattern Paper : Prima Rondelle Collection
    Dies :
    Cheery lynn Daisy strip ,Anastasia Border, Tropical Flourish.
    Spellbinders Label 9 die
    Inks : Distress Inks : Scattered straw,Spun sugar,Peeled paint and Memento  Pear Tart,Versafine Onyx Black ink
    Small white flower's from Crafter's Corner
    Pearls : stash
    If you have any queries regarding any of the products used please leave me a comment here or write to us at info@crafterscorner.in
    Have a Good Day Everyone and Don't forget to play along our current challenge Gift's Galore to win some Exciting Prizes :)


    Wednesday, 12 June 2013

    LOVE IS SWEET – GIFT BOX with TAG


    Hello everyone. Today I am going to present a GIFT BOX with TAG. It’s a unique type of box with a small tag on top and unmistakable words expressing your love for the person receiving it – LOVE IS SWEET.

    Traditionally Gift boxes are covered and the person receiving it has to open it to see what’s inside. However this Gift Box is open and hence can be kept on the table / study. The Tag on top of it, with a small message for your loved one and the big words “Love is Sweet” would always be around you, reminding you of the sweet relationship you share with your loved one.

    The base of the box is made from fine acid free high GSM paper, specially die cut using Martha Stewart Punch-Vintage Floral. To add to the vintage look of the base, it is distressed using Tim Holtz Brushed Corduroy distress ink. The Box is made from the same paper but covered with a lovely pattern paper Graphic 45-French Country and its top highlighted using a lovely lace.

    The back / mast of the box is made using Spellbinder dies-Labels Seventeen and Graphic 45 pattern paper. Since this would be visible at all times, special attention is given to its look. I have kept it neat with just one trinket in the centre-Prima Vintage Trinkets. The tag on which your message would go is made from Spellbinder dies-Labels Seventeen. and used Graphic 45 pattern paper-French Country
     (available at crafters corner )and used Distress Stain-tarnish Brass on the edges of the tag. The message “Love is Sweet” goes on the left. The words are made using MDF wooden embellishment.(lots of collection--contact shalini mittal)

    Finally to accentuate the LOVE, an embellishment of butterfly is placed at the centre of the box frame and, of course, some chocolates to express the sweetness of your love.


    For any query regarding any product please contact at info@crafterscorner.in

    I hope you all will like this work and would love to hear some comments bellow...
    and don't forget to participate this month lovely challenge---Challenge 9---Gifts Galore

    Sunday, 16 December 2012

    Sewing theme-Card and a tag


    Hello all!!
    Happy sunday.Its kavitha here to share another inspiration for challenge#3-Make a set.My theme is totally based on tim holtz sewing room die set,i just love them.Its not always necessary to add flowers,flourishes and butterflies to make a card pretty right?I have used only laces,ribbons,twine and buttons here and still it can look very pretty and girly:)I have given lots of texture to this card using distressing,tearing,sand paper,white paint,embossing folder etc.I have also used MS  vintage doily punch which really gives a lace effect.The corner die is from cherry lynn,which is one of my current favorite.I have used Scotch tape for sticking the laces and it is really strong.Other things like buttons and chipboard accents are from my stash.Hope you like my card,please feel free to drop in a comment if you have any doubt about the supplies.


    Hope you got some inspiration:) Please do join in for the current challenge-Make a set.You can win a beautiful 12 x 12 Fiskars stamp set and Crafter Corner Gift Voucher worth Rs 500/- !!!!

    Happy crafting,
    kavi
     http://www.crafterscorner.in (All craft supplies under one roof)
    For any further information regarding any of the products please contact :- info@crafterscorner.in