Followers

Showing posts with label Collage Clay. Show all posts

Saturday, 23 April 2016

MOD PODGE CRACKLE MEDIUM

Good Morning Friends 

This is Isha here today!! Hope you all doing good :)
Today I am here to do a quick product review on MOD PODGE CRACKLE MEDIUM 

Mod podge crackle medium :Add a crackled coat to the Mod Podge on the top of your project. You’ll need to add a contrasting paint color over the top to make it show up – but you’ll like the finished look.
Result: Ultra fine, eggshell crackle.
I hope you all have an idea now what this product is all about. I have quick and easy pictorial for you all, Lets get started : 

 
I have taken Mod Podge Crackle medium and some Folk art acrylics colors 


And you can never get enough of COLLAGE CLAY goodness, I have used mine strawberry collage clay with folk art Magenta color and Chevron stencil to make some fun background,
I have taken some clay on craftsheet and added few drops of acrylic color


                                    Here is some textured goodness with collage clay


 Now lastly I have applied generous amount of Mod Podge Crackle medium. You got to be cautious while applying crackle medium, make sure you move your foam brush in one single direction.


Voila!!
Can you see the eggshell cracks.. 
I have allowed it to dry for more then 24 hours.
Once dried I have distressed the surface with  spun sugar distress inks and wiped the excess ink with the help of an tissue.

With Mod Podge crackle medium you can apply to any surface and get this cool aged crackle effect. 
Have made this card using the crackle medium 


                                                                        Close-up 


 I hope you have liked this product 
Don't forget to leave some love
XOXO
have a nice day 
Products Used: 
-Collage clay strawberry)
-Hero arts chevron stencil 
- Distress ink - spun sugar, peeled paint
- Stamp clearly besotted & quotes from dylusion stamp set
-

Friday, 2 October 2015

Wonders with- ULTIMATE BACK SUPPORT!

Hello everyone! 
Well Today I'm here with an AWESOMEEE product! 
Let me give you few hints? 
Its a perfect product to turn cabochons into charms and the possibilities with these charms are endless! Let me just show you all what I am talking about .. :D
TADAAA! 
Confused? Dont know what this is? Well these are called ULTIMATE BACK SUPPORTS 
What do they do? Why do I need them? How do I use them? 
Well I'm here to answer all your questions! :) So lets get started! 

Well I hope you all know by now How crazyy I am about embellishments/ charms/ resins/ cabochons and anything and everything thats cute and can jazz up pretty projects! 
So I picked up these embellishments for today's tutorial I have tried to link up all the products but incase you like any specific one from the picture n cant find it do ask as a lot of cute cabochons come in the mix pack n since I am a person who loves them I usually but the mix packs! Our store has a variety of them- 25pcs, 100pcs, 400pcs etc. 
Enough of talking lets get started! 


Well all you need to do is flip the embellishment add a tiny drop of Glossy Accents and stick the ultimate back support on it. Let it dry for few mins and thereeee you gooo! A pendant/ Charm is ready! 


Wasn't that Quick and Super Easy?  Inspiration coming up down below! The possibilities are  ENDLESS! From Pendants, earrings, bracelets, Danglers for your albums, baby books, planners and what not! 

Now Let me share a short tute on some super cute pendants I made using Collage clay and these Adorable Polka dot bottle caps- one of the new releases! 


Add back support to the pc and pipe your fav design with the clay and decorate it! 
Super cute pendants are ready! 


Next I made a keychain! Isn't it cute? I love the bright pink bow! 


So easy to add resin flowers to metal charm bracelets now! And do you see those pearls? They are available in the store now and they come with the hooks making jewellery is so easy now :D

Here's a chocolate bracelet! And do you see the chocolate sauce on the ice cream? It looks yumm right? Its Drizzle paint by plaid! 


Here's a super cute pendant I made for my niece she just loved it! Ultimate back support is such an awesome product! 

Lastly one more keychain! 

Hope you all liked my post! 
Dont forget to leave some love!

Hugs! 
Anchal Sapra 


PRODUCTS USED
21 Chain


Monday, 21 September 2015

Collage clay cake boxes!

Hello everyone! How are you all doing? Hope you all are enjoying the fab posts my fellow Team mates are posting :)
Well today I'm back with a new post on Collage clay!
This post was originally a video tutorial but sadly I haven't been able to upload the video due to some technical glitch soo I decided to turn it into a pictorial please ignore the not soo high picture quality and bear with me :*

This is the box we will be making and here's another version of it in a small size! ISn't it cute? And looks so edible? My nephews wanted to eat it haha :p

So lets get started!
Lets see if anyone can guess how did I create the texture of the cake? Any ideas?
Welll I used sand :p You require few basic supplies for this project I've linked them all for you :)


Lets get started!

I started with a plain wooden box removing the locks so that I have a smooth surface.

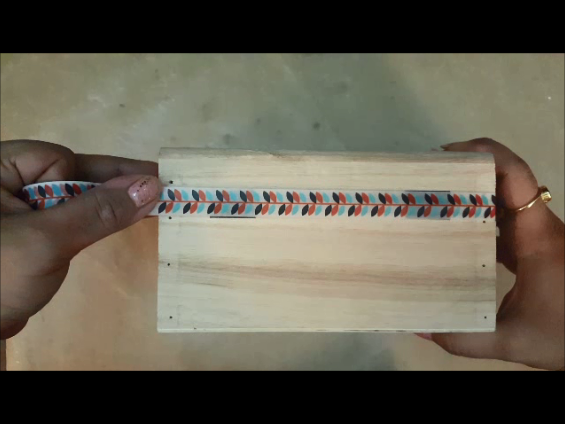
I added washi tape to it so that it stays close as I work on it  and it makes a nice border for me.

I am using the 3d matte gel by Prima for this you can also use mod podge, decoupage glue for the same 

Start by adding an even layer of the matte gel all over the box n sprinkling sand over it. Tap off the extra

The more grainy the sand the better would be the texture

Next coat it again with the matte gel sealing all the sand together n let it dry.


Remove the tape once its dry n begin painting

Im using a chocolate coloured acrylic paint for the box.

Next comes in the fun technique of making coloured clay Just pour some clay in a bowl add your fav colour of acrylic paint n mix well.


Next take a piping bag and add the clay to it. You can use any nozzle with it n then just begin piping :)


I've used 3 colours of clay for this box you can decorate it however you wish! Hope you all enjoyed the tutorial!
Have a great day
Hugs
Anchal Sapra

PRODUCTS USED


Sunday, 13 September 2015

Waffle Flower Stamps

Hello Crafty Friends,

How have you been? It's been a while since i tried my hands on any new brand of stamps. 

Today, I am sharing few cards with Waffle Flower stamp set - Riverside. The quality of the stamps is really good and they take  inks very well. Plus the set has many small images which helps in creating a scene.
 Most of them are outline stamps so stamping with waterproof ink and colouring with water colours was an obvious choice. But I went a little off and stamped them on pattern paper, fussy cut all and assembled them on a water coloured background. 


I stamped some trees and fussy cut few to give variation. Sentiment is by MamaElephant.


For the next card I used that little bunny. It is looking at the sky...kinda sad and lost ! Set has sentiment too which says " wish you were here" .


So I  decided to paint the night sky with various distress inks  and stamped few stars & added splatter with Perfect Pearl. I painted the hill, stamped bunny and coloured it with copic. I used cloud stamp as thought bubble to frame my sentiment and hand drew those tiny dots. 


Those pine trees were calling for a Christmas card. So for next one, I stamped two trees with Altenew inks, hand drew lights. I used embossing pen (RANGER-Perfect Pen) on bulbs and clear embossed them.


I used SSS stencil and Mod Podge Clay to mimic snow in the background. Sentiment is from my stash. 


For the next card


I used river stamp (solid image) for building my back ground. I stamped it multiple times with very light inks. Sentiment is a wood veneer by Studio Calico. Simple right?

For next one, I decided to use that tiny jar and fire flies. It is really tiny so I stamped multiple of then in a line, added a strip of gold CS as a shelf & coloured inside of jar with yellow distress ink.


The sentiment ( by reverse confetti) ties the whole card together. 


Lastly, 2 tiny fish, 3 little hearts and a simple sentiment...


...makes this adorable tag.

I have tried to use all those tiny stamps and make distinctively different cards. Hope you will enjoy them. That is all for today...keep crafting!

Supply :