Hi friends Dr Sonia here, posting at Crafters Corner after quite an interval! My personal blog has been very active this month with the numerous Teachers Day Gifts my
kiddo and I made but they were all very simple projects and it honestly feels
good to be writing an in depth challenging post!
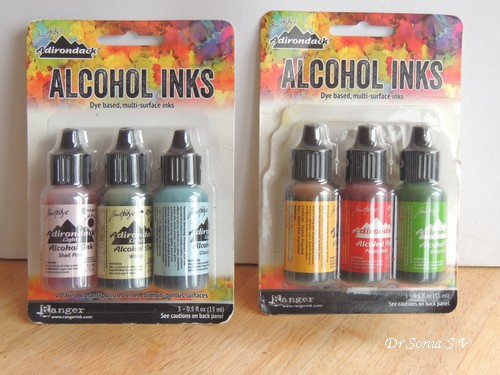
This post is an in depth introduction to the fascinating world of crafting with alcohol inks. One of the beauties of alcohol inks is their use not just on paper but on myriad surfaces and hence their appeal to different types of crafters such as the polymer clay artist, jewelry maker, recycling crafter and even the professional artist!
I will discuss the different techniques using alcohol in another post.
What are alcohol Inks?
Some properties of Alcohol inks
- Translucent
- Fast drying
- Permanent
- Concentrated – hence the use of felt and alcohol inks to maximize their potential
- Ideal for use on nonporous surfaces
The most popular alcohol inks are the ones popularized by Tim Holtz and marketed by Ranger
What to consider buying to play with alcohol Inks
Inks
· Packs of 3 – for crafters starting with alcohol inks it makes sense to buy the packs which contain 3 color combinations. They are more economic and there are several color combinations you can choose
· Individual Bottle Packs – once you get the hang of using alcohol inks you may want to play with more colors and Ranger has a huge variety of colors in individual bottle packs
· Metal fixatives – these come in gold and silver metallic colors and are opaque unlike the proper alcohol inks. Adding them to your alcohol ink projects gives a beautiful grandeur to your projects
Felt
You can actually apply alcohol inks directly to a surface but these are very concentrated inks and using a piece of felt to apply these fast drying inks will help you get the maximum use from these inks
Also many fun techniques require alcohol inks + blending solution to be applied to the piece of felt before applying to a surface
You can buy Ranger’s Felt refill packs [the size of these felt pieces fits perfectly to the applicator tool] or cut up your own felt pieces from a felt roll you may be having. The quality of felt you use is important as if it frays a lot you will be left with lots of fibers on your project!
NOTE: felt is not the same as foam. Foam cannot be used to apply or blend alcohol inks
Applicator
An Applicator is a wooden block with a Velcro to which you can fasten pieces of felt
It’s similar to the Distress ink blending applicator you may already be having. The only difference is that instead of sponge/foam you need to attack a piece of felt for alcohol ink crafts
Why do you need an applicator?
An applicator is not absolutely essential for alcohol ink crafts! Like many crafty tools it just makes your crafting easier and more fun! Since alcohol inks stain, it’s neater and easier to use your felt pieces mounted on the applicator rather than using felt with your hands directly!
Alcohol blending solution
Alcohol inks are extremely concentrated inks and they are also super fast drying. Because of both these properties using a blending solution can help you to explore the full potential of these beautiful inks.
Alcohol blending solution can achieve 3 effects
· Lighten Colors – if you like subtle colors adding more blending solution will help get the perfect color tone you desire
· Blend Colors-because alcohol inks are fast drying it’s difficult to mix colors. Adding a drop or 2 of the blending solution can help achieve a beautiful blending of the colors! Will demonstrate the various fun techniques in a detailed post later.
· Clear Colors from an area – suppose you want to remove inks completely or partially from an area a swipe with alcohol blending solution will achieve it.
Other Uses of the Blending Solution
Tim Holtz the creator of these products also says the blending solution is great to
· Remove glue residue from scissors etc
· Remove ink stains
· Use as a general clean up solution
Can you use normal alcohol instead of alcohol blending solution?
Yes you can but you need not get the perfect results you do with the Ranger’s alcohol blending solution created especially for crafting. Maybe use regular alcohol / spirit for cleaning purposes.
Working surface
Since alcohol inks are permanent inks and fast drying you need to protect your working surface from being stained with inks.
You can either use a craft mat like the popular Ranger’s Craft sheet [ any ink stains can be cleaned with alcohol spirit swabs/ spirit or alcohol blending solution] or just cover your working area with thick plastic sheets [ which are bound to get stained]
Hand Protection
While working with alcohol inks if you use an applicator your hand staining is bound to be significantly less but still if you want to avoid ink smudges altogether ,use a pair of gloves.
What surface can you use Alcohol Inks on?
Alcohol inks need to be applied to a nonporous surface
You won’t get the beautiful effects of alcohol inks on normal paper or cloth as they would just soak through!
Popular Surfaces for crafting with Alcohol Inks:
- Metal
- Aluminum foil sheets
- Ceramic tiles
- Glass
- Shrink Plastic
- Beads, pearls, rhinestones, crystals
- Plastic
- Acetate / transparency sheets
- Glossy Cardstock
- Polymer Clay
- Some Stones
- Resin - here are some of things I made at home with resin and alcohol Inks
 |
| Alcohol Ink + Resin |
Will be back with a detailed post on Alcohol Ink techniques